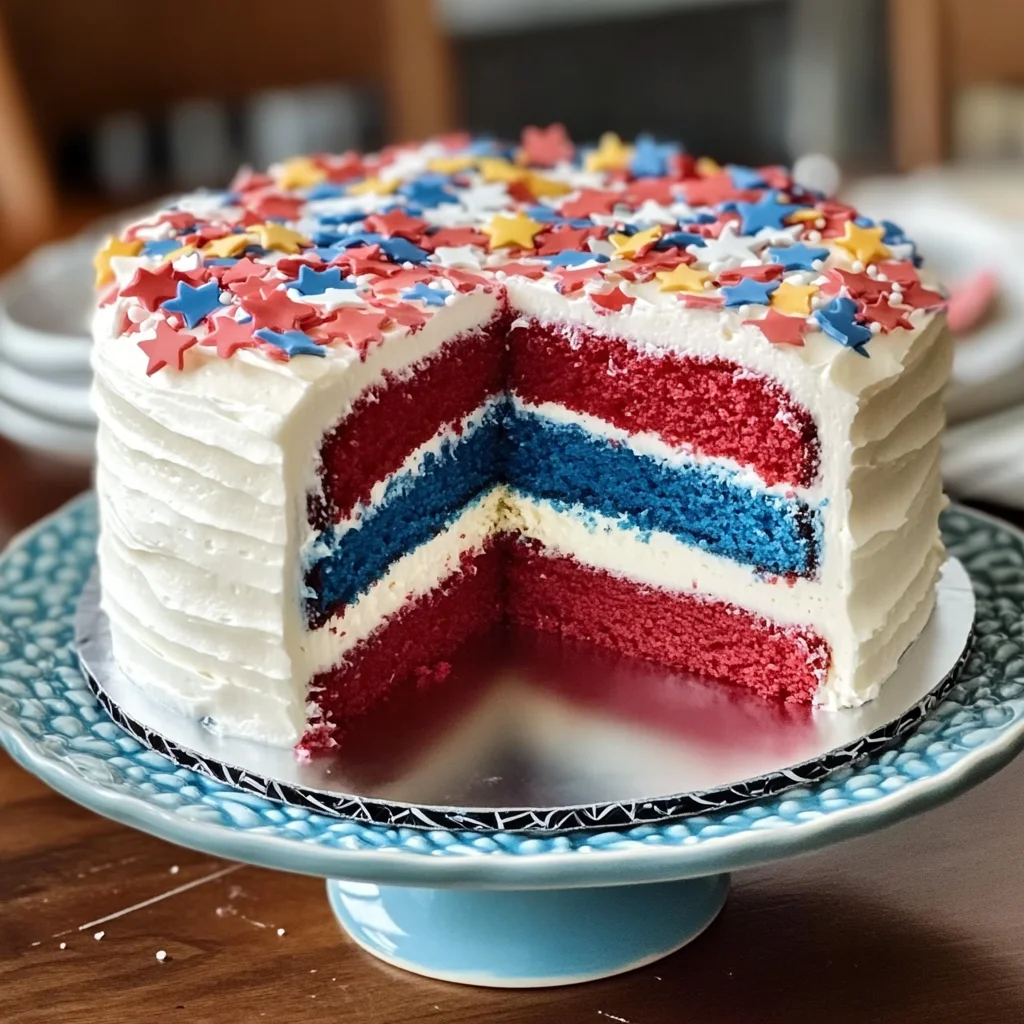
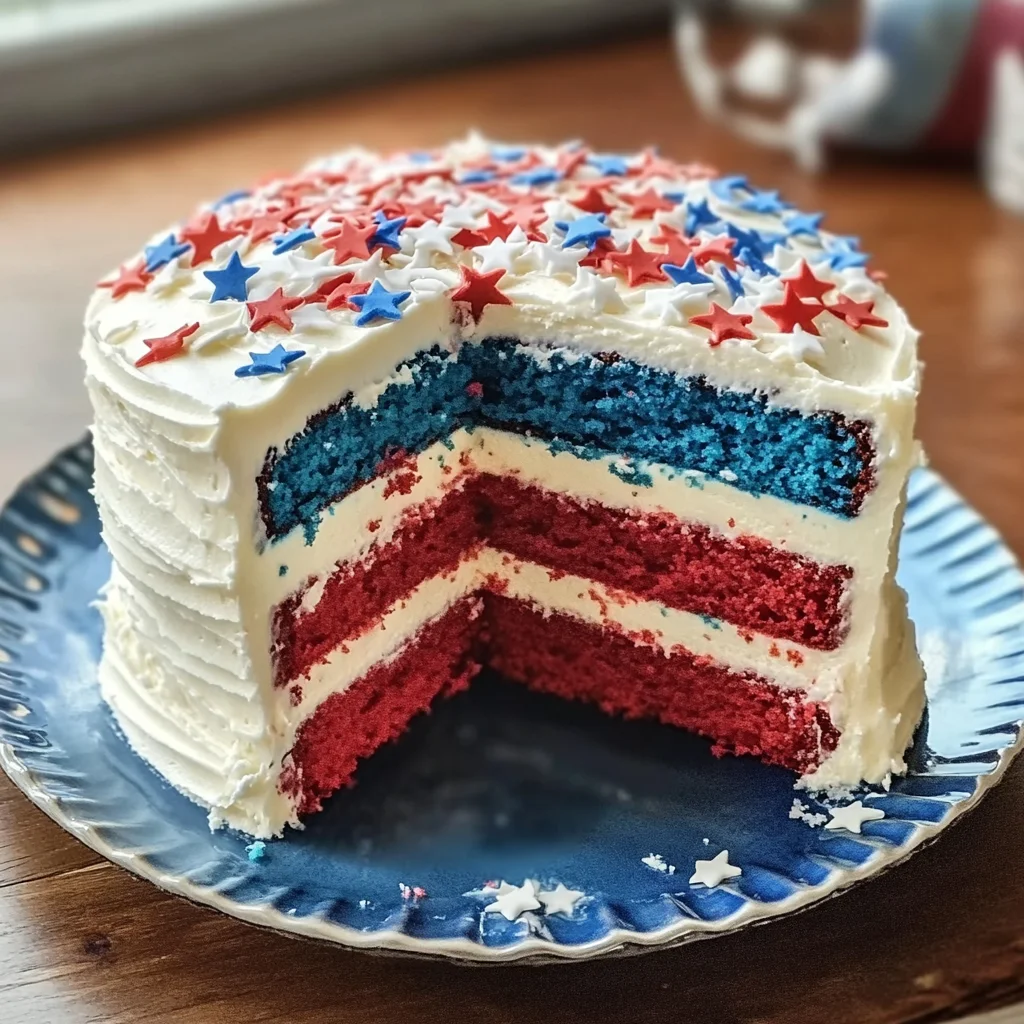
This Fourth of July, as the sun sets and the sky erupts into a dazzling display of color, let your table be graced by something truly special: the Red, White and Blue Layered Flag Cake. This cake is more than just a dessert; it is a celebration of the spirit of togetherness, joy, and everything that makes America beautiful. Imagine cutting through layers of vibrant red and white cake, revealing a striking blue center topped with fluffy frosting and twinkling sprinkles—a feast for both the eyes and the palate! Each bite brings a symphony of sweetness that captures the essence of summer festivities. I promise you, this cake will not only satisfy your sweet tooth but will also steal hearts and ignite conversations at your gathering.
I’ve always been captivated by how food has the power to bring people together—there’s something magical about sharing a slice of cake with friends under a starlit sky. The Red, White and Blue Layered Flag Cake is an embodiment of that magic. It’s perfect for summer barbecues, picnics in the park, or any festive occasion where laughter fills the air. This recipe is straightforward yet impressive enough to be your signature dessert year after year. You’ll find that every layer tells its own story, each one contributing to a delightful experience that celebrates freedom and unity.
Ingredients:
Let’s embark on this culinary journey together! Gather these ingredients with love and care—each one plays an essential role in creating our stunning flag cake that everyone will rave about.
- 1 box Betty Crocker™ Super Moist™ White Cake Mix. This cake mix is a fantastic starting point for our layered masterpiece because it provides a wonderfully moist texture that’s simply irresistible. It’s incredibly forgiving for novice bakers, ensuring consistency in flavor and rise. What I love is that it saves time without compromising taste—perfect for busy days when you still want to impress!
- Water, vegetable oil, and whole eggs called for on the cake mix box. These are fundamental components that bring life to our cake mix! The water hydrates the dry ingredients while the vegetable oil keeps our cake moist—trust me on this step; no one likes a dry cake! Using whole eggs enhances richness and structure; they help bind everything together beautifully.
- 2 teaspoons red paste food color. This vibrant hue isn’t just for aesthetics—it evokes passion and celebration! Paste food coloring is preferred here because it delivers bold color without adding too much liquid to our batter. When you see that rich crimson swirl through your mixing bowl, you’ll feel the excitement building!
- 1 box Betty Crocker™ Super Moist™ White Cake Mix (again). Yes, we’re using two boxes to create layers! This ensures we have enough batter to construct our impressive multi-layered cake without cutting corners on flavor or height.
- Water, vegetable oil, and egg whites called for on the second box mix. We use egg whites here to achieve a lighter texture in our white layers—this helps balance out the denser red layers and adds visual contrast when sliced.
- 1/2 teaspoon blue paste food color. Just like our red counterpart, this blue food color brings depth to our creation! The bright blue will stand out against the fluffy white frosting and create that iconic flag look we’re aiming for.
- 3 tablespoons red, white and blue star-shaped candy sprinkles. These delightful sprinkles are what dreams are made of—they add whimsy and fun to our cake! Plus, who can resist those little pops of color? They evoke childhood memories of celebrations past.
- 3 tubs (12 oz) Betty Crocker™ Whipped Fluffy White Frosting. This frosting is creamy perfection—it spreads like liquid gold across our layered creation! Its lightness complements rather than overwhelms our cake flavors while providing that necessary sweetness we all crave. Feel free to use any brand you love if you’re going homemade; just ensure it’s fluffy!
- Betty Crocker™ Red, White & Blue Sprinkles, as desired. To finish off your patriotic dessert with style! A sprinkle here or there echoes joy; it gives your cake a festive flair that beckons everyone to dive in.
Equipment You’ll Need:
Having the right tools can make all the difference between chaos and smooth sailing in your kitchen adventure! I always say that good equipment is like having reliable partners in this delicious dance we call baking.
- 2 (8-inch) round cake pans – These pans are essential for crafting each layer of your stunning flag cake. The 8-inch size allows for an ideal baking height; they ensure even cooking while providing ample space for those gorgeous layers we’ll build later on!
- Cooking spray – A must-have to prevent any sticking mishaps! Coating your pans ensures effortless release when it comes time to flip them out—no one wants crumbled layers ruining their beautiful design.
- Parchment paper – Lining your pans with parchment paper creates an extra barrier against sticking while also making cleanup easier afterward—trust me; you’ll thank yourself later!
- Cooling rack – Once those beautiful cakes come out of the oven, they need some room to breathe! A cooling rack allows air circulation around all sides so they cool evenly without getting soggy on the bottom.
- Biscuit cutter (4-inch) – For crafting those lovely rounds in each layer, this tool becomes invaluable as we assemble our multi-layered beauty. It creates uniform shapes every time—essential for presenting an aesthetically pleasing dessert.
With these ingredients and tools at hand, you’re well-equipped to create something truly extraordinary with your Red, White and Blue Layered Flag Cake!
Step 1: Prepping Your Oven & Pans
Before anything else begins, let’s prepare ourselves mentally by preheating our oven to 350°F (325°F if you’re using dark or nonstick pans)—this step might seem minor but trust me when I say it’s absolutely paramount for achieving perfectly baked layers! While that’s heating up like a warm hug from summer sunshine, prepare two 8-inch round pans by spraying their bottoms and sides generously with cooking spray before lining them with parchment paper; this ensures easy removal once baked without losing precious bits of our creation!
Step 2: Crafting Our Red Layers
Now onto creating those eye-catching red layers! Begin by following instructions on one box of Betty Crocker™ Super Moist™ White Cake Mix as directed specifically for 8-inch round pans using water, oil (your hero!), and whole eggs—that perfect blend creates magic within those golden-brown edges we’re after. Once combined smoothly into batter blissfulness (don’t rush this step!), add in those vibrant 2 teaspoons of red paste food coloring—you’ll be amazed at how rich it looks swirling into life before baking! Divide evenly between both prepared pans before placing them into your preheated oven where they’ll bake away deliciously for approximately 28–33 minutes or until golden brown with toothpick tests confirming their doneness—a crucial moment where patience pays off immensely!
Step 3: Baking Our Blue & White Layers
While those crimson beauties cool down lovingly after their oven adventure (10 minutes tops!), we turn attention towards preparing another batch: one more box mix set aside awaits transformation into both blue hues plus fluffy white goodness! Spray another pair of clean pans as before then follow directions again using water & oil along with egg whites instead—the lighter texture achieved through this process brings balance among flavors as mentioned earlier when layering takes place later on too… Pour half into one pan while stirring remaining batter along with vibrant blue food coloring plus some star-shaped sprinkles until everything harmonizes beautifully before pouring carefully into second pan too—such delightfully festive treats await us ahead!
Step 4: Cooling Down & Trimming
After each layer bakes nice ‘n’ snugly around similar time frames like before (28–33 minutes), allow them relaxation moments outside hot ovens where ten minutes pass quickly once lifted gracefully off into cooling racks below their fragrant presence… Don’t forget parchment paper removal afterward—the goal here is fully cooled cakes readying themselves majestically soon enough so don’t rush this vital cooling phase either—that hour spent waiting only solidifies success ahead when trimming rounded tops off later transforms every piece into flat perfection readying us next steps…
Stay tuned as we continue assembling this stunning Red, White and Blue Layered Flag Cake—it’s going to be unforgettable!
Step 5: The Art of Layering Colors
Now that your cake layers are baked to perfection, it’s time to add some artistry to our Red, White and Blue Layered Flag Cake! Begin by preparing the blue and white cake layers. First, take those two fresh, fluffy white layers that you’ve just baked, and again, spray the bottoms and sides of your 8-inch round cake pans with cooking spray before lining them with parchment paper—this ensures a flawless release from the pans later on. Follow the instructions on the box to prepare the second cake mix, but remember this time we’ll be using egg whites instead of whole eggs. This substitution is crucial because it helps maintain that beautiful light texture we’re after in our white cake layers. After mixing up your batter, pour half into one pan.
In the remaining batter, you’ll want to fold in that vibrant blue food color along with a sprinkle of star-shaped candy sprinkles. This is where the magic happens! The blue flourishes will not only give us that striking color we desire but also provide an extra hint of sweetness that will dance on your palate. Pour this delightful mixture into the other pan, ensuring both batters are evenly distributed. Place them in the preheated oven for 28 to 33 minutes, or until a toothpick inserted in the center comes out clean—this is your golden ticket to knowing they’re done! The aroma wafting through your kitchen as these cakes bake is simply intoxicating; trust me—it’s worth every minute of waiting! Once out of the oven, allow them to cool in their pans for about 10 minutes before transferring them to a cooling rack. Removing the parchment paper at this stage is paramount; it allows air to circulate around those warm cakes and prevents sogginess.
Step 6: Precision Trimming for Beautiful Layers
After cooling completely—this can take about an hour—let’s move on to trimming those cakes for perfect layering. Using a serrated knife, carefully slice off any rounded tops from your cake layers so they lay flat when stacked. This step might seem small but it’s absolutely non-negotiable! A flat surface ensures stability as you build your towering masterpiece; no one wants a lopsided flag cake wobbling away at their Fourth of July gathering! Now we’ll turn our attention specifically to the red cake layers. Each layer gets cut in half horizontally—this will give us four thin red layers instead of just two thick ones.
But wait—we’re not done yet! From each red layer, you’ll need to cut a small round center using a 4-inch biscuit cutter. This little detail is essential as it creates an opening for our next layer, which adds whimsy and an unexpected surprise when you slice into the cake later on. Wrap those cut-out circles and one thin layer in plastic wrap and pop them into the freezer; they’re destined for another delicious adventure down the road! Repeat this cutting technique for both your blue and white layers too. It may feel tedious now, but I promise you—it’s going to pay off big time when you unveil this stunning dessert!
Step 7: Assembling Your Flag Masterpiece
The fun part is here—assembly time! Start with one of your red layers placed beautifully on a serving platter (or cake stand if you’re feeling fancy). The platter should be sturdy enough to hold this tall creation because it’s about to become something truly extraordinary! Spread about 1/3 cup of frosting over the top of this layer; make sure it’s an even coating that reaches all edges—this will help keep everything together like glue once we stack more layers atop it. Next up is one of our delicate white layers; place it gently over that frosted red base and spread another generous layer of frosting on top.
Repeat this process with another red layer followed by frosting before placing your final blue layer on top. Ahh, just take a moment and admire those beautiful colors standing tall together! Now here’s where we get creative again: carefully spread a thin layer of frosting inside the cut edge of that blue layer. This acts as adhesive magic when you insert one of our frozen white rounds into that empty space; it will create a beautiful surprise when served! Then follow up with another dollop of frosting atop your new white circle before gently pressing down with the other frozen red circle—you want everything snug but not squished!
At this point, it’s crucial we apply what’s known as a crumb coat—a thin layer of frosting over the entire outside surface of your cake. This serves two main purposes: it locks in any crumbs while giving us a smooth base for our final coat of frosting. Use an offset spatula or butter knife for spreading; don’t rush this step because taking time here leads to an elegant finish later on! Once you’ve covered every inch with crumb coat goodness, refrigerate your masterpiece for about 30 minutes so it can firm up nicely.
Step 8: The Final Frosting Flourish
Alright friends, we’re nearly there—the finish line is within sight! After chilling our crumb-coated creation, it’s time for its crowning glory: that final coat of fluffy whipped frosting! Retrieve your glorious layered flag cake from its cool resting spot and take a moment to admire how beautifully it has come together; I assure you it’s going to be worth every ounce of effort you’ve put forth thus far. Grab your tub(s) of Betty Crocker™ Whipped Fluffy White Frosting and generously spread another layer over the sides and top—think luscious clouds enveloping your creation.
As you frost, don’t forget those tiny nooks and crannies where frosting loves to hide; smooth out any uneven spots as best as possible because presentation is key here! Once you’re satisfied with how stunningly pristine it looks (and I know you will be), go ahead and shower it with sprinkles—the iconic touch that takes this dessert from delightful to dazzling! Those vibrant red, white & blue sprinkles will add texture while enhancing its festive appeal.
Now comes perhaps my favorite part: let this beauty chill once more in the refrigerator for at least another 30 minutes before slicing into it. This chilling phase allows flavors to meld beautifully while giving our frosting time to set firmly—it truly transforms our simple ingredients into something profoundly satisfying!
Conclusion:
As we wrap up our delightful journey through creating this extraordinary Red, White and Blue Layered Flag Cake, I can’t help but feel a rush of excitement thinking about all the memories waiting to be made around this centerpiece at your celebrations. The way the rich red berry notes dance harmoniously with the light sweetness of the fluffy white layers creates a truly extraordinary experience that goes far beyond mere dessert. Not only does this cake look enchanting with its patriotic colors, but each bite is a symphony of flavors that sings summer nostalgia—making it perfect for barbecues or festive gatherings alike.
This recipe is undoubtedly a must-try—not just for its taste but also for the sheer joy of making it. From whisking together soft batter to watching those vibrant layers rise in the oven—it’s an engaging process that invites everyone into your kitchen to share in moments of laughter and love. Whether it’s Fourth of July celebrations or birthday parties filled with laughter among friends and family, this cake shines through as a universal symbol of togetherness and joy on any occasion worth celebrating.
Imagine savoring one slice alongside a perfectly brewed cup of coffee during an afternoon get-together with friends or serving it during after-dinner festivities while fireworks illuminate the night sky—it’s pure magic! For those especially decadent moments when you crave something sweet yet refreshing on warm days, pairing this layered beauty with some homemade whipped coconut cream elevates indulgence to new heights. And let’s not forget about pairing it with fruity sorbets—each contrasting flavor accentuates what makes this cake so irresistible!
Feeling adventurous? This recipe is wonderfully adaptable—think about swapping out traditional food colorings for natural alternatives like beet juice or spirulina powder if you’re looking for healthier options without sacrificing vibrancy! You can even experiment by incorporating different flavors into the frosting—perhaps zesting lemon into your whipped frosting for zesty brightness or folding in crushed berries for added texture throughout. The possibilities are endless! So gather your ingredients, invite loved ones over (or enjoy some solitary baking therapy), and dive into creating something beautiful today! Don’t forget: share your experience with me; I can’t wait to hear how your own journey unfolds!
Red, White and Blue Layered Flag Cake
- Total Time: 1 hour 30 minutes
- Yield: Serves approximately 12 slices 1x
Description
Celebrate summer with this stunning Red, White and Blue Layered Flag Cake that’s sure to impress! Try it today for unforgettable flavor!
Ingredients
- 2 boxes Betty Crocker Super Moist White Cake Mix
- Water
- Vegetable oil
- Whole eggs (for red layers)
- Egg whites (for white layers)
- 2 teaspoons red paste food color
- 1/2 teaspoon blue paste food color
- 3 tubs Betty Crocker Whipped Fluffy White Frosting
- 3 tablespoons red, white and blue star-shaped candy sprinkles
Instructions
- Preheat the oven to 350°F (or 325°F if using dark pans). Grease two 8-inch round cake pans with cooking spray and line them with parchment paper.
- Prepare one box of cake mix according to the package instructions using water, vegetable oil, and whole eggs. Stir in red food coloring until well combined. Divide the batter evenly between the prepared pans and bake for 28-33 minutes until golden brown.
- While cooling, prepare the second box mix using water, vegetable oil, and egg whites. Fold in blue food coloring into half of the batter while leaving the other half plain for white layers. Bake as directed.
- Allow all layers to cool completely before trimming rounded tops for even stacking.
- Assemble by layering red, white, red again, then adding the blue layer on top. Frost between each layer with whipped frosting.
- Finish with a crumb coat of frosting over the entire cake. Chill for 30 minutes before applying a final layer of frosting and decorate with sprinkles.
- Prep Time: 30 minutes
- Cook Time: 60 minutes
- Category: Dessert
- Method: Baking
- Cuisine: American
Nutrition
- Serving Size: 1 slice (95g)
- Calories: 350
- Sugar: 29g
- Sodium: 220mg
- Fat: 14g
- Saturated Fat: 2g
- Unsaturated Fat: 10g
- Trans Fat: 0g
- Carbohydrates: 52g
- Fiber: 0g
- Protein: 3g
- Cholesterol: 30mg
Leave a Comment