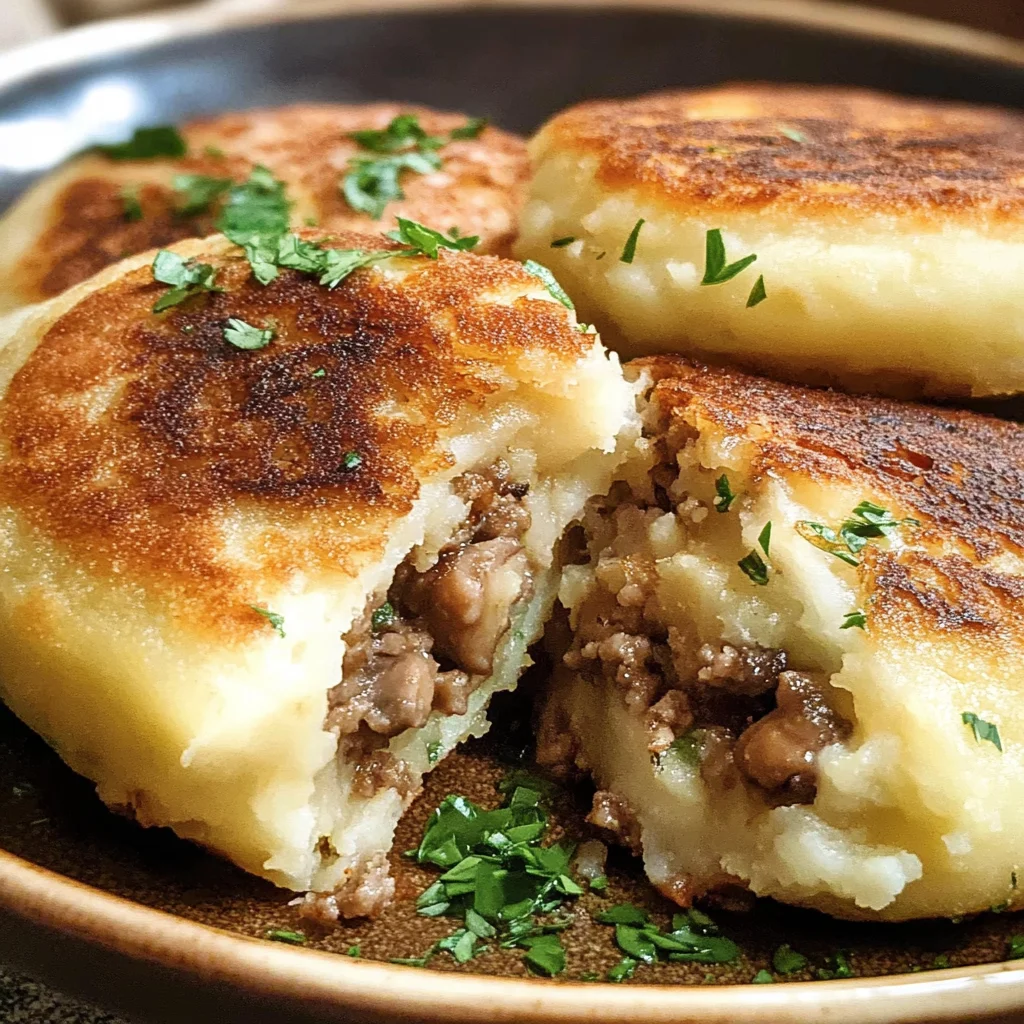
There’s something truly magical about food that brings us together, isn’t there? It’s not just a matter of sustenance; it’s a tapestry woven with memories, love, and shared experiences. Every bite carries the essence of tradition while whispering tales of innovation. Today, I’m thrilled to share one of those cherished recipes that has graced my family table for generations: Stuffed Potato Cakes with Meat and Mushrooms. From the moment you take your first bite, you’ll find yourself enveloped in the comforting embrace of savory meat paired with earthy mushrooms, all wrapped in a warm potato cocoon. This dish is more than just a meal; it’s an invitation to gather round and savor the moments that matter.
As we embark on this culinary journey together, let’s delve into what makes these stuffed potato cakes so special. These delightful treats are not only easy to make but also incredibly versatile; you can adapt them according to your taste and preferences. Imagine hosting a cozy dinner party or preparing a family meal after a long day—these cakes will fit perfectly into any occasion, bringing warmth and joy to your table. Trust me when I say that once you master this recipe, it will become a beloved staple in your kitchen repertoire!
Stuffed Potato Cakes (Meat, Mushrooms): A Comforting Delight
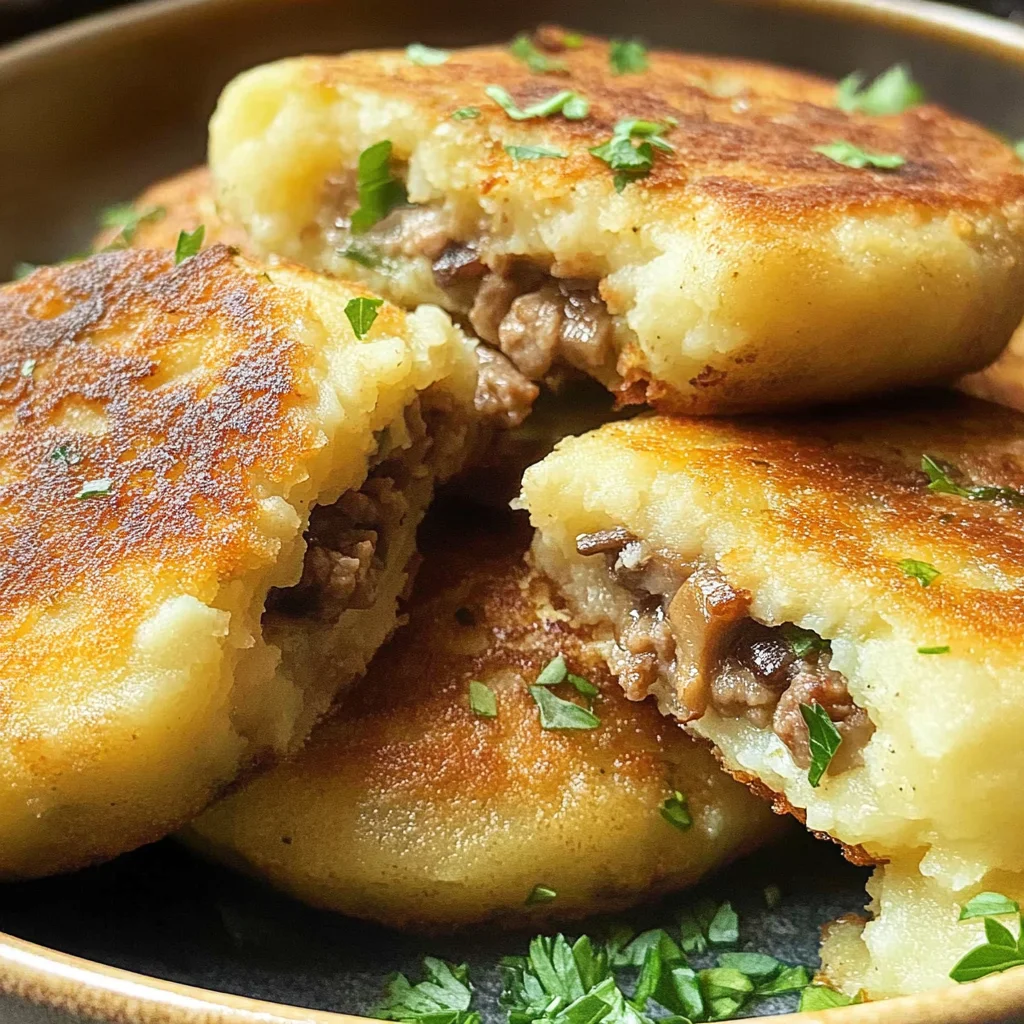
Welcome to the heart of comfort food! These Stuffed Potato Cakes are like little pillows of happiness that hold within them a rich filling of ground meat and mushrooms. The soft, creamy potato exterior contrasts beautifully with the hearty interior, creating a balance that is both satisfying and utterly delightful. You’ll find yourself making these again and again—whether for a quiet weeknight dinner or as a show-stopping dish at gatherings.
Ingredients:
Before we dive into the cooking process, let’s gather our ingredients and set ourselves up for success. Each component plays an essential role in crafting these delicious potato cakes.
- 2 pounds potatoes. Potatoes are the star players in this dish, providing the base for our soft dough. When selecting potatoes, opt for starchy varieties like Russets or Yukon Golds; they yield a creamy texture that is simply irresistible once mashed. The key here is to ensure they’re fresh—look for firm ones without any blemishes or green spots. Properly cooked potatoes will absorb flavors beautifully from the filling while maintaining their structure.
- 1 cup all-purpose/plain flour (plus more for dusting). Flour acts as our binding agent, helping to bring the mashed potatoes together into a cohesive dough. It adds just the right amount of structure without making it heavy. When measuring flour, be sure to spoon it into your measuring cup rather than scooping directly from the bag; this prevents packing and ensures accuracy! If you need gluten-free options, feel free to substitute with rice flour or a gluten-free blend.
- 1 large egg. The egg serves as an emulsifier in our dough, adding richness while helping everything stick together beautifully. It also gives our potato cakes that lovely golden hue when pan-fried! Make sure your egg is at room temperature for optimal mixing—this makes it easier to incorporate evenly throughout the dough.
- ⅔ teaspoon fine sea salt. Salt is crucial here—not only does it enhance flavor but it also strengthens the protein structure of our dough, giving it better texture. Always remember: good seasoning is key to elevating any dish from ordinary to extraordinary!
- 11.64 ounces ground turkey or beef (7-10% fat). The choice between turkey or beef depends on your personal preference; both are fantastic options! Ground meat adds substantial flavor and protein to our filling while keeping everything moist as it cooks. Aim for meat with some fat content (7-10%) for juiciness without being overly greasy—this balance leads to an irresistibly satisfying bite.
- 5.29 ounces mushrooms (wiped, finely chopped). Mushrooms bring depth and umami richness to our filling! When choosing mushrooms, go for fresh varieties like cremini or button mushrooms—they should feel firm and have no slimy patches. Don’t forget to wipe them clean instead of rinsing under water; moisture can change their texture during cooking!
- 1 medium onion (finely chopped). Onions add sweetness and aroma that elevate our filling’s complexity! Finely chopping ensures they cook down nicely without leaving large chunks behind—a smooth bite is what we’re aiming for here.
- 2 teaspoons all-purpose/plain flour. This small amount of flour helps bind our meat mixture together while absorbing excess moisture from cooking—the last thing we want is soggy filling! Just like before, measure accurately by spooning flour gently into your cup.
- ½ teaspoon paprika and dried mixed herbs (each). Paprika introduces warmth and color while dried herbs offer aromatic notes that complement our earthy flavors beautifully! Feel free to experiment with different herbs based on what you have on hand; thyme or oregano would work wonderfully too!
- ½ teaspoon fine sea salt (and pepper to taste). Seasoning our filling well is non-negotiable! This layer of flavor enhances every bite—don’t shy away from tasting as you go along!
- 1 tablespoon tomato paste. Tomato paste contributes acidity which balances out richness from meat and adds another layer of flavor complexity! Opt for high-quality brands if possible; they tend to be richer in taste.
- 3 tablespoons olive/vegetable oil. Used for sautéing vegetables and frying our cakes later on, oil plays an important role in achieving those beautiful golden-brown crusts we crave! Extra virgin olive oil offers robust flavor but feel free to use vegetable oil if preferred—it works just as well!
Equipment You’ll Need:
Before we get started on making these delightful stuffed potato cakes, let’s gather some essential tools that will make your cooking experience smoother and more enjoyable! While they may not be ingredients per se, having the right equipment is crucial in ensuring everything comes together seamlessly.
- Large pot – A sturdy pot is essential for boiling potatoes until they’re tender enough to mash smoothly without any lumps left behind—this step sets the foundation for your dough’s texture!
- Non-stick frying pan – This kind of cookware prevents sticking during frying time while allowing us those lovely golden-brown edges we desire on each cake! If you don’t have one available yet—cast iron pans work wonders too if prepped correctly!
- Potato masher or ricer – For achieving perfectly smooth mashed potatoes free from lumps—both tools excel at doing just that! A ricer pushes potatoes through small holes creating an airy texture which makes dough lighter overall.
- Mixing bowl – You’ll need two bowls: one large enough for combining all ingredients comfortably plus another smaller one dedicated solely towards preparing fillings—that way things stay organized throughout this process!
Now that we’ve gathered everything necessary let’s dive into preparing those amazing Stuffed Potato Cakes (Meat, Mushrooms) together!
Step 1: Preparing Our Potatoes – Setting The Stage
The first step in crafting these delectable stuffed potato cakes begins with preparing our beloved spuds! Start by peeling away their skins—you want nothing but tender flesh inside these little pockets of joy! Once peeled, chop them into even chunks before placing them into a large pot filled with salted water over medium-high heat until boiling occurs—a pinch o’ salt elevates natural flavors immensely here! Boil until fork-tender—the moment when they break apart effortlessly signifies readiness—usually around 15–20 minutes depending on size variations present within chunks themselves (just keep an eye!).
Once fully cooked through but not mushy—we’re aiming for silky smoothness later on—drain thoroughly using colander then return back into hot pot briefly before mashing begins so any residual moisture evaporates completely—a perfect base awaits us here! Mash vigorously using either traditional masher tool or ricer until dreamy creaminess ensues—remember: no lumps allowed! Set aside mixture allowing coolness settle down gradually before incorporating other elements necessary ahead…
Step 2: Cooking Onion & Mushrooms – Building Flavors
With potatoes waiting patiently offstage let’s turn attention towards aromatics—we want layers upon layers developing within filling itself now! Heat up large non-stick frying pan over medium heat followed closely behind by adding generous tablespoonfuls worth olive oil once shimmering occurs—it should dance delightfully across surface area inviting aromas soon-to-follow into play as onions enter scene next… Cook finely chopped pieces gently stirring often about three minutes until translucent appearances emerge signaling softness achieved successfully while stimulating senses around fragrant allure growing stronger each passing moment…
Next up comes starring cast member: mushrooms themselves sliced thinly beforehand being added alongside onions currently simmering away happily awaiting transformation process ahead… Medium heat continues working its magic here allowing moisture escape slowly over six-seven minutes’ span till liquid evaporates entirely leading browning effects beginning unfold enhancing textures further still beyond initial stage reached previously… Stirring regularly keeps things moving along nicely ensuring none stick whilst deepening flavors developing slowly forming harmonious blend appealing throughout entire journey culminating final result achieved shortly thereafter…
Step 3: Adding Meat – Layering Richness
Once onion-mushroom duet reaches peak harmony introducing ground turkey/beef becomes next priority—it enhances overall richness drastically whilst soaking up drippings present already mingled prior perfectly suited match made heaven-wise indeed… Sprinkle paprika along dried herbs atop mixture then season generously with salt & pepper too—all create symphony orchestrating fabulous medley unfolding right before eyes transforming mundane situation into something truly extraordinary before us now unfolding gracefully moment-by-moment revealing potential lying dormant waiting activation needed…
Cook mixture approximately five minutes consistently stirring throughout ensuring no moisture remains behind whatsoever till everything melds seamlessly together creating luscious texture inviting exploration ahead upon tasting occasion presenting itself shortly thereafter… Time elapsed should indicate dryness achieved means final touch arrives swiftly where adding couple teaspoons worth flour gets thrown inside stirring actively once more before removing from heat altogether letting cool completely down afterward allowing perfect balance restoration established prior moving forward onto next stages awaiting eagerly onward journey coupled alongside anticipation rising steadily meanwhile…
Step 4: Making Dough – Crafting Bliss
Now comes my favorite part—the creation of soft tender dough which forms foundation upon which entire masterpiece stands tall proudly showcasing artistry involved therein flawlessly executed thus far enjoying success attained thus far leading us closer nearing finish line ahead… Begin integrating prepared cooled mashed potatoes into mixing bowl alongside previously beaten egg followed closely by sprinkling fine sea salt over top then generously pouring measured amounts remaining all-purpose flour expectantly watching transformation unfold as blending occurs gradually combining elements yielding smooth consistency without visible traces left behind whatsoever holding promise delights contained within patiently waiting discovery soon awaiting adventurers willing venture forth bravely onward exploring epicurean treasures hidden underneath surface level awaiting unearthing under skilled hands working deftly crafting bliss unto existence shaping future possibilities await unveiling later down road ahead marvelously set stage…
Feel free at this juncture divide incorporating mixture evenly halves rolling gentle logs formed subsequently slicing widthwise seven pieces each log resulting total fourteen patties altogether ready prepped forward next steps ahead embarking ultimate endeavor enticing adventures promised forthcoming moments await patiently longing discovery journey yet undertaken fully realized expanding horizons limitless potential boundless opportunities await shining brightly illuminating paths traversed previously reaching fulfillment knowing satisfaction attained wholly embracing joys awaiting…
Step 5: Stuffing the Potato Cakes with Love
Now comes the moment we’ve all been waiting for—stuffing those delightful potato cakes! Take each small piece of dough and flatten it gently in the palm of your hand. This is your canvas, so feel free to shape it into a circle that’s roughly 3-4 inches wide. The goal here is to create a perfect pocket for your hearty filling, which, trust me, is going to be the star of the show. Place about 1 to 1.5 tablespoons of that beautifully seasoned meat and mushroom mixture right in the center. Here’s where your patience pays off: you want to close up those edges carefully and pinch them together tightly to seal in all that incredible flavor. If you notice any cracks or gaps, just press them together; we want to keep that filling intact during cooking.
As you pat down each stuffed cake gently, think of this as giving them a little hug before they hit the skillet. You should aim for about 14 stuffed potato patties altogether from this batch—each one a little treasure filled with warm goodness. Remember, if the dough becomes too sticky while you’re working, don’t hesitate to dust your hands with a sprinkle of flour; just be cautious not to overdo it, as too much flour can alter the texture and make them less tender. The key here is to work swiftly but thoughtfully, ensuring every morsel gets its due share of love!
Step 6: Sizzling Perfection in the Pan
With your potato cakes ready to go, it’s time to bring out their golden potential! Heat about 1½ tablespoons of oil in a large non-stick pan over medium heat until it shimmers like liquid gold—this indicates it’s perfectly prepped for frying. What you’re looking for here is that delicate balance between crispy and tender; too hot and they might burn before cooking through, too cool and they’ll absorb excess oil instead of crisping up nicely. Trust me on this: patience is key!
Once your pan is sizzling, carefully place your potato cakes in it without overcrowding them; give each one space to breathe so they can achieve that gorgeous golden-brown crust. Cook them for about 2-3 minutes on each side—you’ll know they’re ready when they release easily from the pan and boast that beautiful caramelized hue we all crave. I always recommend using a spatula gently to flip them over; this helps maintain their shape while letting you peek underneath at that perfect browning action happening there. After each batch, don’t forget to wipe down your pan! It helps remove any leftover flour residue that could burn and spoil the beautiful flavors you’ve worked so hard to create.
Step 7: Achieving That Perfectly Crispy Exterior
Ah, this step is where culinary magic happens! As your stuffed potato cakes sizzle away in that glorious pan, keep an eye on their transformation—the sound alone will be music to your ears! The visual cues are just as exciting; watch as they take on a rich golden-brown color that signals crispy perfection has been achieved. It’s also important at this point not to rush things; let them cook undisturbed for those crucial first few minutes on each side before flipping them over. This allows for maximum crispiness—you want that amazing crunch when you sink your teeth into these beauties.
One tip I swear by is to take a moment after frying each batch and let them rest on a paper towel-lined plate for just a minute or two. This not only helps drain any excess oil but also allows steam—which can make those lovely crispy exteriors soggy—to escape before serving. It’s these little touches that elevate our home-cooked meals into something truly extraordinary!
Step 8: Serving Up Your Masterpiece
Now comes perhaps the most satisfying part—serving up these delectable stuffed potato cakes! The aroma wafting through your kitchen alone will have everyone hovering around in anticipation; it’s an utterly intoxicating experience! You can serve them as an impressive appetizer or as part of a cozy dinner spread alongside some fresh greens or vibrant dipping sauces like tangy sour cream or zesty yogurt sauce—they complement these crispy delights beautifully.
As you plate up these golden nuggets of flavor, don’t forget how hard you’ve worked—and how rewarding this moment feels! Each bite reveals layers of soft mashed potatoes hugging an irresistibly savory filling that’s rich yet comforting at the same time. Honestly, my friends often rave about how satisfying they are; it’s like getting wrapped up in a warm blanket on a chilly evening. And remember: while these stuffed potato cakes are best enjoyed fresh from the pan, they also make fantastic leftovers—just reheat them gently in a hot skillet until warmed through again.
Final Touches: A Celebration of Flavor
Before diving into these mouthwatering creations, consider garnishing with chopped fresh herbs like parsley or chives for an extra pop of color and flavor—that touch adds an extra layer of freshness that balances out all those hearty elements beautifully! As you sit down with family or friends around the table sharing stories and laughter amidst bites of pure bliss, know that you’ve created something special together—a dish filled not just with ingredients but with love and care.
These Stuffed Potato Cakes (Meat, Mushrooms) aren’t just food; they’re memories waiting to be made around the dining table. So gather those loved ones close and enjoy every delicious bite—you’ve earned it!
Storage and Enjoyment Tips for Your Stuffed Potato Cakes (Meat, Mushrooms)
Now that you’ve crafted these delightful stuffed potato cakes, it’s time to revel in the joy of sharing them with loved ones or even saving some for later! The aroma wafting through your kitchen is just the prelude to the heavenly experience of biting into these scrumptious treats. But let’s be honest, even if you can’t finish all 14 in one sitting—though I wouldn’t blame you if you tried—there’s no need to fret! You can preserve these beauties so they stay just as delicious for days to come.
Storing Leftover Stuffed Potato Cakes (Meat, Mushrooms)
To keep your stuffed potato cakes at their best, store them in an airtight container in the fridge. This will help maintain their luscious texture and mouthwatering flavor for about three to four days. For an extra touch of care, consider placing a slice of bread inside the container; this little trick absorbs moisture and helps prevent your cakes from turning soggy. Trust me; the taste after storage remains remarkably satisfying, with the flavors melding beautifully over time. When it comes to reheating, a gentle pan-fry with a splash of oil on medium heat will revive their golden crust while keeping the inside wonderfully moist. Alternatively, you could pop them in the oven at 350°F (175°C) until warmed through—either way, I promise you’ll be left wondering how something so simple could taste so extraordinary!
Freezing Stuffed Potato Cakes (Meat, Mushrooms) for Later
If you want to plan ahead for those busy weeknights or surprise guests, freezing your stuffed potato cakes is an excellent option! To do this properly, allow them to cool completely first, then arrange them in a single layer on a baking sheet until firm before transferring them to an airtight freezer bag or container. They’ll keep well frozen for up to three months—imagine having this deliciousness ready at your fingertips! When you’re ready to enjoy them again, there’s no need to thaw; simply cook them straight from frozen on medium heat until they’re golden and heated through. This convenience factor makes meal prep a breeze while ensuring that you always have something utterly satisfying ready when cravings strike.

Stuffed Potato Cakes (Meat, Mushrooms)
- Total Time: 50 minutes
- Yield: Approximately 14 servings 1x
Description
Indulge in the comforting flavors of Stuffed Potato Cakes filled with savory meat and earthy mushrooms. This delightful recipe brings together the soft, creamy texture of mashed potatoes and a rich filling that’s bound to become a favorite at your dinner table. Perfect for family meals or gatherings, these cakes are versatile and easy to make, allowing you to customize the filling based on your preferences. Each bite offers warmth and satisfaction, making them an ideal choice for any occasion. Whether paired with a refreshing salad or served with tangy dipping sauces, these stuffed potato cakes promise to elevate your dining experience!
Ingredients
- 2 pounds potatoes (Russets or Yukon Gold)
- 1 cup all-purpose flour (plus more for dusting)
- 1 large egg
- 11.64 ounces ground turkey or beef (7-10% fat)
- 5.29 ounces finely chopped mushrooms
- 1 medium onion (finely chopped)
- 3 tablespoons olive oil
- Salt, pepper, and spices (paprika, mixed herbs)
Instructions
- Peel and chop the potatoes into even chunks. Boil in salted water until fork-tender (about 15-20 minutes), then drain and mash until smooth. Let cool.
- In a skillet, heat 1 tablespoon of olive oil over medium heat. Sauté onions until translucent (about 3 minutes), then add mushrooms and cook until moisture evaporates (6-7 minutes). Remove from heat.
- In a mixing bowl, combine cooled mashed potatoes, beaten egg, flour, salt, and pepper to form a dough.
- For the filling, mix cooked onions and mushrooms with ground turkey/beef, additional flour, spices, and seasonings.
- Shape the potato dough into small patties, placing a tablespoon of filling in the center before sealing.
- Heat remaining olive oil in a non-stick pan over medium heat. Fry each cake for about 2-3 minutes on each side until golden brown.
- Prep Time: 30 minutes
- Cook Time: 20 minutes
- Category: Main
- Method: Frying
- Cuisine: Comfort Food
Nutrition
- Serving Size: 1 serving
- Calories: 140
- Sugar: 0g
- Sodium: 250mg
- Fat: 6g
- Saturated Fat: 1g
- Unsaturated Fat: 4g
- Trans Fat: 0g
- Carbohydrates: 18g
- Fiber: 2g
- Protein: 5g
- Cholesterol: 25mg
Leave a Comment