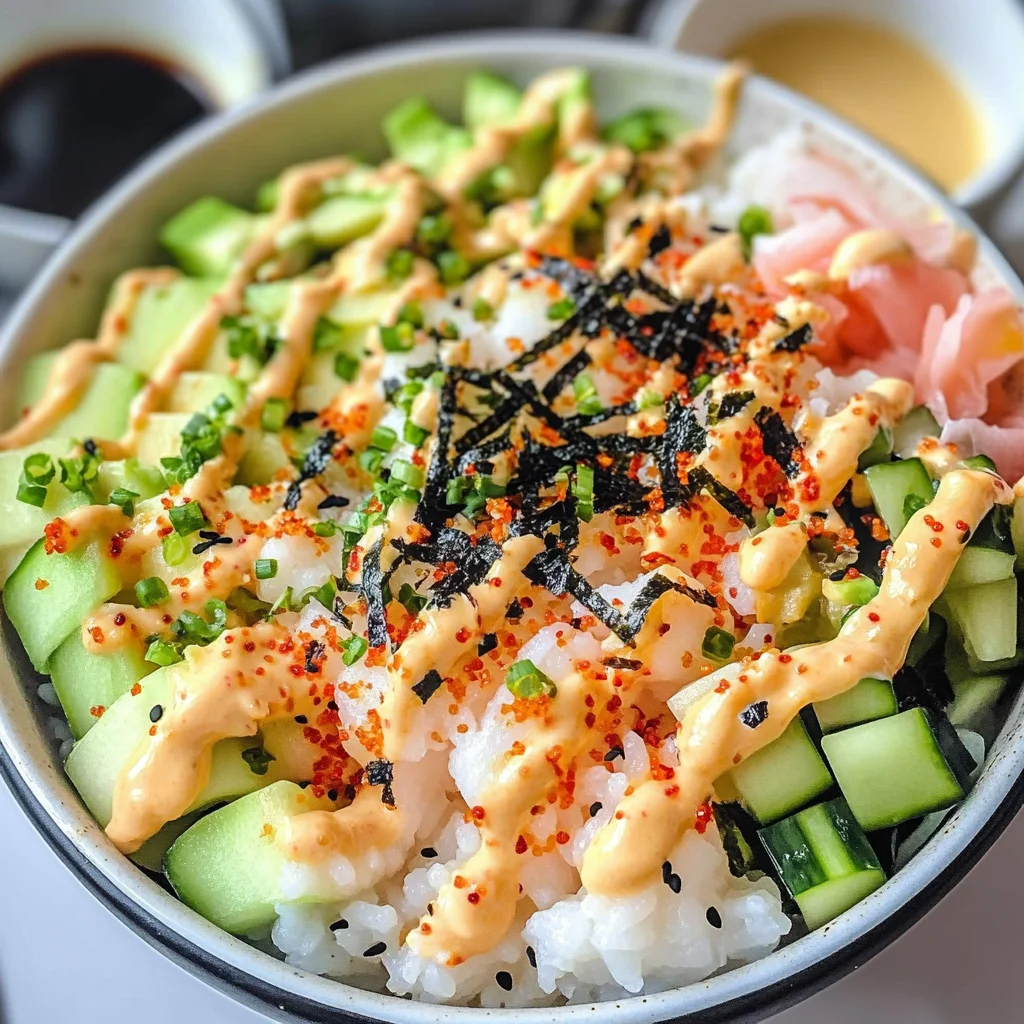
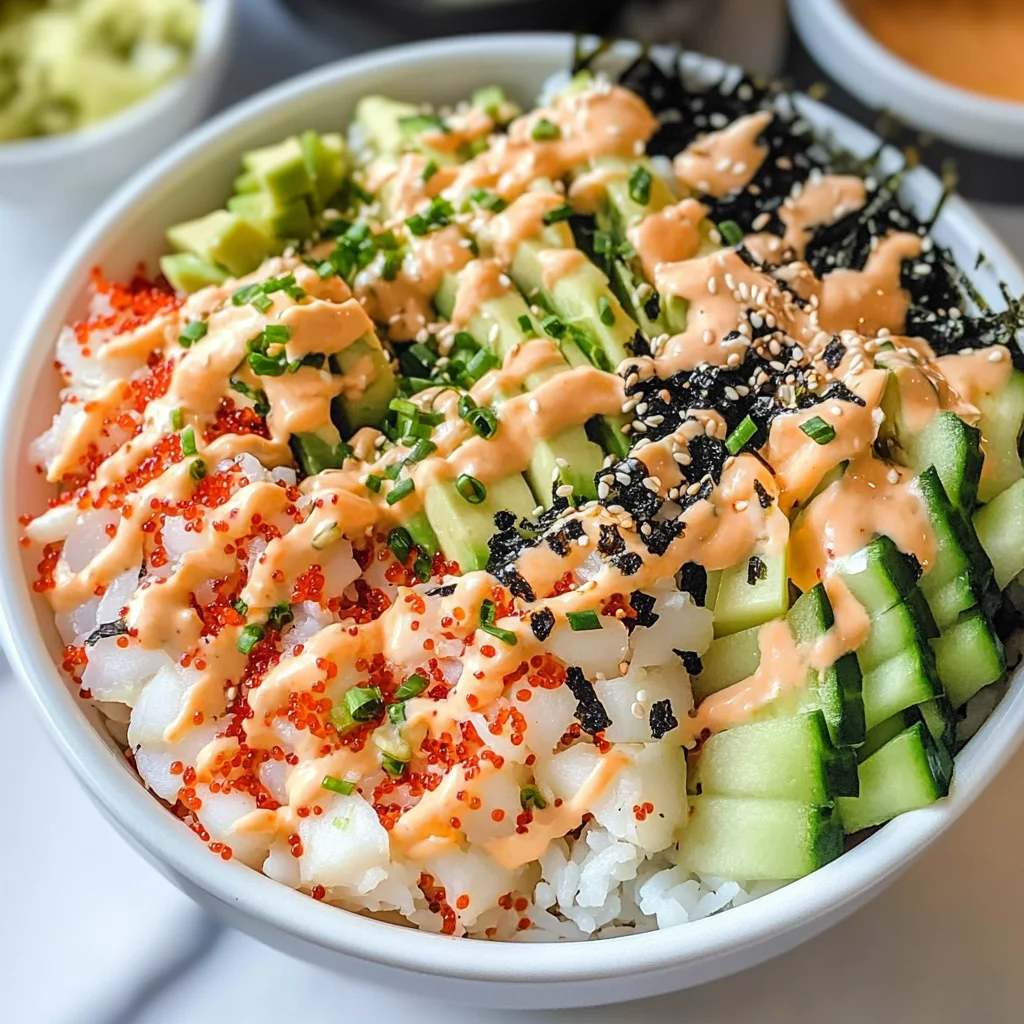
There’s something truly magical about food that transcends mere nourishment; it’s a tapestry woven from culture, tradition, and love. When I think of California Sushi Bowls, I’m transported to a sun-drenched afternoon, the salty breeze teasing my hair as I dive into a bowl brimming with vibrant colors and flavors. This dish is not just another meal; it’s an experience that brings together the comforting familiarity of sushi and the playful creativity of a bowl meal. Each bite is like a dance on your palate, balancing tender crab, tangy rice, and fresh vegetables in perfect harmony. Trust me when I say this: once you try these California Sushi Bowls, they’ll become a staple in your home, an ode to easy yet elegant dining that you can whip up any day of the week.
The beauty of California Sushi Bowls lies in their versatility. You can savor them as a light lunch or dress them up as an impressive dinner for friends. They embody the spirit of Californian cuisine—fresh, innovative, and always welcoming. The layers of flavor come together effortlessly; the warm sushi rice cradles cool avocado and crisp cucumber while the spicy mayonnaise adds a lovely kick that dances across your taste buds. It’s a delightful contrast that’s sure to impress anyone who takes a bite. So roll up your sleeves and prepare for an adventure in your kitchen—you’re going to love every moment of this culinary journey!
California Sushi Bowls: A Delightfully Fresh Culinary Escape
Welcome to one of my favorite recipes! These California Sushi Bowls are not only incredibly easy to make but are also bursting with freshness and flavor that will leave you craving more. Imagine tender crab meat mingling with perfectly seasoned sushi rice and bright vegetables—a dish that feels indulgent yet light at the same time. Let’s embark on this joyful cooking journey together!
Ingredients:
As we gather our ingredients for these delightful California Sushi Bowls, each component plays a crucial role in creating the symphony of flavors you’ll soon dive into. Let’s take our time to appreciate what goes into this beautiful dish.
- 1 1/2 cups dry Calrose Sushi Rice: This short-grain rice is essential for achieving that signature sticky texture we all love in sushi dishes. Calrose rice cooks up plump and tender, absorbing flavors beautifully while maintaining just the right amount of chewiness. When shopping for rice, look for high-quality brands—this will ensure you get that delightful texture which serves as the foundation for your bowls.
- 2 cups water: Water is more than just a cooking medium here; it acts as the magic element that transforms dry grains into fluffy morsels of goodness. The ratio is vital; using too much or too little water can lead to overly soggy or dry rice—neither of which will do justice to our beautiful bowls! Make sure you’re measuring accurately for perfect results.
- 1/4 cup seasoned rice vinegar (Marukan): This ingredient elevates our sushi rice from plain to extraordinary! Seasoned rice vinegar adds just the right balance of sweetness and acidity which enhances the flavors without overwhelming them. It complements the crab beautifully while helping to keep everything cohesive. If you’re unable to find seasoned vinegar, you can mix regular rice vinegar with sugar and salt to achieve something similar.
- 1/4 cup Japanese mayonnaise: Oh, how I adore Japanese mayo! Its creamy richness adds depth to our spicy sauce while offering a smooth texture that binds everything together nicely. This isn’t just any mayo—it’s silkier and has a subtly sweet flavor profile that enhances every bite without overpowering it.
- 2 teaspoons sriracha: Here comes the heat! Sriracha introduces a tantalizing kick that awakens your senses without being overwhelming. It’s important because it contributes not only spice but also complexity to our creamy mayonnaise blend—trust me, you’ll want this zing in every bite!
- 8 oz imitation crab chopped into small pieces: This is where we add that delightful seafood flavor without needing live crabs! Imitation crab (made primarily from fish) mimics traditional crab but is much easier on your wallet and has a great texture that’s perfect for mixing into our bowls.
- 1/2 cup diced English cucumber: The crispness of cucumber provides a refreshing crunch that beautifully contrasts with our creamy elements while adding hydration. Choose English cucumbers for their thin skin and fewer seeds—they offer more flesh for slicing and dicing!
- 1-2 nori sheets (chopped or crumbled into small pieces): Nori brings that unmistakable oceanic essence reminiscent of traditional sushi rolls—it’s like sprinkling some magic onto your bowls! Whether you prefer large pieces or small crumbles depends on personal preference—go wild!
- 1 large avocado (peeled and sliced): Avocado adds creaminess and richness—think of it as nature’s butter! It’s packed with healthy fats making this dish not only satisfying but also incredibly nourishing.
- Black and toasted sesame seeds (for garnish): These tiny seeds pack a punch in terms of flavor! Black sesame seeds lend an earthy crunch while toasted ones bring out nutty undertones; both contribute visual appeal as well!
- 1/4 cup low-sodium soy sauce (for serving): A classic accompaniment that rounds off our dish perfectly with umami goodness—just remember to choose low-sodium options if you’re watching your salt intake!
- Nori Furikake: This seasoning blend often includes seaweed flakes mixed with sesame seeds and spices—it’s like confetti for your bowls! Furikake amplifies flavors while offering aromatic notes that’ll keep everyone guessing what makes these bowls so special.
Equipment You’ll Need:
Now that we have gathered all these beautiful ingredients, let’s talk about some essential tools you’ll need to create these divine California Sushi Bowls! Having the right equipment ensures everything goes smoothly—from cooking your rice perfectly to assembling those gorgeous bowls.
- Rice cooker: If you’re serious about making sushi rice at home, investing in a good-quality rice cooker is absolutely paramount! It takes all the guesswork out cooking rice; simply measure your ingredients, press start, and let it do its thing while you focus on prepping other components.
- Mesh sifter or fine-mesh strainer: Rinsing sushi rice is critical—it washes away excess starch which can cause gummy results instead of nice fluffy grains. A fine-mesh sieve makes rinsing simple by allowing water through while keeping all those precious grains intact.
- Rimmed baking sheet: Once cooked, transferring your hot sushi rice onto a rimmed baking sheet allows it cool evenly without steaming itself further—a crucial step before seasoning!
- Rice paddle or spatula: To fold in our seasoned vinegar gently without mashing the delicate grains requires something flat yet gentle—like a bamboo paddle or spatula designed specifically for this task.
Step 1: Rinse Away Excess Starch
Start off by rinsing 1 1/2 cups of Calrose sushi rice in a mesh sifter under cold running water until it runs clear—this is such an important step because washing away excess starch prevents clumping during cooking! Place the rinsed grains into your trusty rice cooker along with 2 cups of water before setting it on its cooking cycle. While many people might overlook this initial rinse thinking it’s trivial, I promise you taking this extra minute will yield fluffy results worth celebrating!
Step 2: Transfer & Season Your Rice
Once your sushi rice has cooked perfectly (you’ll know it’s done when every grain appears plump), it’s time to transfer it gently onto a rimmed baking sheet using either chopsticks or spatula—the goal here is keeping those grains intact rather than smashing them down! Pour over 1/4 cup seasoned rice vinegar evenly over top then carefully fold using said paddle—not stirring aggressively but rather lifting and turning so each grain gets kissed by that tangy goodness while cooling completely at room temperature before serving will ensure maximum flavor absorption!
Step 3: Craft Your Spicy Mayo
While waiting for our glorious sushi rice concoction cool down completely (don’t rush this step!), let’s whip up some seriously delectable spicy mayo by combining 1/4 cup Japanese mayonnaise with 2 teaspoons sriracha until well blended together—the result should be creamy yet strikingly flavorful—perfectly poised between rich indulgence & fiery excitement! Adjust levels accordingly based on personal preference if needed—I often find myself reaching back repeatedly just because it tastes so utterly intoxicating!
Step 4: Chop & Prepare Toppings
Now it’s time to prep those fresh toppings—the vibrant additions that’ll elevate each bowl exquisitely! Start by chopping up 8 ounces leg-style imitation crab meat into bite-sized pieces followed closely by dicing half an English cucumber until they resemble little cubes bursting with color—you want them crisp enough retain their crunch against all others involved here whilst still remaining visually appealing within each bowl when assembled later on too!
I can already feel my excitement building just thinking about how beautiful—and delicious—these California Sushi Bowls will turn out once we assemble everything together! Keep following along as we transform these components into something truly extraordinary…
California Sushi Bowls: A Delightful Fusion of Flavors
As we dive deeper into the creation of these California Sushi Bowls, I want to share the joy that comes from each ingredient and every step involved in this delightful dish. There’s something profoundly satisfying about assembling a meal that not only fills your belly but also warms your soul. So, let’s continue with our journey through flavor and texture—trust me, you’re going to love this!
Step 5: Create Your Spicy Mayo Masterpiece
Now it’s time to whip up that utterly intoxicating spicy mayonnaise that will elevate our California Sushi Bowls to stratospheric levels of deliciousness. In a small mixing bowl, combine 1/4 cup of Japanese mayonnaise with 2 teaspoons of sriracha. I can’t emphasize enough how special this combination is; the creamy richness of the mayonnaise blends seamlessly with the heat and tang of the sriracha, creating a sauce that is both addictive and versatile. You’ll find yourself wanting to slather it on everything! Use a whisk or a fork to mix these two together until you have a smooth, vibrant-colored sauce. The visual cue here is simple: it should be fully blended without any streaks of mayonnaise left showing. This step is crucial because it adds depth and complexity to the overall flavor profile of your bowl. When you drizzle this on top later, it not only enhances the taste but also adds an appealing pop of color—something that’s always delightful when presenting food.
Step 6: Chop Your Fresh Ingredients
Next up, let’s focus on those fresh ingredients that will bring crunch and freshness to our bowls! Take 8 ounces of imitation crab and chop it into small bite-sized pieces; think about how each piece will mingle with the sushi rice and veggies later on. The texture here is key—this imitation crab has a subtle sweetness that pairs beautifully with the other elements in our dish. Then, grab 1/2 cup of diced English cucumber; its crispness is absolutely paramount as it balances out the creaminess of the avocado and mayo while adding a refreshing crunch that screams summer! As you chop, don’t rush this step; take your time to ensure uniform sizes so every bite is harmonious. And let’s not forget about the nori sheets—whether you choose to crumble them into small pieces or chop them finely—this dried seaweed will add an umami punch that’s simply non-negotiable in sushi preparations.
Step 7: Assemble Your Bowl with Care
Once all your components are ready, it’s time for assembly—one of my favorite parts! In a large mixing bowl, gently add the cooled sushi rice (which should be at room temperature by now). It’s important that this rice has cooled completely because warm rice can lead to mushy textures when combined with fresh ingredients; we want each component distinct yet harmonious. Now, introduce your chopped imitation crab and diced cucumber into this bowl; as you do so, I encourage you to fold rather than stir—the goal here is to keep everything intact without crushing your precious grains of rice. You’ll want to see an inviting mix where each ingredient showcases its personality while still being part of a beautiful ensemble. Finally, delicately lay down slices of fresh avocado atop this mixture—the creamy richness will create an exquisite contrast against the other flavors.
Step 8: Final Touches That Make All The Difference
The finishing touches are where magic truly happens! Drizzle your homemade spicy mayo over the assembled rice mixture generously but thoughtfully; I often use a spoon or squeeze bottle for more controlled application. This isn’t just for aesthetics—each drizzle coats all those lovely ingredients in flavor heaven! Next up, sprinkle some crumbled nori over the top along with black and toasted sesame seeds—the latter providing an irresistible nutty crunch while enhancing visual appeal, turning your bowl into a work of art on the dining table. If you have nori furikake at hand (a Japanese seasoning blend), go ahead and sprinkle some over as well—it’s like adding confetti to your party! Trust me on this one; these final touches elevate not just taste but also presentation—a feast for both eyes and palate!
Final Thoughts: Enjoying Your California Sushi Bowls
And there you have it—your California Sushi Bowls are ready to be enjoyed! As you take your first bite, relish in the symphony of flavors and textures coming together in perfect harmony; every spoonful melds crisp vegetables with rich avocado, sweet crab, and that zesty punch from our spicy mayo. These bowls are not just food; they’re an experience filled with love and care—a beautiful reminder that cooking can bring people together in profound ways.
I promise you’ll want to make these again and again—they’re perfect for gatherings or even a cozy night in! So gather your loved ones around or simply treat yourself—you deserve it! Remember to savor each bite; after all, good food is meant to be enjoyed slowly and appreciatively. Happy cooking!
Storage and Enjoyment Tips for Your California Sushi Bowls
Now that your California Sushi Bowls are beautifully assembled and ready to be devoured, I can barely contain my excitement! The vibrant colors of the fresh veggies, the creamy avocado, and the delicate crab create a feast for not just the eyes but also the soul. But what if you find yourself with some delightful leftovers? Fear not! There are ways to preserve this culinary masterpiece while maintaining its integrity and flavor.
Storing Leftover California Sushi Bowls
To store your leftover California Sushi Bowls, I recommend using airtight containers, as they will keep your ingredients fresh and prevent any unwanted odors from infiltrating your delicious meal. Place your bowls in the refrigerator, where they will stay good for up to two days. However, for optimal taste, try to finish them off within 24 hours—trust me on this one! If you’re worried about soggy rice or wilted vegetables, consider placing a slice of bread in the container; it helps absorb moisture without sacrificing taste or texture. When you take a bite of your leftover sushi bowl after storage, you’ll still experience that delightful combination of flavors—it’s like a little gift from yesterday’s cooking adventure!
Freezing Components for Later
If you’re looking to extend the life of your California Sushi Bowls even further, consider freezing individual components such as the sushi rice or the chopped imitation crab. To freeze properly, scoop out portions into freezer-safe bags or containers, ensuring you remove as much air as possible to prevent freezer burn. When done right, these components can last up to three months in the freezer! The beauty of this approach is that it allows you to whip up an easy dinner on busy nights: simply thaw overnight in the refrigerator and reheat your rice gently in a microwave or on the stove with a splash of water. This method is not only convenient but also opens up a world of possibilities—you’ll always have a touch of homemade goodness waiting for you.
Dinner
California Sushi Bowls
- Total Time: 45 minutes
- Yield: Serves 4
Description
California Sushi Bowls are a vibrant and flavorful culinary experience that brings the essence of sushi into an easy-to-make bowl format. Picture a delightful combination of tender imitation crab, perfectly seasoned sushi rice, and an array of fresh vegetables all drizzled with a creamy, spicy mayo. This dish is not only visually appealing but also bursting with textures and tastes that will keep you coming back for more. Whether you’re enjoying them for lunch or serving them at dinner gatherings, these bowls embody freshness and creativity. Get ready to savor each bite as you embark on this delicious journey!
Ingredients
- 1 1/2 cups dry Calrose sushi rice
- 2 cups water
- 1/4 cup seasoned rice vinegar
- 1/4 cup Japanese mayonnaise
- 2 teaspoons sriracha
- 8 oz imitation crab, chopped
- 1/2 cup diced English cucumber
- 1 large avocado, sliced
- Nori sheets (chopped)
- Black and toasted sesame seeds (for garnish)
- Low-sodium soy sauce (for serving)
Instructions
- Rinse the sushi rice under cold running water until it runs clear. Cook the rice in a rice cooker with 2 cups of water.
- Once cooked, transfer the rice to a rimmed baking sheet and fold in the seasoned rice vinegar. Allow it to cool.
- In a separate bowl, mix Japanese mayonnaise and sriracha to create your spicy mayo.
- Chop imitation crab and dice cucumber. Prepare nori sheets by chopping or crumbling them.
- In a large bowl, combine cooled sushi rice with imitation crab, cucumber, and sliced avocado.
- Drizzle spicy mayo over the top, sprinkle with nori pieces and sesame seeds before serving.
- Prep Time: 15 minutes
- Cook Time: 30 minutes
- Category: Dinner
- Method: Bowl Assembly
- Cuisine: Japanese
Nutrition
- Serving Size: 1 serving
- Calories: 450
- Sugar: 3g
- Sodium: 700mg
- Fat: 17g
- Saturated Fat: 3g
- Unsaturated Fat: 14g
- Trans Fat: 0g
- Carbohydrates: 61g
- Fiber: 5g
- Protein: 12g
- Cholesterol: 15mg
Leave a Comment