There’s something magical about the smell of warm caramel and cinnamon apples drifting through the house on a crisp autumn afternoon. It brings back memories of apple-picking weekends, flannel blankets, and cozy kitchens filled with chatter and clinking baking pans. Those cherished moments are forever intertwined with the joy of baking, and that’s exactly the feeling these Easy Caramel Apple Cheesecake Bars evoke with every decadent bite. It’s more than just a dessert; it’s an experience that wraps you in warmth and nostalgia, inviting everyone to gather around the table and share in its sweetness. The creamy cheesecake base is perfectly balanced by the tartness of fresh apples and a luscious drizzle of caramel—truly a symphony of flavors that will make your heart sing.
The beauty of these Easy Caramel Apple Cheesecake Bars lies not only in their taste but also in their ability to bring people together. Imagine serving these delightful bars at a family gathering or a cozy dinner party; they will undoubtedly become the star of the show. The layers of buttery graham cracker crust, velvety cheesecake filling, tender spiced apples, and crunchy streusel topping create a delightful contrast of textures that keeps each bite exciting. I promise you, once you take your first mouthful, you’ll be hooked! So roll up your sleeves, put on your favorite apron, and let’s embark on this delicious culinary journey together.
Step 1: Preheat Your Oven & Prep Your Baking Dish
First things first—we need to preheat our oven to 350°F (175°C). This temperature ensures optimal cooking conditions throughout each layer while allowing flavors meld beautifully together during bake time ahead! While waiting on oven warmth happening behind scenes let’s prepare ourselves by lining up those pans accordingly—grab your trusty 9×9-inch baking dish (make sure it’s clean). Now line it using parchment paper letting some hang over sides generously (think extra handles!) enabling easy removal post-baking once cooled down completely later on—trust me this step saves headaches later…we want effortless enjoyment come serving time instead right?
Step 2: Make That Buttery Graham Cracker Crust
Next up? We’re diving straight into creating that delicious graham cracker crust which serves dual purposes—it gives stability underneath rich cheesecake filling whilst providing wonderful crunchy contrast against soft toppings above too! In one large bowl combine two cups worth graham cracker crumbs alongside half cup melted unsalted butter plus quarter cup granulated sugar—all three elements come together forming cohesive mixture resembling wet sand consistency (don’t worry if looks slightly messy initially!).
Using clean hands press mixture firmly onto bottom prepared pan ensuring even distribution across surface area before transferring directly into preheated oven where awaits its destiny—to bake blissfully away between eight ten minutes until lightly golden brown appearing upon surface sighted through transparent oven door peering eagerly inside wonderland unfold before eyes…once done remove promptly set aside cooling slightly (we don’t want hot crust melting creamy goodness spilling everywhere).
Step 3: Prepare The Creamy Cheesecake Layer
While waiting patiently upon cool-down period let’s shift focus toward whipping up luscious creamy cheesecake layer next shall we? Grab yourself either hand mixer stand mixer whatever tickles fancy best then place two blocks softened cream cheese into bowl immediately followed by half cup granulated sugar swirling around till combined fully resulting smooth velvety texture achieved painstakingly through efforts achieved diligently along way here today—you’ll feel proud once done knowing tastebuds soon rewarded handsomely afterward too!
Once satisfied begin introducing eggs gently one at time mixing between additions thoroughly ensuring no lumps remain behind (we strive perfection after all!). Final touch? Stirring in teaspoon pure vanilla extract adds depth flavor enhancing overall experience created thus far—we aim high here folks trust me when I say nothing less than extraordinary awaits ahead soon enough…pour this heavenly concoction atop previously cooled graham cracker crust awaiting beneath eager anticipation already built tension mounting higher every second ticking away towards completion unfolding quickly now…
Step 4: Apple Layer Magic Begins
Now comes most exciting part yet tossing diced fresh apples directly into bowl alongside tablespoon granulated sugar plus half teaspoon ground cinnamon eighth teaspoon nutmeg mingling together creates aromatic blend intoxicating senses nearby urging all taste buds awaken from slumber ready partake festivities commence shortly thereafter…scatter apple chunks evenly atop cheesecake layer ensuring maximum coverage possible sprinkle wildly enjoying freedom creativity unleashed among kitchen walls bursting forth vibrancy alive momentarily captured through simple act motion above rest assured everyone watching would approve wholeheartedly witnessing transformation occurring within mere moments unfolding gracefully before eyes anticipating blissful fruition achieved end result ultimately…
Step 5: Crafting the Perfect Streusel Topping
Now, let’s dive into one of the most delightful components of our Easy Caramel Apple Cheesecake Bars—the streusel topping. This is where we transform simple ingredients into a crumbly, buttery masterpiece that adds texture and depth to our dessert. In a mixing bowl, combine 1/2 cup of light brown sugar, 1/2 cup of all-purpose flour, and 1/4 cup of old-fashioned oats. These elements come together in a harmonious blend that not only enhances the flavor but also creates that irresistible crunch on top of the creamy cheesecake layer. Remember, the oats are absolutely paramount here; they introduce an earthy quality that balances out the sweetness while providing a heartiness that complements the apples beautifully.
Next, you’ll want to add 1/4 cup of cold butter that you’ve cubed ahead of time. The cold butter is crucial—this ensures that when it bakes, it melts in pockets rather than completely integrating with the dry ingredients. I like to use a pastry cutter for this part, but your fingers work just as well! The goal is to mix until you achieve a crumbly texture reminiscent of small pebbles scattered across a beach; you’re looking for variation in size for visual appeal and textural intrigue. Once combined, sprinkle this streusel generously over your diced apples already resting atop the cheesecake layer. Trust me on this step; it’s going to create an incredible contrast between creaminess and crunch that makes each bite an absolute joy!
Step 6: Baking to Perfection
With our layers beautifully assembled and ready for action, it’s time to pop these heavenly bars into the oven! Preheat your oven to 350°F (175°C) if you haven’t already—it should be nicely warmed up by now, creating an inviting environment for those flavors to meld together. Carefully slide your baking dish onto the middle rack and set a timer for 40–45 minutes. This is where patience truly pays off; during this time, magic happens as the cheesecake sets while the streusel topping transforms into a golden-brown crown atop your creation.
As these bars bake, keep an eye on them around the 30-minute mark—watch for that transformation! You’re looking for a slight jiggle in the center; it should not be liquidy but have just enough movement to signal it’s still soft yet firming up nicely. The edges will begin to puff up slightly and take on a lovely golden hue. If at any point they start to darken too quickly, don’t hesitate to cover them loosely with aluminum foil. This gentle shielding allows them to cook through without burning—a non-negotiable trick I learned through many kitchen adventures! Once they’ve baked perfectly, remove them from the oven and let them cool at room temperature before moving on.
Step 7: The Magic of Chilling
Ah, my friends, here comes one of the most crucial steps—the chilling process! I promise you; this is where our Easy Caramel Apple Cheesecake Bars transform from simply delicious to utterly extraordinary. Allow them to cool completely at room temperature first—this could take about an hour or so—but don’t rush this step! Cooling prevents condensation from forming when you place them in the fridge later on—a little kitchen hack that can make all the difference in achieving that perfect texture.
Once cooled, cover your baking dish with plastic wrap or foil (making sure it’s airtight) and transfer it into your refrigerator. Now here’s where patience becomes essential again: allow these bars to chill for at least three hours—or even better, overnight if you can contain your excitement! This chilling period allows all those tantalizing flavors to deepen and mingle beautifully; it’s akin to letting a fine wine breathe before savoring it. When you’re finally ready to dive into these treats after their long-awaited rest in the fridge, you’ll notice how they hold their shape flawlessly upon cutting—this is exactly what we want!
Step 8: Slicing and Serving Your Creation
Finally, after what feels like an eternity (but really is just good ol’ patience), it’s time for the grand reveal! Carefully lift your chilled Easy Caramel Apple Cheesecake Bars from the pan using those handy parchment paper overhangs—you’ll thank yourself later for this little detail! As you slice these decadent bars into squares (I suggest using a sharp knife dipped in hot water for clean cuts), take a moment to admire their beautiful layers—the creamy cheesecake juxtaposed against tender apple pieces topped with golden streusel is truly a sight to behold.
Now comes one last touch that elevates these bars from delightful to divine: drizzling with rich caramel sauce just before serving! I prefer using homemade caramel if time permits; however, store-bought works perfectly well too—just ensure it’s smooth and luxurious. Drizzle generously over each square—don’t skimp on this part because caramel adds such depth and richness! As you serve these bar beauties at your next gathering or cozy night in with friends or family, prepare yourself for gasps of delight as everyone takes their first bite—the symphony of flavors will sing through every taste bud!
So there you have it—your own batch of Easy Caramel Apple Cheesecake Bars ready to bring joy and warmth into your home! Enjoy every moment spent crafting this cherished recipe; each bite will remind you why homemade desserts are simply irreplaceable!
Storage and Enjoyment Tips for Your Easy Caramel Apple Cheesecake Bars
Now that your Easy Caramel Apple Cheesecake Bars are beautifully baked and cooled, it’s time to dive into the delightful world of enjoyment! But before you rush off to devour these little squares of bliss, let’s talk about how to keep them fresh and irresistibly delicious. After all, this dessert is so rich and flavorful, you’ll want every last crumb to be just as scrumptious days later as it is when first made. Whether you plan to enjoy them right away or save some for later (trust me, they’re a perfect treat for any occasion), knowing how to store them properly will ensure they remain a decadent delight.
Storing Leftover Easy Caramel Apple Cheesecake Bars
To keep your leftover Easy Caramel Apple Cheesecake Bars in peak condition, the best method is to place them in an airtight container. This protects them from absorbing any unwanted odors from your fridge while also keeping their texture intact. Ideally, you’ll want to store them in the refrigerator, where they can safely last for up to five days. If you’re like me and can’t resist that luscious caramel flavor lingering on your taste buds, here’s a pro tip: tuck a slice of bread into the container with the bars! This little trick helps maintain moisture without making your bars soggy—it’s absolutely paramount for preserving that delightful creamy texture. After storage, these bars maintain a wonderfully rich flavor profile, with the apples softening even further while still offering a satisfying bite. And if you want a warm treat right out of the fridge? Just pop one in the microwave for about 10-15 seconds—oh my goodness, it transforms into gooey perfection!
Freezing for Later
If you find yourself needing to prepare ahead or simply want to stash away some of this heavenly dessert for those unexpected cravings down the line, freezing is an excellent option! To freeze your Easy Caramel Apple Cheesecake Bars correctly, first slice them into squares and layer them between parchment paper in an airtight container or freezer bag—this prevents sticking and makes it easy to grab just one (or two!). They can be kept frozen for up to three months without losing their delightful flavors. When you’re ready to indulge again, simply transfer the desired amount to the fridge overnight or leave them at room temperature for about an hour; they thaw beautifully! It’s such a convenient way to have this indulgent dessert on hand whenever you need a sweet pick-me-up or have guests over—and who could resist impressing friends with homemade cheesecake bars pulled straight from their freezer?
Dessert
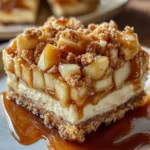
Easy Caramel Apple Cheesecake Bars
- Total Time: 1 hour 15 minutes
- Yield: Approximately 12 servings 1x
Description
Indulge in the delightful experience of Easy Caramel Apple Cheesecake Bars, where creamy cheesecake meets spiced apples and luscious caramel. These bars evoke the warmth of autumn with each decadent bite, making them perfect for gatherings, cozy evenings, or as a sweet treat any time of year. Imagine buttery graham cracker crusts layered with velvety cheesecake and topped with tender apples infused with cinnamon and nutmeg. Finally, a generous drizzle of caramel sauce transforms these bars into an irresistible dessert that’s sure to impress. Gather your loved ones around the table, cut yourself a square, and savor the moments filled with nostalgia and joy.
Ingredients
- 2 cups graham cracker crumbs
- 1/2 cup unsalted butter, melted
- 1/4 cup granulated sugar (for crust)
- 2 (8 oz) blocks cream cheese, softened
- 1/2 cup granulated sugar (for filling)
- 2 large eggs
- 1 teaspoon vanilla extract
- 2 medium apples, peeled and diced
- 1 tablespoon granulated sugar (for apples)
- 1/2 teaspoon cinnamon
- 1/8 teaspoon nutmeg
- 1/2 cup light brown sugar
- 1/2 cup all-purpose flour
- 1/4 cup old-fashioned oats
- 1/4 cup unsalted butter, cold and cubed
- Caramel sauce for drizzling
Instructions
- Preheat oven to 350°F (175°C). Line a 9×9-inch baking dish with parchment paper.
- In a bowl, combine graham cracker crumbs, melted butter, and sugar. Press mixture into the bottom of the prepared pan.
- Bake crust for about 10 minutes until golden brown. Allow to cool slightly.
- Using a mixer, blend cream cheese and sugar until smooth. Add eggs one at a time, mixing well after each addition. Stir in vanilla.
- Spread cheesecake mixture over cooled crust.
- In another bowl, toss diced apples with sugar, cinnamon, and nutmeg. Distribute evenly over the cheesecake layer.
- For streusel topping, mix brown sugar, flour, oats, and cubed cold butter until crumbly; sprinkle over apple layer.
- Bake for 40–45 minutes until set but slightly jiggly in the center. Cool at room temperature before refrigerating for at least three hours or overnight.
- Drizzle with caramel sauce before serving.
- Prep Time: 30 minutes
- Cook Time: 45 minutes
- Category: Dessert
- Method: Baking
- Cuisine: American
Nutrition
- Serving Size: 1 bar (85g)
- Calories: 310
- Sugar: 22g
- Sodium: 150mg
- Fat: 18g
- Saturated Fat: 10g
- Unsaturated Fat: 7g
- Trans Fat: 0g
- Carbohydrates: 35g
- Fiber: 2g
- Protein: 4g
- Cholesterol: 70mg

Leave a Comment