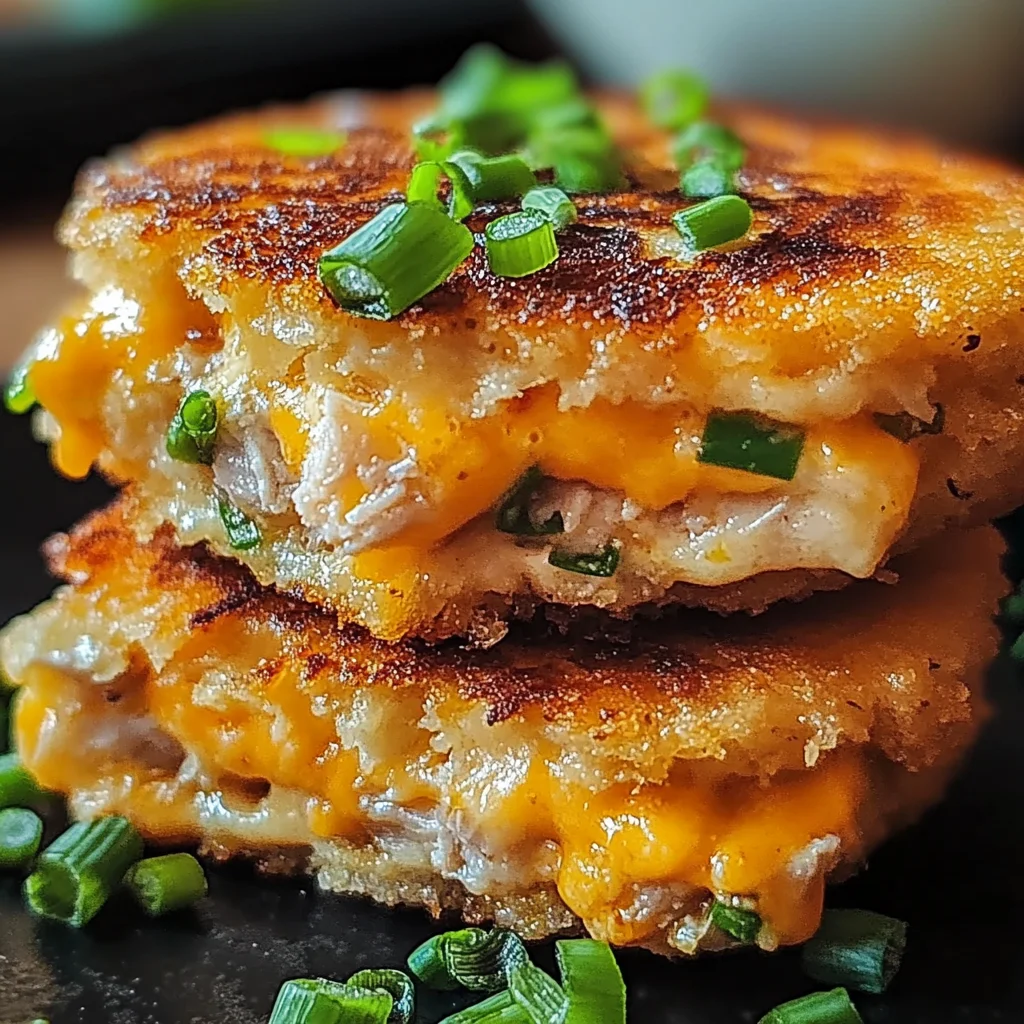
There’s something undeniably special about sharing a meal that transcends mere sustenance—it’s an experience that can ignite warmth and connection, stirring up memories and emotions. The Tuna Melt Patties Recipe is one of those delightful creations that effortlessly brings people together, evoking nostalgia while embracing simplicity. Imagine the comforting aroma wafting through your kitchen as you combine tender tuna with savory spices, transforming pantry staples into crispy, golden patties that are melty on the inside. Each bite is a symphony of flavors, where the rich creaminess of cheese meets the delicate flakiness of tuna, inviting you to savor every mouthful. This recipe isn’t just about food; it’s a celebration of the joy found in cooking, a bridge between what we’ve known and what we’re ready to explore.
As we embark on this culinary journey together, I can’t help but share how these Tuna Melt Patties have become a staple in my home. They’re not only quick to whip up—taking less than 20 minutes from start to finish—but they also embody the kind of comfort food that makes you want to gather around the table with family or friends. Whether you’re enjoying them on toasted bread or nestled beside a crisp salad, there’s an effortless charm in their versatility that delights everyone who takes a bite. Trust me when I say these patties will soon become part of your regular meal rotation—perfect for busy weeknights or lazy weekends when you want something delicious without spending hours in the kitchen.

Tuna Melt Patties Recipe: Comfort Food with a Twist
Welcome to this delightful twist on a classic! These Tuna Melt Patties are not only easy to prepare but also packed with flavor, making them a favorite among both kids and adults alike. Let’s dive into this recipe and embark on a culinary adventure full of taste and heart!
Ingredients:
Before we get our hands dirty, let’s gather our ingredients. Each component plays an essential role in crafting these delectable patties, so take a moment to appreciate what each one brings to the table.
- 2 cans (5 oz each) tuna, drained. The star of our show! Canned tuna is incredibly versatile and budget-friendly, making it perfect for quick meals like these patties. When selecting your tuna, opt for brands packed in water for a lighter flavor and texture; it’s crucial to drain it well to avoid excess moisture in our mixture. If you prefer something more sustainable or adventurous, feel free to explore options like albacore or skipjack; they’ll all work wonders in this recipe.
- ½ cup breadcrumbs. These little nuggets are vital for binding our mixture together while providing that delightful crunch we crave outside. I often use plain breadcrumbs for their neutral flavor but feel free to experiment with seasoned ones if you’re looking for an extra kick! Just remember that quality matters here; homemade breadcrumbs can elevate this dish further by offering freshness and texture that store-bought options might lack.
- ¼ cup mayonnaise. A touch of creamy goodness is essential for keeping our patties moist and flavorful. Mayonnaise acts as both a binder and flavor enhancer here—its richness melds beautifully with the tuna. If you’re looking for alternatives due to dietary preferences or restrictions, consider using Greek yogurt or avocado mash; they provide similar textures while adding their unique flair.
- 1 egg. This ingredient is non-negotiable! Eggs bring everything together cohesively, providing structure while ensuring our patties hold their shape during cooking. It’s fascinating how such a simple addition can make a profound difference in texture—don’t skip it! For those avoiding eggs altogether, consider using flaxseed meal mixed with water as an effective substitute.
- 1 teaspoon Dijon mustard. This adds an element of tanginess that’s absolutely paramount in balancing the flavors within our patties. Dijon mustard not only enhances taste but also contributes depth; it’s like adding a secret handshake among flavors that transforms ordinary into extraordinary! If you don’t have Dijon on hand, yellow mustard can work too—just keep in mind it will alter the flavor profile slightly.
- ½ teaspoon garlic powder & ½ teaspoon onion powder. These two ingredients create an aromatic foundation that brings warmth and familiarity to each patty. Garlic powder is my go-to for its convenience without sacrificing flavor—plus it blends seamlessly into our mixture without any crunchiness from fresh garlic pieces! Onion powder complements beautifully by offering sweetness and balance; if you love fresh herbs or veggies, try adding finely minced onions or scallions instead!
- ½ teaspoon salt & ¼ teaspoon black pepper. Seasoning is key here—it elevates all other flavors present within each bite! Salt enhances sweetness while balancing bitterness and acidity; meanwhile, black pepper adds just enough heat without overpowering anything else going on in your patties’ world.
- ½ cup shredded cheddar cheese (or Swiss). Cheese makes everything better—I truly believe that! In this case, cheddar offers sharpness paired perfectly with creaminess when melted inside each patty; however, feel free to use Swiss if you’re craving something milder yet equally delicious! The choice is yours; just be sure you use freshly shredded cheese instead of pre-packaged shreds whenever possible for optimal melting properties.
- 2 tablespoons green onions, chopped. Not only do these add color but they also introduce brightness into every bite! Green onions bring mild onion flavor without overwhelming our dish—if you’d prefer another herbaceous touch try substituting fresh parsley or dill instead!
- 1 tablespoon butter (for cooking). Butter creates that luscious golden crust we all adore—the sizzling sound as it hits the hot skillet sends chills down my spine! While olive oil can certainly work too if you’re looking for healthier alternatives (or dairy-free options), nothing quite compares with butter’s rich flavor during frying—it’s simply irresistible!
Equipment You’ll Need:
Now that we’ve gathered all our ingredients let’s talk about some essential tools you’ll need for whipping up these tasty Tuna Melt Patties! Having the right equipment makes everything smoother—from mixing ingredients effortlessly to achieving perfect cooking results.
- Large mixing bowl – A sturdy bowl is where all the magic starts! It provides enough space for combining ingredients thoroughly while allowing easy mixing without fear of spills—a crucial partner during this creative process!
- Fork or potato masher – You’ll want either one handy for breaking apart your tuna efficiently before blending everything else together seamlessly—this step ensures uniformity throughout each patty when cooked!
- Skillet or frying pan – Choosing the right pan matters immensely here because its surface area affects even heating during cooking time; I recommend opting for non-stick versions if possible since they prevent sticking issues while helping achieve that coveted golden crust effortlessly!
- Spatula – A good spatula helps flip those delicate patties without crumbling them apart—you want them intact as they cook so you’ll be able to serve them proudly at your table later!
Step 1: Prepare the Tuna Mixture
To kick off this delightful journey towards creating your Tuna Melt Patties Recipe, let’s start by preparing the base mixture that will form the heart of our dish! In your large mixing bowl (the one we discussed earlier), combine your drained tuna along with breadcrumbs, mayonnaise, egg, Dijon mustard, garlic powder, onion powder, salt, and pepper—all those wonderful flavors coming together harmoniously into one cohesive blend! As you mix everything thoroughly using either your fork or potato masher (whichever feels most comfortable), take note of how textures change; it’s vital that every component melds perfectly so our final product holds up nicely during cooking.
This initial step is absolutely essential—not only does it combine flavors but also ensures even distribution throughout each patty once formed later on down the line—the last thing we want is uneven seasoning ruining someone’s experience at mealtime! Mix until no visible dry pockets remain—aiming instead for consistency resembling thick dough which will hold shape when molded into individual patties later on—a bit like sculpting clay but much tastier!
Step 2: Add Cheese & Shape Patties
Once you’ve achieved that beautiful mixture consistency from Step 1 (which I’m sure smells divine already!), it’s time to add shredded cheese along with chopped green onions—the finishing touches before transforming this hearty blend into actual patties! Stir gently until all elements are evenly incorporated into one another—the rich creaminess from cheese now mingling delightfully among savory notes previously established—it truly elevates every aspect involved thus far!
Next comes shaping: trust me when I say this part adds excitement as well as anticipation towards final results—we’re getting closer now! With clean hands (a must!), portion out your mixture into roughly equal sizes—aiming for about 4-5 patties total depending on preferred thickness would be ideal here—then gently press down forming round disks carefully ensuring edges remain intact throughout process; think burger meets cake but infinitely more satisfying once cooked properly!
Step 3: Cook the Patties
Now onto arguably my favorite part—the cooking process where raw ingredients transform magically before eyes right before serving at table later tonight! Heat up your skillet over medium heat allowing butter melt gracefully across surface area evenly coating bottom edge before adding those delightful shaped patties gently onto hot surface—a sizzle will greet you instantly promising crispy goodness ahead!
Cook each side meticulously watching closely between flipping periods lasting approximately 3–4 minutes per side until golden brown appears beneath bubbling tops indicating readiness during final stages; patience pays off big time here so don’t rush this step—the result? Utterly intoxicating crispy exterior surrounding warm cheesy filling waiting eagerly inside wanting nothing more than devoured immediately post-cooking blissful moment arrived swiftly thereafter!
Step 4: Serve & Enjoy
Once all sides have achieved desirable levels of crispness alongside inviting aromas wafting through air around kitchen space—it’s finally time serve up those glorious Tuna Melt Patties hot right off skillet straight onto toasted bread slices perhaps topped additionally garnished lightly upon plate next alongside fresh salad showcasing colors bursting vibrantly alongside contrasting textures present therein creating masterpiece fit worthy any occasion celebrated around tables far & wide alike today ahead soon approaching swiftly thereafter!
I hope you’ve enjoyed every moment spent preparing these Tuna Melt Patties Recipe just as much I did sharing secrets behind success alongside tips guiding pathway forward confidently toward creation ultimately achieved fruition later tonight upon gathering everyone together laughing joyously over shared meals filled laughter warmth which feeds souls beyond expectations experienced previously alone prior stepping forth bravavely ahead journey begun recently anew today ahead moving forward positively toward future dining adventures awaiting patiently around corners nearby looming ever closer arriving soon indeed ahead brightening days ahead surely await us all forevermore never ending fostering bonds lasting lifetimes beyond mere moments shared fleetingly passing quickly away oftentimes overlooked too easily sometimes lost sight amidst busyness life throws daily challenges faced regularly actually coming back home again returning safely back within those hallowed kitchens once again fueling passions reignited sparking embers glowing brightly illuminating paths forward guiding steps towards new discoveries yet untold awaiting patiently exploring uncharted territories unknown still out there waiting quietly beckoning us onward always urging onwards wandering freely seeking solace found deep within culinary realms boundless limitless opportunities abound endlessly therein awaiting discovery awaiting eager hearts hungry souls yearning satiation fulfillment everlasting joy found simply through sharing recipes lovingly crafted heartfelt connections forged forevermore treasured cherished dearly always remembered fondly reflecting light happiness shared together forevermore shining brightly illuminating lives touched shared experiences enriched deepened cherished memories created anew across generations passed along reimagined reinvented anew boldly reaching forward ever onward…
Creating Your Tuna Melt Patties Recipe
Step 5: Add Cheese & Shape Patties
Now that you have your tuna mixture well combined, it’s time to introduce the real stars of the show: the cheese and green onions. This is where the magic truly begins! Stir in the shredded cheddar cheese, or if you’re feeling a bit adventurous, go for Swiss cheese instead. The choice is yours, but trust me when I say that the melty goodness of both cheeses elevates these patties to another level of deliciousness. The cheese not only adds a creamy texture but also a flavor profile that harmonizes beautifully with the tuna.
Once you’ve mixed in the cheese, it’s time to bring your patties to life! Using your hands—yes, get in there—form the mixture into 4-5 patties, each about half an inch thick. Don’t rush this step; take your time to shape them evenly. This is absolutely crucial because even cooking depends on uniformity. A little tip: wet your hands slightly before forming the patties; it helps prevent sticking and makes shaping easier. As you form these little disks of joy, relish in the anticipation of how they will transform from mere ingredients to mouthwatering patties sizzling in your pan.
Step 6: Cooking Your Patties to Perfection
With your patties shaped and ready to go, let’s move on to cooking them. Grab a skillet and place it over medium heat — patience is vital here! While it heats up, add about one tablespoon of butter to the pan. Watching that butter melt is akin to witnessing a culinary performance; it becomes this luscious liquid gold that will coat our patties beautifully. When sizzling starts happening and you see a slight bubbling around the edges of the butter—this is your cue that it’s go-time!
Carefully lay each patty into the skillet without overcrowding them; give them space so they can crisp up nicely. Cooking each side for about 3-4 minutes creates that delightful golden-brown crust we all adore. This crispy exterior isn’t just for show; it serves as a protective barrier that locks in moisture while allowing those heavenly flavors to develop inside. As they cook, resist the urge to flip them too soon—trust me on this! You want them firmly set so they don’t fall apart when you turn them over.
Step 7: Flipping and Browning
Now comes an exhilarating moment—the flip! After about 3-4 minutes on one side, check for that beautiful golden color before turning them over gently with a spatula. The satisfaction of flipping perfectly browned patties can’t be overstated! Once flipped, allow them another 3-4 minutes on this side until they reach that same enticing hue—a visual cue telling you they’re wonderfully cooked through.
As you watch them brown, you’ll notice how their aroma fills your kitchen—it’s utterly intoxicating! That smell signals not just flavor but also comfort and nostalgia, evoking memories of cozy family meals or lazy weekend brunches. If you find any bits sticking to the pan when you flip, don’t panic! Just give it a little more time; they will release once they’ve developed enough crust.
Step 8: Serving and Enjoying Your Tuna Melt Patties
Once both sides are gloriously golden brown and crispy, it’s time for my absolute favorite part—serving these beauties! But before we dive into plating, consider giving each patty an extra cheesy finish by topping them with a sprinkle of shredded cheese just before they’re fully done cooking; then pop them under the broiler for a minute or two until everything melts into a gooey masterpiece. Trust me; this step is non-negotiable for those who crave an extra layer of indulgence!
To serve these delectable patties, think outside traditional sandwich confines. You can absolutely place them atop toasted bread or English muffins for a classic approach—but why stop there? Pairing them with a fresh salad not only balances out their richness but also brings an additional crunch and vibrancy to your meal. Picture this: vibrant greens drizzled with zesty vinaigrette paired with warm tuna melt patties melting under your fork—it’s pure bliss!
Final Touches: Elevate Your Experience
Step 9: Garnishing and Presentation
As we wrap up our Tuna Melt Patties Recipe journey, let’s talk presentation—because we eat with our eyes first! Garnishing can elevate even simple dishes into something extraordinary. Consider chopping fresh herbs like parsley or dill to sprinkle over your finished patties just before serving; this adds both color and an aromatic freshness that complements those rich flavors beautifully.
Don’t forget about sauces! A light drizzle of lemon juice or even some homemade tartar sauce made from vegan mayo can enhance every bite’s experience by cutting through richness while adding brightness. As you plate up these savory creations, remember—the love and care you’ve poured into making these patties shine through every detail from their shape to their garnishes.
And there you have it—your very own Tuna Melt Patties Recipe has come full circle from humble pantry ingredients to stunningly scrumptious dishes ready for sharing (or keeping all to yourself!). I promise you’ll find joy not just in eating but also in sharing these delightful bites with friends and family at home—a truly extraordinary experience that warms both heart and soul alike!
Storage and Enjoyment Tips for Your Tuna Melt Patties Recipe
Now that your kitchen is filled with the aromas of golden, crispy Tuna Melt Patties, it’s time to dig in! But what if you find yourself with a few leftovers (if that ever happens)? Fear not, my friend! These delightful patties can be stored effortlessly for future enjoyment without losing their charm. Whether you have a busy week ahead or just want to savor these flavors later, I’ve got you covered with some simple but effective tips.
Storing Leftover Tuna Melt Patties Recipe
To keep your delicious Tuna Melt Patties fresh and flavorful, I recommend placing them in an airtight container. This helps retain their moisture and prevents them from getting soggy. If you find yourself with extra patties after a gathering (or maybe just after a satisfying meal), pop them in the refrigerator where they’ll stay good for about 3-4 days. Trust me on this; the key lies in keeping them sealed to maintain that perfect balance of crispness and tenderness. And here’s a little pro tip: if you’re storing them as leftovers, consider putting a slice of bread in the container. This will absorb any excess moisture and help preserve that delightful texture that we all love. When you’re ready to enjoy them again, just give them a quick reheat in a skillet over medium heat for about 2-3 minutes per side until they’re warmed through—this will bring back that irresistible crispiness!
Freezing Tuna Melt Patties for Later
If you’re looking to extend the shelf life even further, freezing your Tuna Melt Patties is an excellent option! Simply place each cooled patty on a baking sheet lined with parchment paper, ensuring they’re spaced apart so they don’t stick together. Freeze them until solid—about an hour usually does the trick—then transfer them into a freezer-safe bag or container. This method keeps your patties fresh for up to three months! The beauty of having these ready-to-go is undeniable; on those busy weekdays when cooking feels like climbing a mountain, you can pull out your frozen patties and have dinner sorted in no time. Just take them straight from the freezer and sauté them in a skillet over medium heat for about 6-8 minutes per side until they’re heated through and crispy once more. It’s like having a little piece of comfort waiting for you whenever you need it!

Tuna Melt Patties
- Total Time: 25 minutes
- Yield: Approximately 5 patties 1x
Description
Tuna Melt Patties are the ultimate comfort food that combines convenience and flavor in one delightful dish. In just under 30 minutes, you can whip up these crispy, cheesy patties that are perfect for a quick dinner or a satisfying lunch. The rich creaminess of cheddar cheese melds beautifully with tender tuna and savory spices, creating a dish that’s not only delicious but also nostalgic. Whether served on toasted bread or alongside a fresh salad, these patties offer a versatile meal option that everyone will love. Plus, they are budget-friendly and made from pantry staples, making them an ideal choice for busy weeknights or casual gatherings.
Ingredients
- 2 cans (5 oz each) tuna, drained
- ½ cup breadcrumbs
- ¼ cup mayonnaise
- 1 egg
- 1 teaspoon Dijon mustard
- ½ teaspoon garlic powder
- ½ teaspoon onion powder
- ½ cup shredded cheddar cheese
- 2 tablespoons green onions, chopped
- 1 tablespoon butter (for cooking)
Instructions
- In a large mixing bowl, combine drained tuna, breadcrumbs, mayonnaise, egg, Dijon mustard, garlic powder, onion powder, salt, and pepper until well mixed.
- Stir in shredded cheese and chopped green onions until evenly distributed.
- Form the mixture into 4-5 patties about half an inch thick.
- Heat butter in a skillet over medium heat and cook each patty for about 3-4 minutes per side until golden brown and crispy.
- Serve hot on toasted bread or alongside a salad.
- Prep Time: 10 minutes
- Cook Time: 15 minutes
- Category: Main
- Method: Frying
- Cuisine: American
Nutrition
- Serving Size: 1 patty (approximately 60g)
- Calories: 170
- Sugar: 0g
- Sodium: 350mg
- Fat: 10g
- Saturated Fat: 4g
- Unsaturated Fat: 6g
- Trans Fat: 0g
- Carbohydrates: 9g
- Fiber: 0g
- Protein: 12g
- Cholesterol: 40mg

Leave a Comment