There’s something utterly enchanting about the first whiff of lemon in the air, isn’t there? It’s like a breath of fresh, sun-kissed summer that instantly lifts your spirits and makes everything feel just a little bit brighter. When I think of baking, I often find myself drawn to the vivaciousness that lemons bring into the kitchen, especially in my beloved Lemon Meltaway Cookies. These little gems are not just any cookies; they are a delightful experience that transcends mere dessert. Imagine buttery clouds infused with the vibrant zest and juice of fresh lemons, transforming each bite into a mouthwatering revelation that melts away all your worries. Each cookie is lovingly coated in a sweet glaze that adds an extra layer of citrusy bliss, making them the perfect treat for warm afternoons or any gathering where joy is on the menu.
What makes these Lemon Meltaway Cookies so special? It’s more than just their light, airy texture or their refreshing flavor—it’s about the memories they create. I remember baking these with my grandmother, her laughter filling the room as we zested lemons together. The process was simple yet magical; we would mix and roll, our hands sticky with dough while anticipation hung in the air. These cookies have a way of bringing people together, whether you’re sharing them at a picnic, enjoying them with afternoon tea, or gifting them to someone you love. They hold the promise of warmth and connection, making every occasion feel like a celebration—even if it’s just Tuesday afternoon.
Lemon Meltaway Cookies: A Refreshing Treat That Melts Your Heart
Let me take you on this delightful journey as we create these Lemon Meltaway Cookies together! Trust me when I say that once you experience the blissful combination of buttery goodness and vibrant lemon flavor in every bite, you’ll want to whip up batch after batch. So grab your apron and let’s get started!
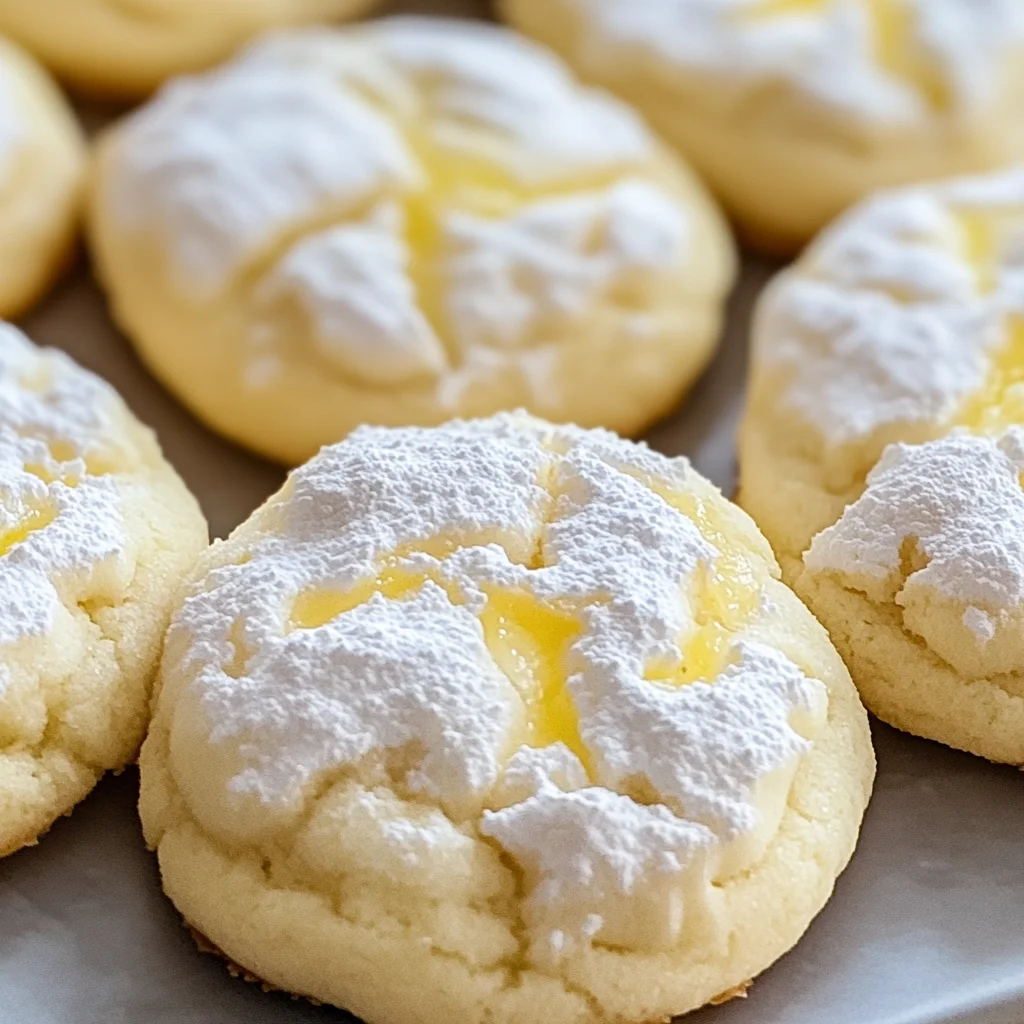
Ingredients:
Embarking on our culinary adventure begins with gathering some key ingredients that will work together in harmony to create these divine cookies.
-
1 cup (2 sticks or 226g) unsalted butter, softened to room temperature. This is crucial for creaming properly and creating that light, airy texture we’re aiming for in our Lemon Meltaway Cookies. If your butter is too cold, it won’t cream effectively; if it’s melted, your cookies will spread too much during baking. Always choose high-quality butter—preferably European-style butter with its rich fat content—for an even more luxurious result.
-
1/2 cup powdered sugar. Unlike granulated sugar, powdered sugar dissolves more easily into our cookie dough, helping achieve that melt-in-your-mouth quality we adore. It also lends sweetness without adding graininess to our finished product. Be sure to sift it before using if it’s clumpy; we want everything smooth and creamy!
-
1 tablespoon lemon zest. Here lies one of the stars of our show! Fresh lemon zest brings a concentrated burst of citrus aroma and flavor that elevates these cookies from ordinary to extraordinary. When purchasing lemons for zesting, look for firm ones with bright yellow skin—these yield maximum zestiness without bitterness.
-
2 tablespoons fresh lemon juice. Just as important as zest, fresh lemon juice adds brightness and acidity to balance out the richness of the butter and sugar in our cookies. Trust me on this: bottled lemon juice simply won’t cut it! Freshly squeezed juice provides a vibrancy that’s essential for those refreshing flavors.
-
1 teaspoon vanilla extract. This ingredient may seem humble compared to lemon’s boldness but offers an underlying warmth that beautifully rounds out the flavors in our cookies. Choose pure vanilla extract over imitation for genuine depth—your taste buds will thank you for it!
-
2 cups all-purpose flour. Flour is what gives structure to our cookies while allowing them to remain soft and delicate at heart—think clouds rather than bricks! When measuring flour, spoon it into your measuring cup instead of scooping directly from the bag; this avoids packing it down too tightly and ensures your cookies don’t end up dense.
-
1/4 teaspoon salt. A pinch of salt is non-negotiable here—it enhances sweetness and balances flavors like nothing else can! Without it, your cookies might taste one-dimensional or overly sweet; trust me when I say this tiny addition makes all the difference.
For the glaze:
-
1 cup powdered sugar (again). We’ll use powdered sugar here because it creates that silky-smooth finish we crave on top of each cookie without any graininess interrupting its charm.
-
2–3 tablespoons lemon juice (to taste). This will help us achieve just the right consistency: not too thick but also not runny enough to slide off our lovely cookies! Adjust according to how vivid you’d like those citrus notes to shine through in every drizzle.
-
1 teaspoon lemon zest (again!). Because can you ever really have too much lemon? This adds an extra zing to our glaze while echoing those flavors from within our meltaways.

Equipment You’ll Need:
Before diving into this delightful baking process, let’s ensure you have all your trusty tools ready at hand! Having the right equipment makes everything feel smoother and more enjoyable; think of them as essential partners in crafting something truly wonderful.
-
Mixing bowl: A sturdy mixing bowl is essential for combining ingredients efficiently without fear of spills or splatters! Opt for one made from glass or sturdy plastic so you can see exactly what’s happening inside as you mix.
-
Electric mixer: While some might enjoy old-fashioned elbow grease (and I commend those who do!), an electric mixer will save time and energy while ensuring perfect creaming results—those fluffy textures are vital for meltaway success!
-
Rubber spatula: This handy tool helps scrape down sides during mixing and folds ingredients gently together without deflating air bubbles—crucial for maintaining lightness!
-
Baking sheet: A good quality baking sheet allows even heat distribution which is key in achieving perfectly baked cookies! Choose one lined with parchment paper so they won’t stick during baking—a simple trick that makes life so much easier.
Now that we’ve got everything we need set up nicely around us let’s dive into creating these glorious Lemon Meltaway Cookies!
Step 1: Preheat Your Oven & Prepare Your Baking Sheet
Before anything else happens in this magic-making process, we need to preheat our oven to 175°C (350°F). This step isn’t merely about getting things hot; it’s about ensuring consistent cooking temperatures throughout which leads us toward golden perfection! While that’s warming up—which takes just a few minutes—we’ll line our baking sheet with parchment paper; this non-stick layer will allow easy removal later on without damaging those delicate cookies during transfer once baked!
Step 2: Cream Together Butter & Powdered Sugar
With our oven preheating beautifully away—and trust me when I say patience pays off here—we can turn our attention back inside where all fun awaits! Grab your mixing bowl and add softened unsalted butter along with half a cup of powdered sugar inside it before turning on your electric mixer at medium speed until things start feeling light and fluffy (about two minutes). You’ll know when it’s ready because it’ll appear pale yellow rather than that deep golden color we began with! This process known as creaming incorporates air into our mixture—the secret behind those tender textures we’re dreaming about—and sets us up fabulously for success ahead!
Step 3: Incorporate Zest & Juices
Now comes perhaps my favorite part—the uplifting addition of flavor boosters! Lower your mixer speed slightly before adding freshly grated lemon zest followed by both two tablespoons worth of fresh-squeezed lemon juice along with one teaspoon vanilla extract into your creamy concoction… Oh goodness gracious—the aroma wafting through my kitchen right now can only be described as pure sunshine! Mix gently until everything’s combined nicely—don’t rush this step since letting those vibrant notes mingle ensures each bite later reflects their profound satisfaction perfectly!
Step 4: Add Flour & Salt
Next up? It’s time for flour magic! Sift two cups’ worth directly over top while also sprinkling in one-quarter teaspoon salt alongside it—this tiny dash highlights sweetness beautifully whilst balancing richness within all other flavors harmoniously nestled inside here too! Using either spatula or mixer fitted paddle attachment blend until soft dough forms—take care not over-mix though because excess gluten development leads us astray toward tougher bakes rather than luscious meltaways we’re aiming toward here today…
Stay tuned as we continue through steps five through eight where we’ll shape these beauties into round bites ready for their moment in that warm oven awaiting us next…
Step 5: Gently Forming the Cookies
Now that your dough is beautifully mixed and has come together like a cozy hug, it’s time to shape these little gems into cookies that are just waiting to melt in your mouth. Take a moment to appreciate the lovely buttery scent wafting from your mixing bowl; this is where the magic begins! You’ll want to scoop out small portions of the dough, about one tablespoon each. I find that using a cookie scoop or even just your hands works wonderfully here. Just remember: the size matters! Keeping them uniform ensures even baking, which is absolutely paramount for achieving that perfect soft texture.
Once you have your dough balls formed, gently flatten them on the prepared baking sheet—this step is crucial. If you skip this, you might end up with puffy cookies rather than those delightful meltaways we’re after. Aim for about half an inch in thickness, as they will spread just enough while baking. As you place them on the parchment-lined sheet, give them a bit of space—about two inches apart will do nicely. This allows the heat to circulate around each cookie during baking and helps achieve that beautiful golden edge without browning too much. Trust me on this; you want that light golden hue rather than any darkening, which can turn these soft delights into something less appealing.
Step 6: Baking to Perfection
With your oven lovingly preheated to 175°C (350°F), it’s time for these cookies to take a short journey into the heat! Carefully slide your baking sheet into the center rack of the oven and set a timer for 10 minutes. Now, here’s where patience plays its role—don’t rush this step! Baking is as much an art as it is a science, so allow those cookies some time to transform from mere dough to fragrant morsels of joy.
As they bake, keep an eye on them—the edges should become ever-so-slightly set while the centers might still look a tad soft; this is perfectly normal and what we’re aiming for! Remember, we aren’t seeking any browning here; that would mean they’re overbaked and might lose their delightful meltaway quality. When the timer goes off, take a peek through the oven door instead of opening it right away; this way, you can observe how they’re rising and developing their charming shape without letting too much heat escape. If they appear just set but still pale in color, give them another minute or two but no more—overbaking will rob them of their tender texture.
Step 7: Cooling Down from Their Heated Adventure
Once your cookies have finished baking and are looking perfectly set (but not brown!), it’s time for them to come out of the oven and cool down a bit. Let them sit on the baking sheet for about five minutes before transferring them onto a wire rack. This resting period is vital because it allows them to firm up slightly; if you move them too quickly while they’re still warm and fragile, they might break apart or lose that gorgeous shape you’ve worked so hard to create.
This cooling phase also allows those heavenly scents to permeate your kitchen even more deeply—seriously, it’s like being wrapped in warmth and love! As they cool on the racks, resist the urge to dive right in; I know it’s tempting! Instead, take a moment to appreciate how far you’ve come with these little treats. They may not look like much yet—but once we add that luscious lemon glaze later on? Oh my goodness—it’ll be utterly intoxicating!
Step 8: The Glorious Glaze
Now comes one of my favorite parts—the lemon glaze! This finishing touch isn’t just an aesthetic detail; it elevates these cookies into something truly extraordinary with its sweet-tart flavor profile that perfectly complements their buttery softness. In a small mixing bowl, combine one cup of powdered sugar with two tablespoons of freshly squeezed lemon juice and one teaspoon of lemon zest. The zest adds another layer of bright flavor that dances on your taste buds—it’s non-negotiable!
Start with two tablespoons of lemon juice first; mix everything together until smooth and glossy—it should be thick enough to coat but not so thick that it doesn’t drizzle beautifully over your cooled cookies. If necessary, adjust by adding more lemon juice or powdered sugar until you reach that perfect consistency—you want it to flow gently off your spoon like liquid gold but still have enough body to cling adorably when drizzled atop each cookie.
Once you’ve got your glaze ready—and oh boy does it smell divine—grab those cooled cookies and prepare for a little artistic endeavor! Using either a spoon or a piping bag (if you’re feeling fancy), drizzle that glorious glaze over each cookie generously but elegantly—let it cascade down like sunshine pouring over flowers. Allow some time for the glaze to set slightly before diving in; this could take about 15-20 minutes at room temperature. Patience pays off here because once set, each bite becomes an exquisite blend of textures—the meltaway cookie enveloped in sweet citrus bliss!
Conclusion:
As we wrap up our journey through this delightful recipe, I can’t help but feel excited about sharing my love for these Lemon Meltaway Cookies with you! From the very first step of creaming that rich butter with powdered sugar to the final drizzle of sweet lemon glaze, this process encapsulates everything beautiful about baking: joy, creativity, and connection. The balance of zesty lemon with buttery goodness creates an utterly intoxicating experience that elevates these cookies beyond ordinary treats—the sheer joy they bring is simply profound.
This recipe is truly a must-try not just because it’s bursting with flavor but also because it invites you into the kitchen with open arms. Imagine gathering friends or family around as these cookies bake in your oven; their enchanting aroma wafts through your home like an invitation to indulge in something special. Whether it’s for afternoon tea, celebrations under sunny skies, or simple moments spent enjoying life’s little pleasures—these cookies shine on every occasion.
For serving suggestions that will elevate your experience even further: imagine savoring one with an icy glass of lemonade on a hot summer day—it’s like sunshine in cookie form! Or perhaps pair it with a cup of herbal tea as an afternoon pick-me-up; their lightness complements warm beverages beautifully. For a truly decadent experience, try crumbling one over vanilla ice cream—a delightful contrast that will leave everyone asking for seconds!
Feeling adventurous? This recipe is wonderfully adaptable! You could swap out lemon zest for orange or lime zest if you’re looking to change things up; each citrus brings its unique twist while still honoring that melt-in-your-mouth quality we adore. You might also consider folding in some poppy seeds for added texture and visual appeal—a vibrant nod to springtime freshness! Whatever variation you choose, I invite you to make this recipe yours by experimenting and discovering what makes it special for you. So roll up your sleeves, embrace this culinary adventure, and share your creations—I can’t wait to hear all about your delicious experiences!

Lemon Meltaway Cookies
- Total Time: 25 minutes
- Yield: Approximately 24 cookies 1x
Description
Discover how to make irresistible Lemon Meltaway Cookies that melt in your mouth! Try this refreshing recipe today and brighten up any occasion.
Ingredients
- 1 cup unsalted butter, softened
- 1/2 cup powdered sugar
- 1 tablespoon lemon zest
- 2 tablespoons fresh lemon juice
- 1 teaspoon vanilla extract
- 2 cups all-purpose flour
- 1/4 teaspoon salt
- 1 cup powdered sugar (for glaze)
- 2–3 tablespoons lemon juice (to taste, for glaze)
- 1 teaspoon lemon zest (for glaze)
Instructions
- Preheat your oven to 350°F (175°C) and line a baking sheet with parchment paper.
- In a mixing bowl, cream together softened butter and powdered sugar until light and fluffy.
- Add lemon zest, lemon juice, and vanilla extract; mix until well combined.
- Gradually add flour and salt; blend until a soft dough forms.
- Scoop tablespoon-sized portions of dough onto the prepared baking sheet, flattening each slightly.
- Bake for 10 minutes or until edges are set but cookies remain pale.
- Allow cookies to cool for five minutes before transferring them to a wire rack.
- In a small mixing bowl, combine one cup of powdered sugar with two tablespoons of freshly squeezed lemon juice and one teaspoon of lemon zest for the glaze. Adjust for consistency and drizzle over cooled cookies.
- Prep Time: 15 minutes
- Cook Time: 10 minutes
- Category: Dessert
- Method: Baking
- Cuisine: American
Nutrition
- Serving Size: 1 cookie
- Calories: 70
- Sugar: 4g
- Sodium: 20mg
- Fat: 4g
- Saturated Fat: 2g
- Unsaturated Fat: 2g
- Trans Fat: 0g
- Carbohydrates: 8g
- Fiber: 0g
- Protein: <1g
- Cholesterol: 15mg
Leave a Comment