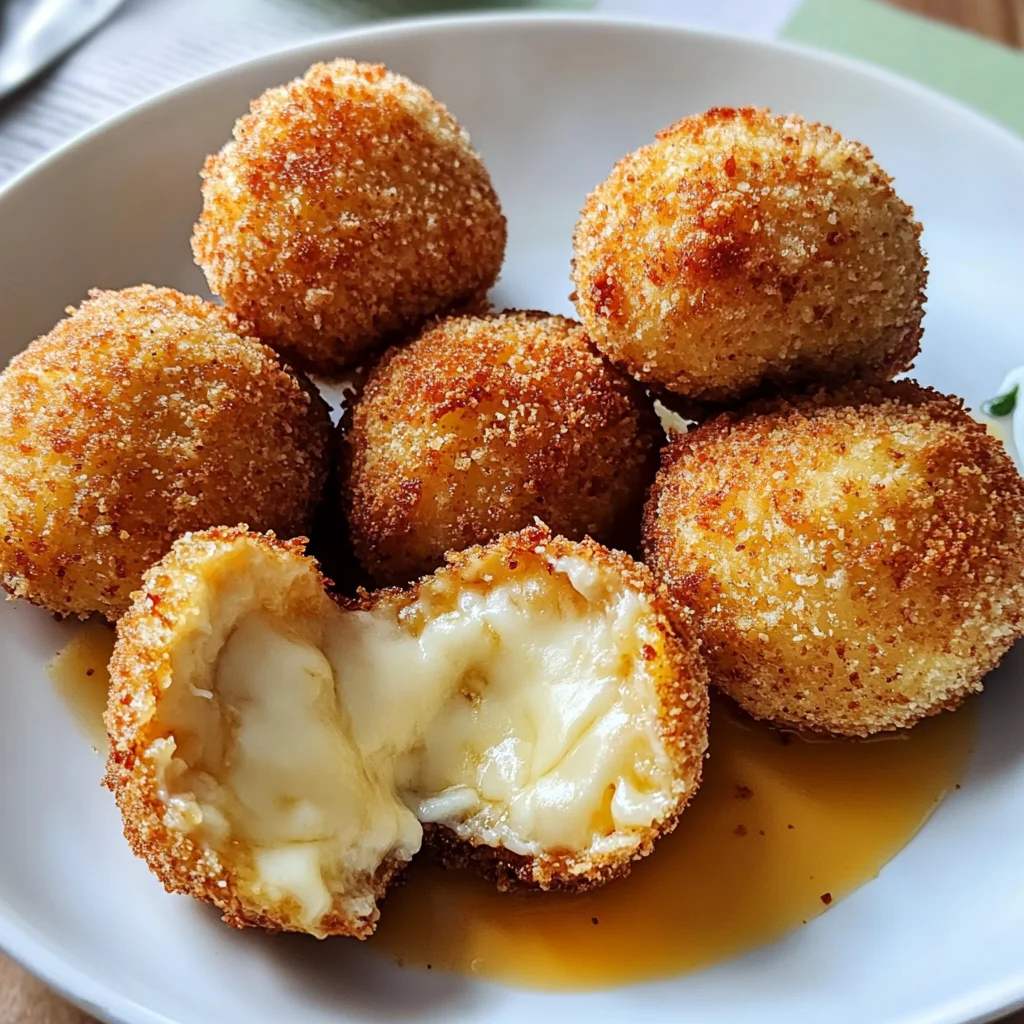
Craving a crispy, melty snack that comes together in minutes? The experience of savoring Air Fried Babybel Cheese is more than just enjoying food; it’s an exhilarating journey into the world of flavors and textures that make life so beautifully delicious. Imagine this: the moment you take a bite, your teeth sink into a golden, crunchy panko crust, giving way to an ooey-gooey center that stretches like liquid gold. It’s utterly intoxicating! Each bite is a symphony of flavors that dances on your palate, blending the savory richness of cheese with the satisfying crunch that air frying brings. This recipe transforms what could be an ordinary snack into a truly extraordinary treat that beckons you back for more.
What makes these Air Fried Babybel Cheese rounds so special? Well, they’re not just quick to prepare; they are also versatile enough to fit any occasion! Whether it’s game night, a casual get-together with friends, or even a cozy afternoon at home with your family, these cheesy delights will always steal the spotlight. They’re perfect for dipping in your favorite sauces (ranch or marinara anyone?) and make for an unforgettable appetizer that everyone will love. Trust me when I say—once you make these little bites of heaven, they’ll become a staple in your kitchen!
Air Fried Babybel Cheese: Cheesy Delight with a Crunch
Let’s embark on this culinary adventure together! Making Air Fried Babybel Cheese is as simple as it is delightful. With just a handful of ingredients and some easy-to-follow steps, you’ll soon be indulging in this warm, crispy snack that promises to elevate your snacking game. So roll up those sleeves and let’s get started!

Ingredients:
As we gather our ingredients for this delightful recipe, remember each one plays a crucial role in crafting those irresistible bites of goodness. Let’s explore what we need:
- 10 Babybel cheese rounds. These little treasures are the heart of our dish. Their creamy texture and rich flavor make them ideal for air frying; they melt beautifully while maintaining their shape thanks to their waxy rind. When selecting Babybel cheese, look for fresh ones — vibrant colors indicate quality. If you’re feeling adventurous, try different varieties such as light or even flavored options!
- 0.5 cup all-purpose flour. Flour acts as the first layer of protection around our cheese rounds. It creates a dry surface for the egg wash to adhere to and helps achieve that golden crust we crave. When choosing flour, opt for all-purpose unless you have specific dietary needs; its versatility is simply unmatched.
- 2 large eggs. Eggs bring moisture and binding power to our recipe — they’re essential for creating that luscious outer crust we adore! Be sure to use large eggs for consistency in size and richness; fresh eggs will yield better results since they whip up fluffier and provide better adhesion.
- 1 tablespoon milk. Just a splash of milk adds creaminess to our egg wash and helps create a richer flavor profile while ensuring that the egg mixture clings nicely to the cheese rounds as we coat them.
- 1 cup panko breadcrumbs. This is where the magic happens! Panko breadcrumbs are lighter and airier than traditional breadcrumbs, which means they crisp up beautifully in the air fryer without absorbing too much oil. They create an irresistibly crunchy exterior while keeping the insides perfectly gooey. If you can’t find panko, regular breadcrumbs will work too but may not yield quite the same crunch.
- 0.5 teaspoon garlic powder and 0.5 teaspoon onion powder. These two spices add depth and flavor to our breadcrumbs without overwhelming the delicate taste of the cheese itself. They contribute subtle yet impactful layers of taste that make each bite feel gourmet-like without requiring complex seasoning blends.
- 0.25 teaspoon smoked paprika. This ingredient introduces an aromatic smokiness that elevates our dish from simple to extraordinary! It complements both cheese and breading beautifully while offering color contrast that makes these bites visually appealing.
- Salt and pepper to taste. Seasoning is key! A pinch of salt enhances all flavors present in our dish while black pepper adds a touch of warmth without being overpowering.
- Olive oil spray (or any cooking spray). A light misting before cooking ensures we achieve that perfectly crisp finish without deep-frying — it’s essential for achieving golden perfection!
- Chopped parsley (optional) is perfect for adding freshness and color when garnishing your finished bites; it transforms our dish from good to exceptional visually!
Equipment You’ll Need:
Having the right tools makes all the difference when whipping up these delightful cheesy snacks! While they might not be “ingredients,” these trusty partners are essential for ensuring everything runs smoothly in your kitchen.
- Air fryer: The star appliance here! An air fryer circulates hot air around food creating crispiness similar to frying but with significantly less oil—making our Air Fried Babybel Cheese healthier yet still scrumptious! If you don’t have one yet, I highly recommend considering this tool as it opens doors to endless culinary possibilities beyond just this recipe!
- Three shallow bowls: These will be your assembly line for coating those cheese rounds efficiently! Shallow bowls help ensure easier access when dipping each piece rather than deep containers where things can get messy—trust me on this one!
- Paper towels: We’ll use these beauties for drying off moisture from our unwrapped Babybels before breading them; patting them dry ensures adherence during coating which means no soggy bottoms!
Now that we have everything gathered together let’s dive into preparing this mouthwatering treat!
Step 1: Setting Up Your Coating Station
First things first—let’s create an efficient setup by arranging three shallow bowls on your countertop or workspace: one filled with flour, another containing beaten eggs mixed with milk, and finally one brimming with seasoned panko breadcrumbs waiting eagerly! This assembly line approach streamlines coating each round effortlessly while minimizing mess—a crucial aspect when working with multiple components like in this recipe! Take care when measuring out flour; consider sifting if it’s clumpy so every layer sticks well later on during frying time!
Step 2: Preparing Your Cheese Rounds
Now it’s time for those adorable Babybel cheese rounds! Carefully unwrap each piece while enjoying their delightful waxy aroma—there’s something nostalgic about opening them up! Once unwrapped, gently dry them off using paper towels; removing excess moisture will help our coatings adhere better during frying so trust me—it’s non-negotiable here! Plus who wants soggy snacks?
Step 3: The Art of Coating
Dipping each dried round into flour comes next—this step sets us up beautifully by providing a dry surface upon which egg can cling easily later on! As you coat each piece evenly, take care not rush through it; ensuring complete coverage prevents any bare spots from forming during cooking which could lead undesirable textures later on—the goal here is full coverage folks! Afterward immerse them entirely into egg wash before rolling them gently within seasoned panko breadcrumbs until coated thoroughly again—don’t forget about flipping over halfway through so both sides get equal love!
Step 4: Freezing Time!
Once all rounds are beautifully coated in their crunchy armor (which looks absolutely divine), it’s time for some patience—we need these little gems chilled before hitting hot air! Pop them into freezer bags or place directly onto baking sheets lined with parchment paper then freeze briefly between 10–15 minutes max—trust me when I say this will help maintain shape during cooking plus yield superior texture once done frying compared without chilling prior.
Stay tuned—we’ll continue preparing these delightful snacks soon enough but if you’re already dreaming about munching down on warm Air Fried Babybel Cheese bites… well let’s just say happiness awaits ahead!
Step 5: Preheat and Prepare Your Air Fryer
Now that your Babybel rounds are perfectly breaded and chilled, it’s time to get our air fryer ready. This step is crucial because a well-prepared air fryer ensures that our little cheese morsels will cook evenly and develop that coveted golden crust. Preheat your air fryer to 380°F (193°C) for about 5 minutes. You might be wondering why preheating is so important—well, when you preheat, you’re not just warming up the appliance; you’re creating an environment similar to deep frying, where the hot air circulates quickly around the food. This rapid circulation helps to achieve that crispy exterior while keeping the inside gooey and melty.
While your air fryer is heating up, take this moment to lightly grease the basket with an olive oil spray. A gentle coating will help prevent sticking, which can sometimes happen even with non-stick baskets. Trust me on this one—it’s utterly heartbreaking to pull out a batch of beautiful cheese bites only to find them clinging stubbornly to the basket. A little oil makes all the difference in achieving a smooth release and allows those glorious flavors to shine through without any interference.
Step 6: Air Frying Process – The Magic Unfolds
Once your air fryer has reached the perfect temperature, it’s time for the exciting part: placing those beautifully breaded Babybel rounds into the basket! Arrange them in a single layer, ensuring there’s enough space between each piece for the hot air to circulate freely; think of it as giving each cheese round its own cozy space where they can blossom into crispy perfection. If you crowd them together, you risk dampening their crispiness, and nobody wants that!
Before closing the lid, give those panko-coated beauties a light spray with olive oil once more. This step isn’t just about aesthetics; it plays a pivotal role in developing that stunning golden-brown color we all love. The oil essentially acts as a conductor for heat, helping the breadcrumbs toast beautifully without burning. Now set your timer for 5–7 minutes of cooking time. Have a peek halfway through—flipping each piece gently with tongs is essential for even browning on both sides. As they cook away, you’ll start catching delightful whiffs of melting cheese mingling with toasty breadcrumbs; it’s an aroma that promises sheer delight!
Step 7: Resting Time – Patience Pays Off
As your Air Fried Babybel Cheese rounds finish cooking and turn beautifully golden brown, they’re going to need just a moment of rest before diving in—a crucial yet often overlooked step! Carefully transfer them onto a plate lined with paper towels or a cooling rack if you have one handy; this will absorb any excess oil and help maintain their crispness as they cool slightly. I know how tempting it is to grab one right off the hot tray; however, giving them 1–2 minutes will allow the molten cheese inside to settle just enough so you can enjoy every delicious bite without burning your tongue.
This resting period also allows flavors to meld together while enhancing that delightful texture contrast between crispy exterior and creamy interior—trust me on this! If you dive in too quickly, while it may feel satisfying at first, you might end up with cheese lava all over your hands (though honestly, what a glorious mess that would be!). So take this moment of anticipation; play around with some dipping sauce ideas or prep some fresh herbs like parsley for garnish—this is where creativity shines!
Step 8: Presentation – Elevating Your Snack Game
Now comes perhaps my favorite part—the final presentation! With your Air Fried Babybel Cheese resting perfectly on their plate, it’s time to make them look as delicious as they taste. If you’ve chosen to use chopped parsley as an optional garnish (which I highly recommend for that touch of freshness), sprinkle it generously over your golden bites—this adds not only visual appeal but also an aromatic herbal note that brightens everything up beautifully.
For serving suggestions, consider pairing these cheesy delights with sauces that complement their rich flavors—think marinara sauce for a classic twist or even a tangy yogurt-based dip for something lighter. The contrast between creamy melted cheese and zesty dips creates such an extraordinary symphony of flavors that will have everyone coming back for more! And remember—the joy of sharing these delightful treats is half the fun! Set them out at your next gathering or lunchbox surprise and watch as smiles spread across faces young and old alike.
Final Thoughts: Enjoying Every Bite
So there you have it! Your incredible Air Fried Babybel Cheese is ready to shine on any table or snack platter. It’s amazing how something so simple can transform snack time into an experience filled with joy and laughter. I promise you, once you take that first bite and experience the warm gooeyness paired with crunchiness, you’ll understand why this recipe has become one of my all-time favorites!
I encourage you to experiment with different seasoning blends in your breadcrumbs or even try using other types of cheese if you’re feeling adventurous—the possibilities are endless! Enjoy sharing these little treasures with friends and family because food is always better when it’s shared—and nothing brings people together like good snacks!
Storage and Enjoyment Tips for Your Air Fried Babybel Cheese
Now that you’ve made these delicious Air Fried Babybel Cheese bites, the real fun begins! Picture yourself savoring that first crispy crunch, followed by an explosion of warm, gooey cheese. It’s a moment of pure joy! But if you find yourself with leftovers (which might be hard to believe), I have some great tips for storing them so you can relish this delightful snack again later.
Storing Leftover Air Fried Babybel Cheese
To keep your leftover Air Fried Babybel Cheese in tip-top shape, it’s best to store them in an airtight container. This not only helps preserve their delightful crunch but also prevents any unwanted moisture from sneaking in. If you’re thinking about how long they’ll last, you can enjoy them for up to three days when stored properly in the refrigerator. For maintaining that irresistibly crispy texture, consider placing a slice of bread in the container alongside the cheese; it acts like a little sponge, absorbing excess moisture. Trust me on this one—it makes all the difference! When it comes to reheating, simply pop them back into the air fryer for a few minutes until they’re warmed through and crispy again. You’ll be amazed at how close they taste to freshly made!
Freezing Air Fried Babybel Cheese for Later
If you’re looking to extend the joy of these cheesy delights even further, freezing is an excellent option! To do this properly, allow your Air Fried Babybel Cheese to cool completely before arranging them in a single layer on a baking sheet and placing them in the freezer until solid. Once frozen, transfer them to a sealed freezer bag or container where they’ll happily reside for up to two months. The convenience factor here is monumental—imagine having these scrumptious bites ready at your fingertips whenever cravings strike! When you’re ready to indulge again, there’s no need to defrost; just throw them straight into the air fryer from frozen and enjoy that crispy goodness once more. Isn’t that just magnificent?

Air Fried Babybel Cheese
- Total Time: 22 minutes
- Yield: Serves 5 (2 cheese rounds per serving) 1x
Description
Indulge in the irresistible delight of Air Fried Babybel Cheese, where crispy meets gooey in every bite! These golden, panko-crusted cheese rounds are quick to prepare and perfect for any occasion—from game night to a cozy family gathering. The crunchy outer layer gives way to a warm, melty center that’s simply addictive. Pair them with your favorite dipping sauces like marinara or ranch, and watch them disappear in no time. With minimal ingredients and straightforward steps, you can elevate snack time into a gourmet experience that will have everyone coming back for more!
Ingredients
- 10 Babybel cheese rounds
- 0.5 cup all-purpose flour
- 2 large eggs
- 1 tablespoon milk
- 1 cup panko breadcrumbs
- 0.5 teaspoon garlic powder
- 0.5 teaspoon onion powder
- 0.25 teaspoon smoked paprika
- Salt and pepper to taste
- Olive oil spray
- Chopped parsley (optional)
Instructions
- Set up three shallow bowls: one with flour, one with beaten eggs mixed with milk, and one with seasoned panko breadcrumbs.
- Unwrap the Babybel cheese rounds and pat them dry with paper towels.
- Coat each cheese round in flour, then dip into the egg mixture, followed by rolling in panko breadcrumbs until fully covered.
- Place coated rounds on a baking sheet and freeze for 10–15 minutes.
- Preheat air fryer to 380°F (193°C) for 5 minutes and lightly grease the basket.
- Arrange cheese rounds in a single layer in the air fryer basket, spraying lightly with olive oil.
- Cook for 5–7 minutes, flipping halfway through until golden brown.
- Let cool for a couple of minutes before serving, garnished with chopped parsley if desired.
- Prep Time: 15 minutes
- Cook Time: 7 minutes
- Category: Snack/Appetizer
- Method: Air Frying
- Cuisine: American
Nutrition
- Serving Size: 2 cheese rounds (60g)
- Calories: 240
- Sugar: 1g
- Sodium: 550mg
- Fat: 16g
- Saturated Fat: 8g
- Unsaturated Fat: 8g
- Trans Fat: 0g
- Carbohydrates: 18g
- Fiber: 1g
- Protein: 10g
- Cholesterol: 160mg


Leave a Comment