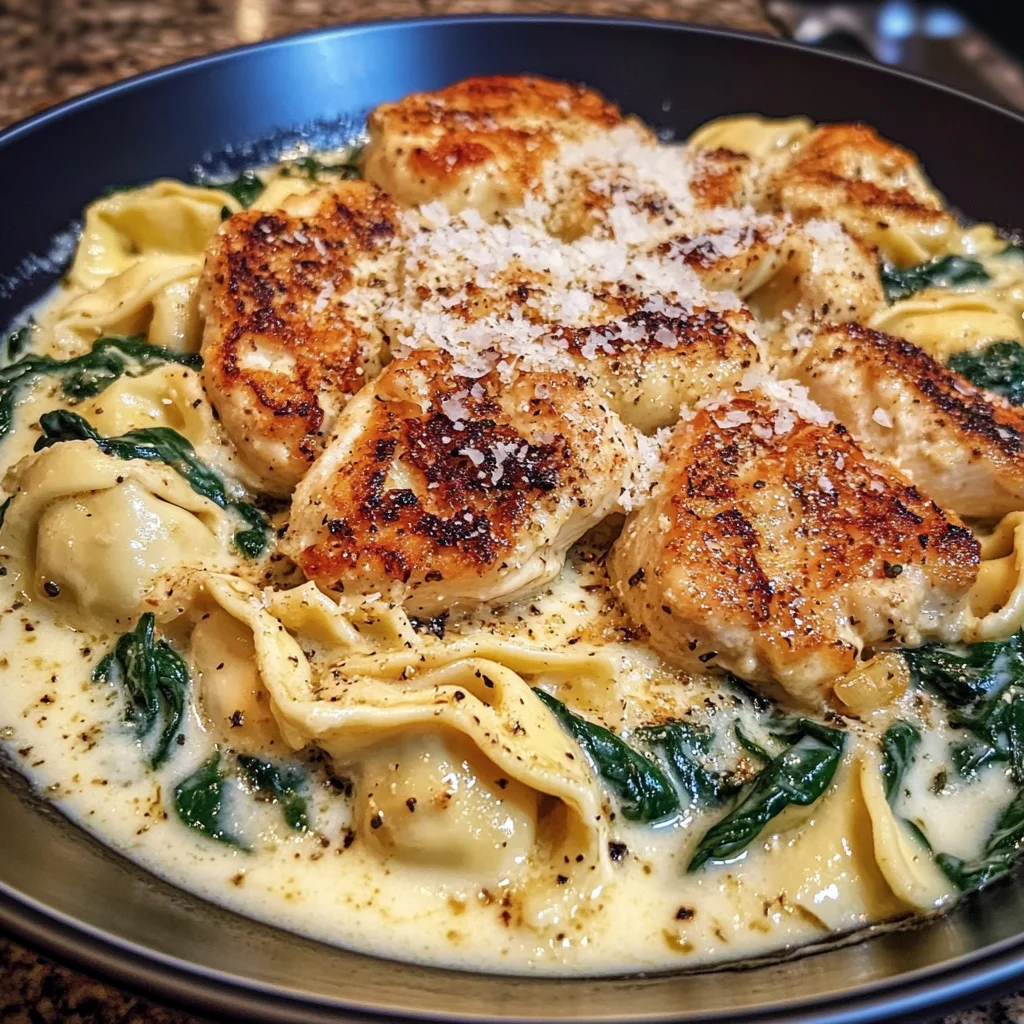
There’s something utterly enchanting about the way food brings people together, isn’t there? When I think of my favorite moments in life, so many are enveloped in the warm embrace of a kitchen filled with laughter, the tantalizing aroma of simmering dishes, and friends gathered around a table. That’s what my Creamy Chicken Tortellini with Spinach and Garlic Parmesan Cheese embodies—a delightful fusion of flavors that feels like a warm hug on a chilly evening or an effortless centerpiece for any gathering. Each forkful is a celebration, a reminder of the joys of home cooking that transcends mere sustenance to become an experience—an exhilarating journey of flavor and texture that dances on your palate.
As I dive into this recipe, I can’t help but feel the excitement bubbling within me as I recall how it came to be one of our family favorites. My friends often ask me for quick yet satisfying meals they can whip up after long days at work or busy weekends. This recipe is nothing short of a revelation; it balances creamy richness with vibrant spinach and the comforting familiarity of cheese tortellini. It’s perfect for those cozy nights when you want something hearty without spending hours in the kitchen. Trust me—once you try this dish, you’ll find it creeping into your regular rotation, too!
Creamy Chicken Tortellini with Spinach and Garlic Parmesan Cheese: A Hug in a Bowl
This dish is more than just pasta; it’s an experience that wraps you in warmth and comfort. The combination of tender chicken, pillowy cheese tortellini, and silky creamy sauce creates an indulgent meal that’s perfect for any occasion. Whether you’re feeding a crowd or enjoying a quiet night in, this recipe promises to deliver satisfaction in every bite.
Ingredients:
Embarking on this culinary journey begins with gathering our ingredients—each one plays an essential role in crafting our Creamy Chicken Tortellini with Spinach and Garlic Parmesan Cheese. Let’s take a closer look at each component to understand their importance!
- 1.5 lbs boneless, skinless chicken breasts. This lean protein is absolutely paramount to our dish’s heartiness. Choosing boneless and skinless chicken breasts not only makes preparation easier but also ensures that we’re left with tender chunks that soak up all the lovely flavors we’ll create. Look for chicken breasts that feel firm yet slightly springy, avoiding any that seem slimy or have an off odor. When cooked properly, these will become juicy morsels that elevate our tortellini to new heights.
- 1/2 cup chicken broth. Here lies the magic ingredient! Chicken broth infuses moisture into our dish while enhancing the overall depth of flavor. Opt for low-sodium versions so you can control the seasoning later—this is crucial! When you add this liquid gold to our pan, it will simmer away beautifully alongside other ingredients, creating an irresistible base for our creamy sauce.
- 1 20 oz package frozen cheese tortellini. The star of the show! Frozen cheese tortellini saves us time while delivering delightful pockets filled with creamy goodness. They cook quickly and provide a comforting texture that pairs perfectly with our luscious sauce. If you’re feeling adventurous, homemade tortellini is always an option; however, I promise you won’t be disappointed by the convenience and taste of high-quality store-bought varieties.
- 1 cup heavy cream. Ahh, the heavy cream—a true game-changer! This ingredient transforms our dish from simple to indulgent by adding richness and velvety texture that coats every piece of pasta lovingly. It also helps bind everything together seamlessly, creating an almost luxurious mouthfeel that’s profoundly satisfying.
- 1/2 cup grated Parmesan cheese plus more for topping. Parmesan cheese adds both sharpness and depth to our creamy sauce—it’s like adding a sprinkle of umami magic! Always opt for freshly grated cheese when possible; it melts better and enhances flavor far beyond pre-grated options due to its fresher oils retaining potency.
- 1/4 cup shredded mozzarella cheese. This addition makes every bite even cheesier (and who doesn’t love that?). Mozzarella provides gooeyness that’s simply irresistible when melted alongside the other cheeses—trust me on this one! And don’t skimp on quality; fresh mozzarella adds an exceptional taste compared to processed versions.
Now that we’ve gathered all these fabulous ingredients let’s get ready to bring our Creamy Chicken Tortellini with Spinach and Garlic Parmesan Cheese to life!
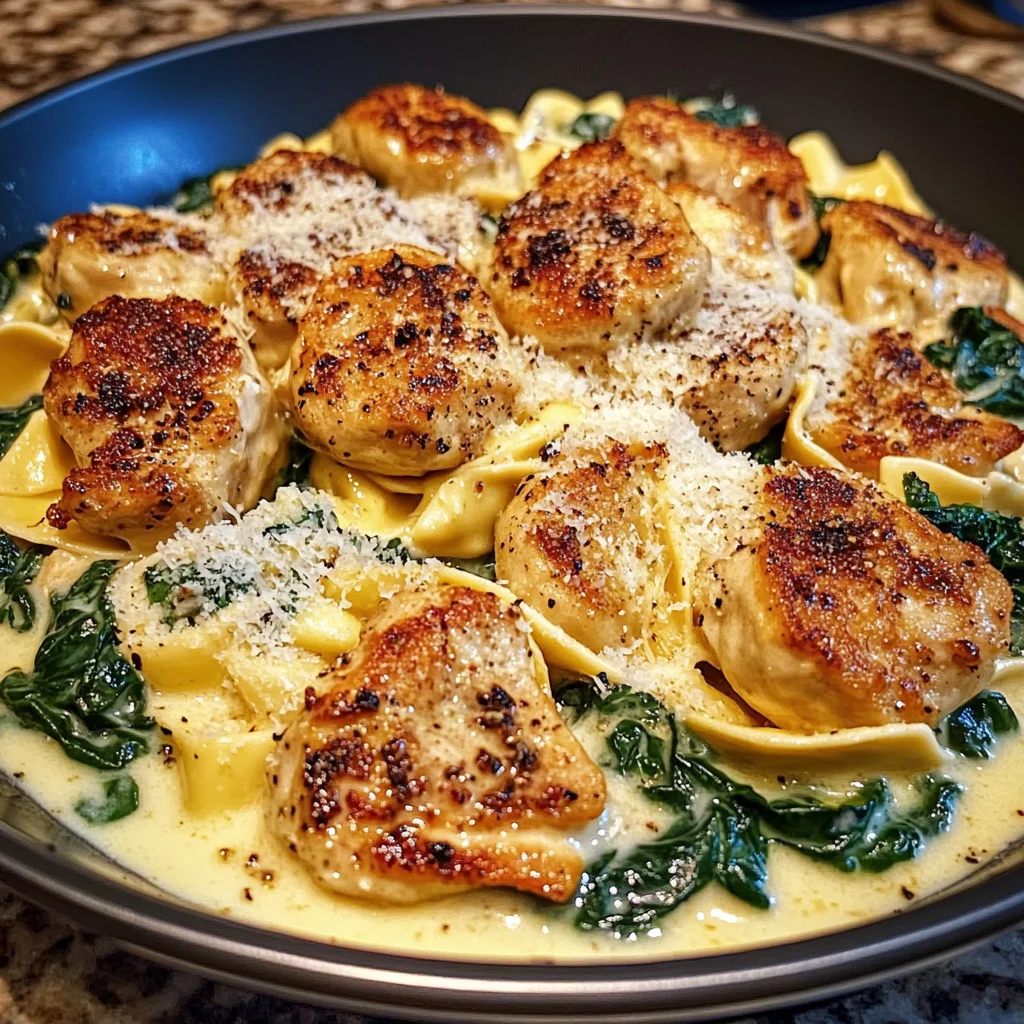
Equipment You’ll Need:
Before we dive into cooking, let’s talk about some essential tools that will make your experience smoother and more enjoyable. Having the right equipment isn’t just about convenience; it allows us to focus on creating delicious food without unnecessary stress.
- Large pot – A sturdy large pot is essential for boiling your tortellini perfectly without overcrowding them—you want them to have enough space so they cook evenly and don’t stick together! Choose one with a lid so your broth can come up to temperature quickly during cooking.
- Skillet or sauté pan – A wide skillet or sauté pan will be your best friend here! It provides ample surface area for browning the chicken beautifully while allowing room for everything else we’ll add later—think about how lovely it’ll look when all those colors come together!
- Wooden spoon or spatula – A trusty wooden spoon or spatula is non-negotiable when stirring sauces gently without scratching your pans—that’s important for preserving their non-stick surfaces! Plus, using wood adds a personal touch as you mix everything together.
- Meat thermometer (optional) – While not required, having a meat thermometer on hand can give you peace of mind when cooking chicken breasts—you want them cooked through but still juicy! Aim for an internal temperature of 165°F (75°C) to ensure they’re safe yet tender.
Now that we’ve got our tools lined up like loyal sous-chefs waiting patiently beside us let’s roll up our sleeves and begin crafting this delicious meal together!
Preparing the Creamy Chicken Tortellini with Spinach and Garlic Parmesan Cheese
Step 1: Sautéing the Chicken
Start by heating your skillet over medium-high heat until it’s nice and hot—you should feel anticipation building as you get ready because this step sets the tone for everything else! Add just enough oil (about 1 tablespoon) to coat the bottom lightly; it will help prevent sticking while giving your chicken beautiful browning marks that contribute incredible flavor through caramelization—a process where natural sugars turn golden brown under heat.
Carefully add your seasoned chicken breasts (I usually season mine lightly with salt and pepper) into the hot skillet—listen closely as they hit the pan; you’ll hear that satisfying sizzle indicating good things are happening! Allow them to cook undisturbed for about 6-7 minutes per side until they reach golden perfection while cooking through entirely (check those juices!). If you rush this step by flipping too soon or overcrowding them in one batch instead of letting them breathe freely among themselves… well let’s just say you’ll miss out on those lovely textures we’re after!
Step 2: Building Flavor
Once your chicken is beautifully browned on both sides (and oh-so-aromatic), remove it from heat temporarily onto a plate while we build even more flavor magic in that same skillet—we’re not wasting anything here! Pour half a cup of chicken broth into the hot pan—it’ll sizzle upon contact—and use your wooden spoon to scrape up all those tasty browned bits stuck at its bottom—the French call this ‘deglazing,’ which essentially releases concentrated flavors back into our dish.
Let this broth simmer down gently until reduced slightly—this should take about 3 minutes or so—for deeper flavor infusion before bringing back those succulent chicken pieces alongside their juices again into play along with two cups packed full of fresh baby spinach leaves—they’ll wilt down beautifully as they mingle together harmoniously within moments!
Step 3: Creating Our Creamy Sauce
Now comes my favorite part—the addition of heavy cream! Pour one cup gradually over everything while stirring gently until combined—that luscious liquid will transform right before your eyes into something utterly intoxicating as it melds in harmony with both brothy goodness from earlier plus cheesy delights we’ll soon introduce! It’s truly sensational—the way everything thickens ever so slightly as flavors marry beautifully—it’s almost like watching art come alive!
Make sure not to rush here; allow time for simmering gently just enough until bubbling starts around edges before lowering heat down low enough where gentle bubbles continue dancing across surface without boiling furiously—that would be disastrous since nobody wants curdled cream ruining their masterpiece!
Step 4: Finishing Touches
At last—but certainly not least—we get ready now by adding glorious cheeses: start sprinkling half-a-cup freshly grated Parmesan followed by quarter-cup shredded mozzarella right atop swirling mixture thoughtfully since both melt effortlessly within seconds creating divine creaminess throughout every nook & cranny present inside those tender tortellinis waiting patiently nearby… Ahhh!!! So close now!!
Once melted thoroughly throughout ensuring even distribution occurred among all ingredients then bring forth twenty ounces frozen cheese tortellini finally—gently toss them around within saucy surroundings until fully coated evenly while checking if further adjusting seasoning might be needed via taste testing at this stage…
Every moment spent crafting these elements builds towards creating something profoundly extraordinary together—you’re truly doing fantastic work here!!
Stay tuned as we continue diving deeper into completing this culinary adventure soon…
Step 5: Searing the Chicken to Perfection
Now that we have our chicken breasts prepped and ready, it’s time to give them a beautiful sear that will create a mouthwatering crust while locking in all those juicy flavors. Start by heating a large skillet over medium-high heat and adding a splash of olive oil—just enough to coat the bottom of the pan, but not so much that it pools. You want it shimmering like liquid gold before introducing the chicken. This step is crucial because searing not only enhances the flavor through caramelization but also creates that stunning golden-brown color, which is utterly intoxicating both to the eyes and palate.
Carefully place the chicken in the hot skillet, making sure not to overcrowd the pan; this ensures even cooking and prevents steaming, which can lead to rubbery textures. The key here is patience—don’t rush this step! Allow the chicken to sear undisturbed for about 5-7 minutes on one side until it develops that lovely golden crust. When you flip it over, you should hear a satisfying sizzle; that’s your cue that perfection is happening! Cook for an additional 5-7 minutes on the second side until cooked through, reaching an internal temperature of 165°F (75°C). Once done, transfer your beautifully seared chicken to a cutting board and let it rest for about 5 minutes before slicing. This resting period allows the juices to redistribute throughout the meat, ensuring every bite is profoundly satisfying.
Step 6: Creating Your Flavorful Base
With our succulent chicken resting comfortably, let’s focus on creating a mesmerizing base for our creamy sauce. In the same skillet where you seared your chicken—yes, don’t wash it just yet!—add another drizzle of olive oil if needed and toss in several cloves of minced garlic. As the garlic hits the pan, it will release its aroma into your kitchen, creating an atmosphere of warmth and welcome that will make everyone’s mouth water in anticipation. Sauté the garlic for about 1-2 minutes until fragrant but be careful not to let it brown too much; burnt garlic can become bitter and ruin your dish.
Next, pour in your chicken broth—it acts as both a flavor enhancer and a way to scrape up all those delightful browned bits from the bottom of the skillet. This technique is called deglazing, and trust me when I say these bits are pure flavor gold! Use a wooden spoon or spatula to gently scrape away any stuck pieces as you bring this mixture to a simmer. It’s important not only for taste but also for texture; these little morsels add depth to our sauce. Allow this mixture to bubble gently for about 3-4 minutes until reduced slightly—it should be visibly thicker but still pourable. This step builds layers of flavor that will meld beautifully with your creamy tortellini!
Step 7: The Creamy Transformation
Now we’re approaching one of my favorite parts: transforming our flavorful base into something truly luxurious! With your broth bubbling away nicely, it’s time to introduce our heavy cream into this concoction. Pour in one cup of heavy cream slowly while stirring continuously; watching it swirl together with those aromatic garlic-infused flavors is like witnessing magic unfold right before your eyes! As this comes together over medium heat, you’ll see how quickly it thickens into a velvety sauce.
At this point, add in half a cup of grated Parmesan cheese along with a sprinkle of salt and freshly cracked black pepper to taste. Stir vigorously until everything is combined well; with each whisking motion, you’re infusing richness into this dish that elevates it from ordinary to extraordinary! The cheese will melt gracefully into the sauce—this is where things get really exciting because you’re crafting something undeniably creamy. Be mindful here; if you let it boil too vigorously after adding the cream and cheese, it may curdle instead of remaining smooth. Keep an eye on your heat level; gentle simmering is ideal for achieving that perfect creamy consistency we’re after.
Step 8: Bringing It All Together
With our sauce now rich and silky smooth, it’s time for one final flourish before we dig in! First things first: let’s cook those tortellini according to package instructions in a pot of salted boiling water—this will typically take around 3-4 minutes if you’re using frozen tortellini. Make sure they float to the surface when they’re done; that’s their way of telling you they’re ready to party! While they cook away blissfully in their boiling bath, let’s ensure we’ve got everything else prepped.
Once drained (but don’t rinse them!), gently fold those tender tortellini into your luscious cream sauce along with some fresh spinach leaves. The spinach will wilt beautifully as it’s stirred into this comforting mixture—trust me on how fantastic this looks and smells together! This step is absolutely paramount because as each tortellini gets coated in that creamy goodness infused with garlic and cheese, they soak up every bit of flavor surrounding them. Continue cooking everything together just long enough for those flavors to meld—around another 2-3 minutes on low heat should do wonders without losing any vibrancy from your spinach.
Conclusion:
As we wrap up our culinary journey through crafting this Creamy Chicken Tortellini with Spinach and Garlic Parmesan Cheese, I hope you’ve felt my excitement along the way! Each step of this recipe—from sautéing that aromatic garlic until golden brown to folding in tender spinach—is infused with passion and warmth, making every moment in the kitchen feel truly special. It’s not just about combining ingredients; it’s about creating a dish that nourishes both body and soul—a symphony of flavors that dances together in harmony.
This recipe is undeniably a must-try for several reasons beyond its mouthwatering taste. The joy of making it is palpable; whether you’re cooking for yourself after a long day or gathering friends around the table for laughter and conversation, there’s something magical about sharing a meal crafted with love. Imagine pulling out that bubbling pot from the stove—the aroma enveloping everyone like a warm hug—as each person eagerly scoops their portion onto their plates. It’s moments like these that make cooking worthwhile!
When it comes time to serve this delightful dish, think about pairing it with something equally comforting yet refreshing—a crisp green salad drizzled with tangy vinaigrette would complement those rich flavors perfectly! For an afternoon pick-me-up, why not add slices of crusty bread brushed with olive oil? And if you’re feeling indulgent (which I wholeheartedly encourage), serve alongside buttery garlic knots for an utterly decadent experience; trust me on this one!
Feeling adventurous? This recipe is wonderfully adaptable! You could swap out spinach for kale or even toss in some sun-dried tomatoes for added depth—each variation enhancing or transforming your dish into something new and exciting. Or perhaps add some sautéed mushrooms for an earthy twist? The possibilities are endless! So gather your ingredients, give this recipe a try, and don’t forget to share your experience—I’d love to hear how yours turns out! Cooking is meant to be shared, cherished, and celebrated together.
Creamy Chicken Tortellini with Spinach and Garlic Parmesan Cheese
- Total Time: 40 minutes
- Yield: Serves 6
Description
Indulge in this Creamy Chicken Tortellini with Spinach and Garlic Parmesan Cheese that’s rich in flavor—perfect for cozy dinners at home!
Ingredients
- 1.5 lbs boneless, skinless chicken breasts
- 1/2 cup chicken broth
- 20 oz frozen cheese tortellini
- 1 cup heavy cream
- 1/2 cup grated Parmesan cheese (plus more for topping)
- 1/4 cup shredded mozzarella cheese
- 2 cups packed fresh spinach
- Minced garlic (to taste)
- Olive oil (for cooking)
- Salt and pepper (to taste)
Instructions
- Heat olive oil in a large skillet over medium-high heat. Season the chicken breasts with salt and pepper, then sear them for 6-7 minutes on each side until golden brown and cooked through. Remove from the skillet and let rest.
- In the same skillet, add minced garlic and sauté until fragrant. Pour in chicken broth and deglaze the pan by scraping up browned bits; let it simmer for about 3 minutes.
- Lower the heat, then add heavy cream slowly while stirring continuously. Incorporate grated Parmesan cheese until melted and well combined.
- Stir in fresh spinach until wilted. Add frozen tortellini to the sauce, coating them thoroughly as they cook for an additional 3-4 minutes.
- Slice the rested chicken and mix it back into the skillet before serving. Top with additional Parmesan cheese if desired.
- Prep Time: 15 minutes
- Cook Time: 25 minutes
- Category: Dinner
- Method: Sautéing
- Cuisine: Italian
Nutrition
- Serving Size: 1 cup (approximately 300g)
- Calories: 550
- Sugar: 4g
- Sodium: 700mg
- Fat: 28g
- Saturated Fat: 15g
- Unsaturated Fat: 10g
- Trans Fat: 0g
- Carbohydrates: 50g
- Fiber: 3g
- Protein: 34g
- Cholesterol: 150mg
Leave a Comment