There’s something incredibly magical about the act of cooking, isn’t there? It’s not just about nourishing our bodies; it’s about creating connections, sharing moments, and weaving stories through flavors. As I stand at my kitchen counter, the scent of fresh herbs mingling with the earthy aroma of grilled dough fills the air, and I can’t help but feel a wave of nostalgia wash over me. This Grilled Honey Goat Cheese Pizza is more than just a recipe; it’s a celebration of simplicity and elegance that brings together creamy goat cheese, nutty pecans, fragrant sage, and a drizzle of golden honey. Each bite is a symphony of flavors that dances on your palate, transporting you to sun-drenched picnics or cozy gatherings with friends. Trust me when I say this: once you experience this dish, it will become your go-to for any occasion.
What makes this Grilled Honey Goat Cheese Pizza truly special is its delightful contrast between sweet and savory elements. The tangy goat cheese melts beautifully over the warm crust while the honey adds a luscious sweetness that perfectly complements the crunch of the pecans and the aromatic sage. It’s an extraordinary balance that speaks to our love for rich, layered flavors that evoke both comfort and joy. Whether you’re hosting a casual dinner party or enjoying a quiet night in with loved ones, this pizza will undoubtedly impress everyone who takes a bite—and it’ll have them asking for seconds! So gather around your grill, because we’re about to embark on a culinary journey that’s as rewarding as it is delicious.
Grilled Honey Goat Cheese Pizza: A Flavorful Adventure Awaits!
If you’re looking for an easy yet impressive vegetarian dish to whip up, you’ve stumbled upon pure gold! This Grilled Honey Goat Cheese Pizza combines all my favorite ingredients into one unforgettable experience. It’s simple enough for a weeknight meal but fancy enough to serve at any gathering. The smoky notes from the grill pair magnificently with the creamy goat cheese and crunchy pecans—truly irresistible! Let me guide you through making this pizza so you can savor each moment just as much as every delicious bite.
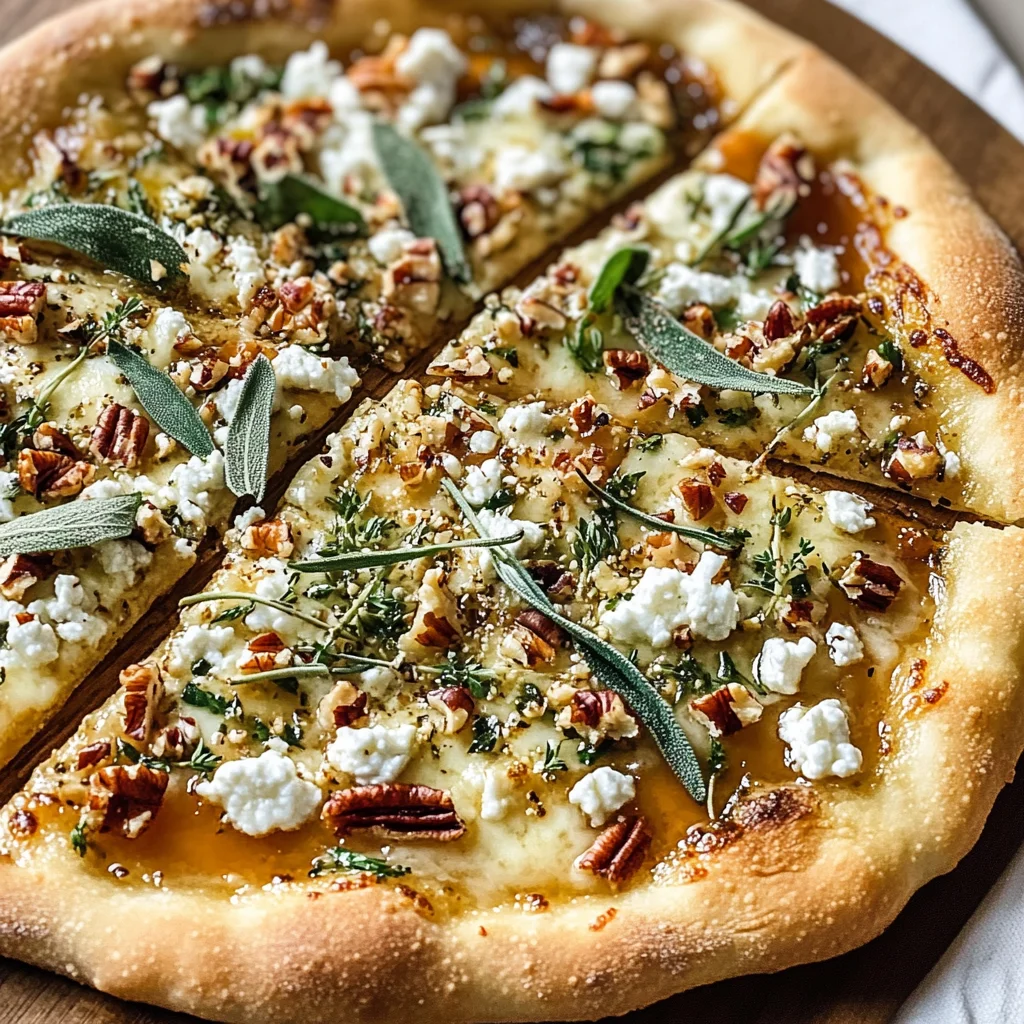
Ingredients:
As we dive into our ingredient list, I want you to think about how each element plays its part in crafting this delightful dish. From the base crust to the toppings, every ingredient has its own story to tell—let’s explore them together!
- 1 lb. pizza dough or 1 tube Pillsbury thin crust dough. The foundation of our pizza is crucial because it holds all those beautiful toppings together. You can use homemade dough if you’re feeling adventurous or opt for Pillsbury for convenience without compromising taste. If you choose homemade dough, let it rise properly; this will yield a light and airy crust that contrasts beautifully with our toppings. If using store-bought dough, simply unroll it and shape it into your desired size—it’s all about ease here!
- 4 oz. soft goat cheese (crumbled). This creamy dream ingredient brings an exceptional tanginess that elevates our pizza from ordinary to extraordinary. Goat cheese melts beautifully on the grill while maintaining its shape somewhat, allowing you to enjoy its rich flavor without turning into a puddle of gooeyness. When selecting goat cheese, look for fresh options from local farms if possible; they often have vibrant flavors and creamier textures compared to mass-produced varieties.
- 1/4 c. chopped pecans. These little gems add not only crunch but also a delightful nuttiness that balances out the creaminess of the goat cheese beautifully. Roasting them briefly before chopping can intensify their flavor even further—don’t skip this step! If you’re nut-sensitive or need an alternative, consider sunflower seeds or pumpkin seeds for similar texture without compromising on that satisfying crunch.
- 2/3 c. shaved Parmesan. While not traditionally associated with goat cheese pizzas, Parmesan offers depth and umami flavor that rounds out our topping ensemble perfectly. Its sharpness complements both sweet and savory elements beautifully! Look for high-quality aged Parmigiano-Reggiano if you can; its complex profile will make all the difference in your final product.
- 2 Tbsp. fresh sage (finely chopped). Fresh herbs are essential when crafting flavorful dishes! Sage contributes an earthy aroma that pairs exquisitely with both honey and cheese—this combination is truly divine! Be sure to chop your sage finely; larger pieces can overwhelm other flavors rather than harmonize with them.
- 2 Tbsp. honey. The star ingredient here—honey drizzled over hot pizza transforms every slice into pure bliss! Its sweetness contrasts beautifully against the savory components while adding an aromatic touch that’s utterly intoxicating! For something unique, try using flavored honey infused with herbs or spices—it can add another layer of complexity that’s simply irresistible.
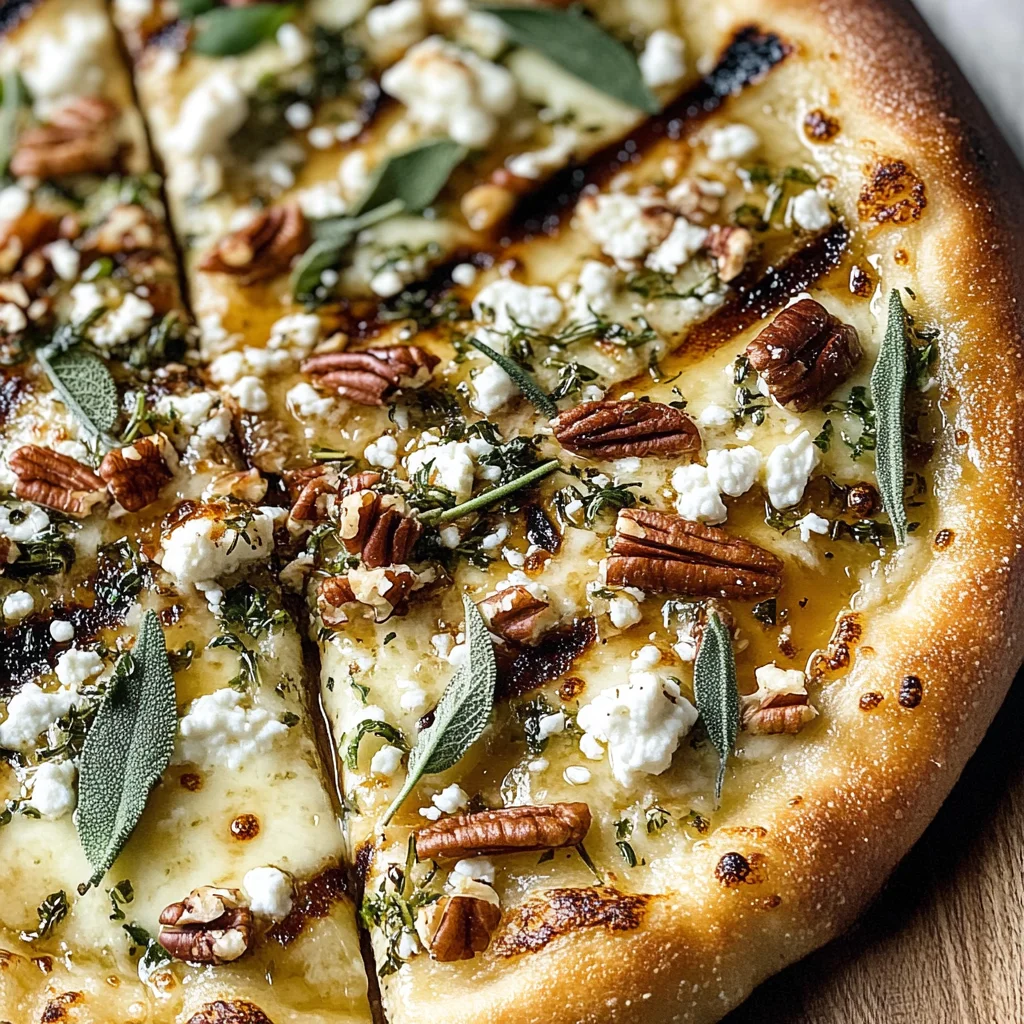
Equipment You’ll Need:
Having the right tools makes all the difference in ensuring your cooking experience is smooth and enjoyable! Think of these essential items as your trusted partners in creating something wonderful—a great meal deserves great equipment!
- Gas or charcoal grill – Obviously crucial for achieving those perfect char marks! A grill allows you to infuse smoky flavors into your pizza that simply can’t be replicated in an oven; it’s like breathing life into each bite! If you’re using charcoal, keep in mind you’ll need some time for those coals to heat up evenly before grilling begins.
- Tongs – These handy utensils are non-negotiable when handling hot ingredients on the grill! They enable you to flip pizzas effortlessly without losing precious toppings or burning yourself—safety first! Plus, they’re great for maneuvering other ingredients around during prep time.
- Floured surface – Creating a clean workspace helps prevent sticking while shaping your dough; trust me when I say no one wants their crust glued to their countertop! Use plenty of flour when rolling out your dough so everything stays smooth sailing throughout this process.
Preparing the Grilled Honey Goat Cheese Pizza
Step 1: Get That Grill Ready!
To kick off our culinary adventure with this Grilled Honey Goat Cheese Pizza recipe, we first need to prepare our grill for action! Begin by preheating either gas or charcoal grills over high heat—the goal here is achieving those irresistible charred patterns on our pizza crust while locking in moisture simultaneously! Before placing anything directly onto those grates (which can be quite sticky), brush them lightly with oil using paper towels or a silicone basting brush—this step is absolutely paramount in preventing any unwanted sticking during cooking!
Step 2: Shape Your Dough
While waiting for our grill temperature to reach perfection (about 500°F), let’s turn our attention toward shaping our pizza dough into its final form! On a well-floured surface (like I mentioned earlier), take your pound of dough and gently press down until it’s roughly ¼ inch thick—you want it thin yet sturdy enough not to tear during grilling adventures ahead! If you’re opting for store-bought tubes of dough instead of making from scratch: Simply unroll it onto parchment paper before proceeding onward!
Step 3: Grill That Crust
Once you’ve shaped your crust just right (and trust me—it should feel like second nature!), transfer it onto preheated grills where all magic happens next! Close the lid tightly while allowing it time (around two minutes) under high heat conditions so beautiful grill marks form on one side before flipping using tongs carefully—you’ll want those lovely lines without burning edges too much!
Step 4: Top It Off
After flipping over perfectly grilled crusts comes perhaps my favorite part: Adding toppings galore! Working quickly now means maximizing delightful meltiness across surfaces involved here—we don’t want any cool pockets left unadorned after all… Sprinkle crumbled goat cheese generously across half grilled sides followed closely behind by chopped pecans providing crunch factor alongside shaved Parmesan lending depth beneath layers awaiting revelation soon enough… Close lids firmly again ensuring everything cooks thoroughly underneath watchful eyes… Let them sizzle away until melted goodness emerges within four-six minutes total cook time depending upon thicknesses employed earlier too!
And there we have it—a beautiful start towards creating something extraordinary together through simple yet complex elements harmonizing brilliantly within each layer crafted henceforth… Stay tuned as we continue exploring how best finalize presentation aspects before savoring bites guaranteed leaving lasting impressions amongst loved ones gathered near…
Step 5: Grilling the Crust to Perfection
Now that your grill is prepped and your dough is ready, it’s time to make that crust sing! Transfer your shaped dough onto the hot grill, where the high heat will work its magic. This step is absolutely paramount because grilling directly gives your pizza that irresistible smoky flavor and those beautiful charred marks that scream summer. Close the lid and let it cook for about 2 minutes. During this time, resist the temptation to peek too often—trust me on this! Keeping the lid down creates an oven-like environment, allowing the crust to cook evenly without burning. When you start smelling that delicious, slightly nutty aroma wafting from the grill, it’s your cue to lift the lid with a pair of tongs and flip the dough.
After flipping, reduce the heat to low—this adjustment is crucial as it allows for a gentle cooking process, ensuring the inside of your crust cooks through without charring too much on the outside. Quickly add your toppings—this keeps everything hot and helps melt that cheese perfectly. You’ll want to keep an eye on things for the next 4-6 minutes; look for bubbling cheese and a crispy base as visual indicators of doneness. Don’t rush this step; patience will reward you with a crust that’s chewy on the inside but perfectly crisp on the outside.
Step 6: Crafting Your Flavor Symphony
As you watch that cheese begin to melt into a glorious puddle of creamy goodness, it’s time to unleash those toppings! Start by generously sprinkling crumbled goat cheese over your grilled pizza base. The beauty of goat cheese lies in its tangy richness; when it melts, it transforms into a luscious layer that beautifully contrasts with our other ingredients. Next up are those delightful pecans—chop them finely if you prefer smaller bites or leave them larger for a satisfying crunch. The nuttiness of pecans adds depth to each bite and complements the creamy goat cheese perfectly.
Once you’ve added these two components, shower your pizza with shaved Parmesan—a wonderful ingredient that not only enhances flavor but also contributes an extra layer of richness. This melty topping acts like a glue, helping everything stick together while delivering that umami punch we all crave in a good pizza. Remember, every sprinkle counts here; feel free to add more or less depending on how cheesy you like things! Close the grill lid again and let everything meld together for about 4-6 minutes. You’ll know it’s ready when you see melted cheese oozing over every edge and can hear faint sizzling sounds coming from beneath.
Step 7: The Herbal Finishing Touch
As we approach the grand finale of our Grilled Honey Goat Cheese Pizza adventure, let’s talk about adding those fresh herbs—specifically sage—which brings an utterly intoxicating aroma to our dish! After removing your pizza from the grill (be careful—it will be hot!), quickly sprinkle finely chopped fresh sage over top while it’s still warm. This herb isn’t just for looks; its earthy notes can elevate our sweet and savory balance even further by adding complexity and freshness. The warmth from the pizza activates its essential oils, infusing each bite with aromatic goodness.
Now comes another magical moment: drizzling honey across your freshly grilled masterpiece! Use about 2 tablespoons of honey for this step—it might seem simple, but trust me when I say it’s non-negotiable! The sweetness pairs beautifully with both creamy goat cheese and robust sage while creating a glossy finish that makes your pizza shine like liquid gold. This is where flavor meets presentation; it won’t just taste incredible—it will look stunning as well! As you drizzle, feel free to go in zig-zag motions or create swirls for artistic flair; remember, we eat with our eyes first!
Step 8: Serving Your Masterpiece
Finally, after all that hard work (and trust me—it’s worth every second!), it’s time to slice up your masterpiece and dig in! Here’s where I urge you not to skip any steps in letting it rest before cutting into it—give yourself at least 5 minutes if you can stand it! Allowing your Grilled Honey Goat Cheese Pizza some time means flavors continue mingling together while making slicing easier without losing all those delicious toppings on each cut. You want clean slices where each piece holds its structural integrity—no one likes a messy pizza!
When you do slice into this beautiful creation—watch how effortlessly each piece separates while revealing layers upon layers of flavor—it’s truly extraordinary! Serve immediately while it’s warm so everyone can enjoy that melty cheese experience! Pair it with a light salad or perhaps some refreshing iced tea for balance; I promise you’ll find this dish is not merely food but an experience filled with warmth, laughter, and shared joy around the table.
Final Touches On Your Grilled Honey Goat Cheese Pizza Journey
Now that you’ve created something truly special with this Grilled Honey Goat Cheese Pizza recipe, remember how important each ingredient was and how they all worked together harmoniously to create this masterpiece. Whether you’re making this for friends at a summer barbecue or just treating yourself on a cozy night in, I can assure you—it’ll be a dish you’ll want to return to time and again. Enjoy every bite knowing you’ve crafted something not just delicious but filled with love and care!
Storage and Enjoyment Tips for Your Grilled Honey Goat Cheese Pizza
Now that your Grilled Honey Goat Cheese Pizza is ready to be served, the aroma wafting through your kitchen is nothing short of intoxicating! The crispy crust, creamy goat cheese, and sweet notes of honey come together to create a truly extraordinary dish that will have you relishing every bite. But what if you find yourself with leftovers? Don’t worry! This delightful pizza can be enjoyed later, and I’m excited to share how to store it properly so you can savor those flavors even after the initial feast.
Storing Leftover Grilled Honey Goat Cheese Pizza
To keep your leftover Grilled Honey Goat Cheese Pizza in its best form, let it cool down to room temperature before stashing it away. I recommend using an airtight container; this ensures that moisture doesn’t seep in and make your beloved pizza soggy. If you want to take it a step further, consider layering parchment paper between slices to prevent sticking and maintain texture. Stored correctly in the fridge, it will keep for about 3 days. Now, here’s a little pro tip: placing a slice of bread in the container can help absorb excess moisture—keeping that crust as chewy and delightful as the first bite! When reheating, I suggest popping it back on the grill or in a skillet for a few minutes; this method revives that lovely crispiness while warming up the toppings beautifully. Trust me on this; you’ll be amazed at how well it holds up!
Freezing Grilled Honey Goat Cheese Pizza for Later
If you’re feeling like prepping ahead of time or simply want to save some pizza magic for another day, freezing is an excellent option! To do so properly, allow your pizza to cool completely before wrapping it tightly in plastic wrap and then placing it inside a freezer-safe bag or container. This double layer of protection is absolutely paramount in preventing freezer burn. It can last up to 2 months frozen without losing much of its charm! When you’re ready to enjoy your frozen treasure, simply preheat your oven to 400°F (204°C), pop that pizza onto a baking sheet straight from the freezer (no need to thaw!), and bake until heated through—about 10-15 minutes should do the trick. The convenience factor here is fantastic; just imagine being able to pull out slices of gourmet goodness whenever cravings strike!

Grilled Honey Goat Cheese Pizza
- Total Time: 25 minutes
- Yield: Serves 4
Description
Experience bold flavors with Grilled Honey Goat Cheese Pizza – easy vegetarian perfection topped with creamy cheese and sweet honey. Try it today!
Ingredients
- 1 lb. pizza dough
- 4 oz. soft goat cheese (crumbled)
- 1/4 c. chopped pecans
- 2/3 c. shaved Parmesan cheese
- 2 Tbsp. fresh sage (finely chopped)
- 2 Tbsp. honey
Instructions
- Preheat your gas or charcoal grill over high heat and lightly oil the grates.
- On a floured surface, shape the pizza dough into a round about ¼ inch thick.
- Grill the shaped dough for about 2 minutes until charred; then flip using tongs.
- Quickly add crumbled goat cheese, chopped pecans, shaved Parmesan, and fresh sage on top.
- Close the grill lid and cook for an additional 4-6 minutes until the cheese is melted and bubbly.
- Remove from the grill and drizzle with honey before slicing and serving.
- Prep Time: 15 minutes
- Cook Time: 10 minutes
- Category: Main
- Method: Grilling
- Cuisine: Vegetarian
Nutrition
- Serving Size: 1 slice (approximately 120g)
- Calories: 290
- Sugar: 8g
- Sodium: 450mg
- Fat: 15g
- Saturated Fat: 7g
- Unsaturated Fat: 8g
- Trans Fat: 0g
- Carbohydrates: 30g
- Fiber: 2g
- Protein: 10g
- Cholesterol: 30mg

Leave a Comment