There’s something utterly magical about the experience of crafting a dessert that not only delights the palate but also evokes deep emotions and cherished memories. When I think about my Pistachio & Blackberry Cheesecake Towers, I am transported to sun-kissed summer afternoons spent with loved ones, laughter mingling with the scent of sweet, creamy indulgence wafting through the air. The vibrant green of the pistachio paste paired with the rich, dark hue of blackberries creates a visual feast that is just as captivating as it is delicious. This recipe isn’t just a delightful treat; it’s a celebration in every bite, a bridge between tradition and innovation that leaves you feeling profoundly satisfied. So why not take your time with this creation? I promise you, the reward will be more than worth it.
As we delve into this culinary adventure together, know that these Pistachio & Blackberry Cheesecake Towers are perfect for any occasion—be it a cozy gathering with friends or an elegant soirée. Imagine presenting these stunning towers on your dining table: they stand tall and proud, each layer telling a story of flavor and texture. There’s an irresistible allure to combining the nutty richness of pistachios with the tart sweetness of blackberries, creating an orchestra of tastes that dances on your taste buds. It’s no wonder that this dessert has become a favorite in my home; every time I make it, I see smiles blossom like flowers in springtime.
Pistachio & Blackberry Cheesecake Towers: A Symphony of Flavors
Let’s embark on this delightful journey together! The process of creating these towers is as enjoyable as the final product itself. You’ll find that each component plays a vital role in achieving that luscious, creamy texture balanced by vibrant fruitiness. So roll up your sleeves and let’s get started!
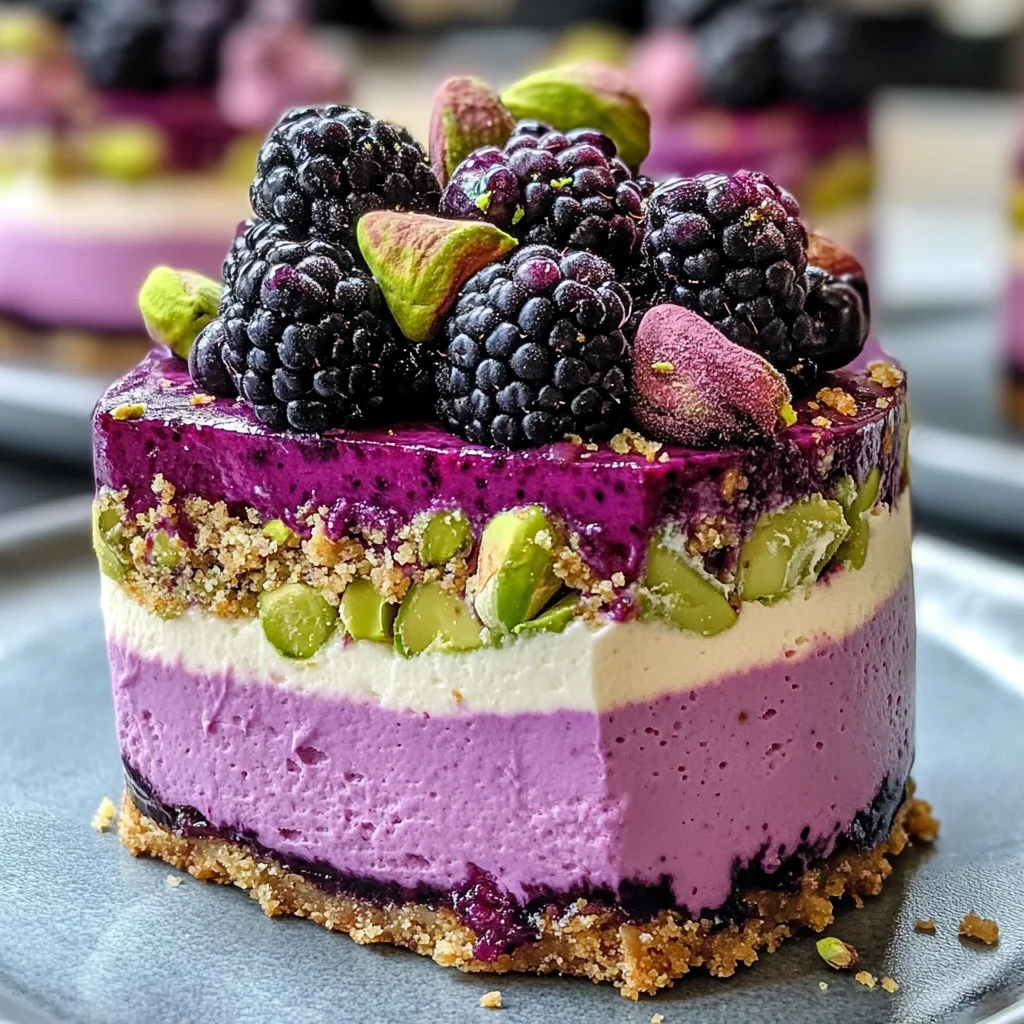
Ingredients:
Every great recipe begins with quality ingredients. For our Pistachio & Blackberry Cheesecake Towers, we’ll be using some truly wonderful elements that not only contribute to flavor but also enhance texture and presentation.
1 cup digestive biscuits, crushed. These biscuits serve as the foundation for our cheesecake towers. Their slightly sweet and buttery flavor complements the creamy filling beautifully while adding a delightful crunch to contrast against the smoothness of the cheese layers. When selecting digestive biscuits, look for those made with whole grains for added depth and flavor; they will give your crust a more complex taste.
6 tablespoons unsalted butter, melted. This ingredient is absolutely paramount for binding those crushed biscuits together into a lovely crust that holds its shape when sliced. Unsalted butter allows you to control the overall saltiness of your dessert—too much salt can overpower delicate flavors like pistachio and blackberry. When melting your butter, aim for just enough warmth so it’s liquid but not sizzling hot; otherwise, it could cook your biscuit crumbs instead of simply combining them.
1 cup cream cheese, softened. Cream cheese brings a rich creaminess that’s essential for creating that luscious mouthfeel we all crave in cheesecake. Make sure it’s at room temperature before blending; this ensures it incorporates smoothly without lumps—a common pitfall if you rush this step! Opt for full-fat cream cheese here; lower fat versions may compromise both taste and texture.
1 cup mascarpone cheese. Mascarpone adds another layer of luxury to our cheesecake filling—its velvety softness contributes to an incredibly smooth texture while enhancing the overall richness. Using high-quality mascarpone is crucial; it should be fresh and creamy without any graininess. Trust me on this—when you take that first bite, you’ll appreciate how beautifully it elevates our dessert.
1 cup pistachio paste. This liquid gold isn’t just delicious; it’s what makes these cheesecake towers truly special! The nutty flavor pairs harmoniously with both cream cheeses while imparting an eye-catching green hue that’s visually striking. When purchasing pistachio paste, ensure it’s pure without added sugars or artificial flavors so you can appreciate its natural essence in every layer.
1/2 cup sugar. Sugar might seem like an afterthought in such a sophisticated recipe but trust me—it’s absolutely non-negotiable! It balances out the tangy notes from the cream cheese while marrying perfectly with both pistachio and blackberry flavors. You can adjust to taste if you’re looking for less sweetness; sometimes I use coconut sugar for its subtle caramel undertones.
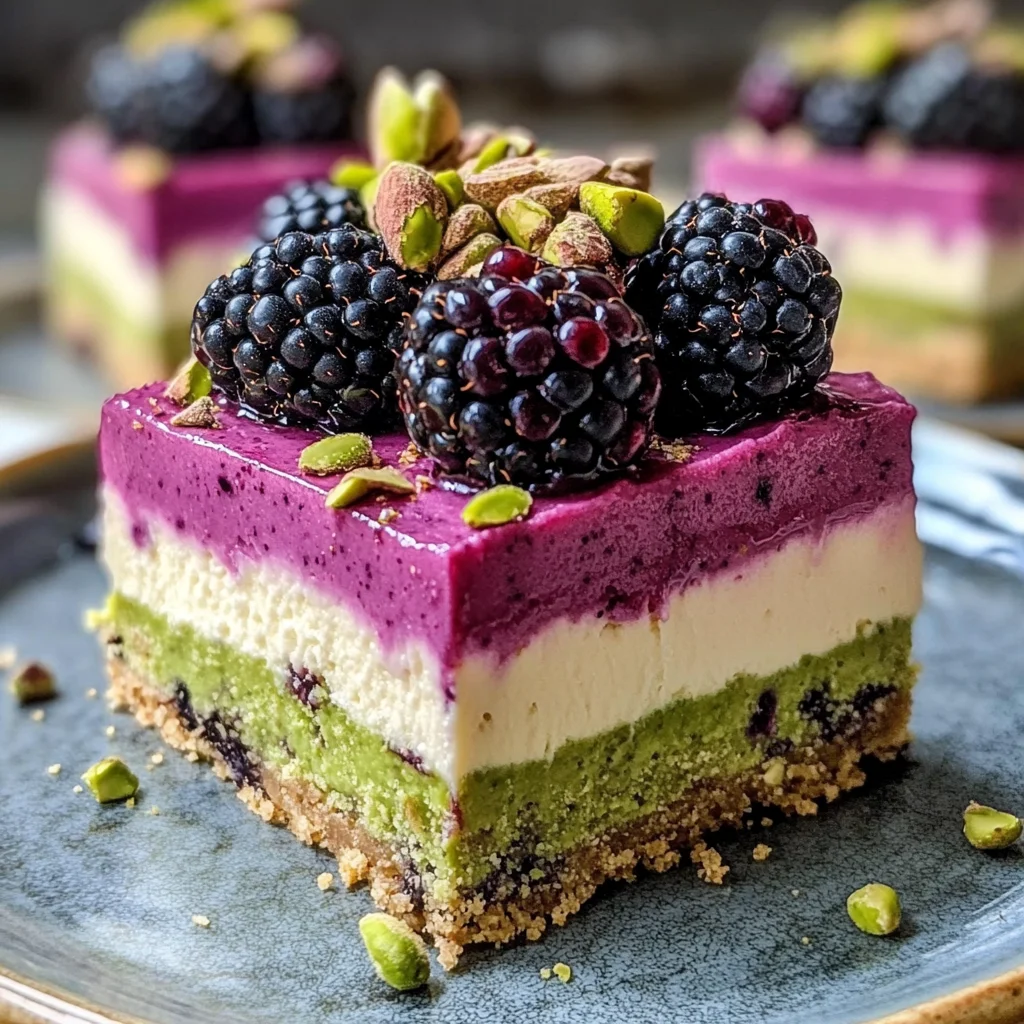
Equipment You’ll Need:
Having the right tools makes all the difference when embarking on this cheesecake adventure! These essential partners will help ensure everything runs smoothly as we create something truly wonderful together.
- 9-inch springform pan: This pan is key for achieving those perfect cheesecake towers! Its removable sides allow easy access once everything is set—a crucial factor when you’re ready to unveil your masterpiece without risking any damage during removal.
- Mixing bowls: You’ll need several sizes of mixing bowls to accommodate different components throughout our recipe—from combining crust ingredients to creating our lush filling mixture.
- Electric mixer (or whisk): If you’re aiming for speed and efficiency (and who isn’t?), an electric mixer is invaluable here! It will help you achieve fluffy fillings quickly without tiring out those precious arm muscles.
- Rubber spatula: A reliable spatula lets you scrape down bowls efficiently while folding ingredients together gently so we maintain airy textures throughout each layer—a must-do when combining whipped elements into denser mixtures!
- Parchment paper: Lining your springform pan’s base will save you from sticky situations later on when it’s time to remove those gorgeous towers! Just cut out a circle slightly larger than your base and place it down before pouring in any crust mixture.
Now that we’ve gathered our ingredients and equipment, let’s dive into creating these heavenly Pistachio & Blackberry Cheesecake Towers!
Step 1: Crafting Our Crunchy Base
Start by preheating your oven to 350°F (175°C). While that’s warming up, grab those digestive biscuits and crush them into fine crumbs—this can be done using a food processor or simply placing them in a zip-top baggie and rolling over them with a rolling pin until they resemble sand. It’s important we have fine crumbs so they bind well when mixed with melted butter—the goal here is to create a solid base that’ll hold everything together beautifully once baked! Once crushed, transfer these crumbs into a mixing bowl before adding in your melted unsalted butter.
With your hands or a fork—whatever feels comfortable—mix until all crumbs are coated evenly in buttery goodness; you want them damp enough so they stick together when pressed down firmly but not soggy! Now comes my favorite part: pour this mixture into your prepared springform pan and use either your fingers or the bottom of another glass dish to press it firmly into an even layer across the bottom. Bake this crust for about 10 minutes until it’s golden brown—this step enhances flavors through caramelization while setting up structure so don’t rush through baking time!
Step 2: Creating the Creamy Filling
While our crust cools down slightly after baking (cue anticipation!), let’s shift gears toward making that decadent filling! In a large mixing bowl, combine softened cream cheese and mascarpone cheese using either an electric mixer or whisk until fully blended—you’re aiming for silky smooth consistency here since lumps would disrupt our tower’s elegance later on! Once combined well enough (think soft clouds), gradually add sugar while continuing mixing—to achieve maximum lightness during this step requires patience so don’t hurry through!
Next comes one of my favorite ingredients: pistachio paste! Gently fold it into your creamy mixture until perfectly incorporated—you should see flecks of green throughout which means you’re on track toward deliciousness ahead! Finally—don’t forget about balancing flavors—is where blackberries come in handy; mash half those beautiful berries lightly before folding them gently into our filling mixture too—we want some chunky bits remaining because they’ll create bursts of tartness amidst all that creamy richness!
Step 3: Assembling Your Towers
Now comes one of the most exciting parts—the assembly! With cooled crust already set inside its pan (and smelling divine), pour half of your luscious filling onto it first—using a rubber spatula helps spread evenly across without disturbing too much crust below then repeat layering process again by pouring remaining filling right over top! The sight alone will be enough motivation—it turns into an artful stack awaiting its turn in fridge chilling nicely overnight (or at least four hours if you’re short on time).
This chilling period serves multiple purposes: first off—it solidifies layers together ensuring they hold shape beautifully once removed from pan later then secondly—flavors meld harmoniously during this downtime creating overall better tasting experience upon serving guests who’ll surely rave about their newfound favorite dessert!
Step 4: The Final Touches
Once chilled completely (patience pays off here), carefully remove sides from springform pan then transfer carefully onto serving platter where they’ll shine brilliantly under soft lighting awaiting guests eager indulgence soon after cutting into their pieces revealing hidden layers beneath surface tantalizing senses further still! Top each slice generously with fresh blackberries reserved earlier—as they burst forth upon first bite enhancing flavors tenfold while making presentation feel celebratory too!
That’s just how simple yet rewarding journey making these Pistachio & Blackberry Cheesecake Towers can truly be—I guarantee everyone will adore them just as much as I do whenever served proudly at gatherings big or small alike…so what are you waiting for? Let’s make some memories today over incredible dessert creations worthy sharing amongst loved ones near dear hearts alike!
Step 5: Creating the Perfect Cheesecake Mixture
Now that you’ve prepared your crust, it’s time to dive into the heart of this recipe: the cheesecake mixture, which is where all the magic happens. In a large mixing bowl, combine the softened cream cheese and mascarpone cheese. You want these cheeses to be at room temperature for a reason; this ensures they blend together smoothly without any lumps. I can’t stress enough how important it is to achieve a velvety texture—nobody wants a gritty cheesecake! Using an electric mixer on medium speed, blend these two luscious cheeses until they are completely smooth, about 2-3 minutes. The goal here is to create a base that’s not only creamy but also rich enough to support the vibrant flavors of pistachio and blackberry.
Next, gently fold in the pistachio paste and sugar. This step requires a delicate touch, as you want to maintain that beautiful airiness created by the mixing earlier. Trust me on this: folding rather than stirring helps keep that lightness intact. Pistachio paste brings such a unique flavor profile—it’s nutty, earthy, and utterly intoxicating when combined with the sweetness of sugar. As you mix, take a moment to inhale deeply; you’ll notice how those scents intertwine, creating an anticipation that’s hard to resist. Once everything is well incorporated, set this bowl aside for just a moment while we prepare for our next step—don’t worry; the best is yet to come!
Step 6: Layering Your Towers with Intention
With our cheesecake mixture ready, it’s time to start assembling our Pistachio & Blackberry Cheesecake Towers! Using your prepared crust as a base, take a pastry bag (or simply use a zip-top bag with one corner snipped off) and pipe an even layer of your cheesecake filling over the biscuit crust. The key here is patience; as you fill each mold or glass with that creamy goodness, make sure to leave some space at the top for our blackberry topping later on. Aim for about ½ inch of filling—this will create beautiful layers that not only look stunning but also provide a delightful contrast in flavor and texture.
Once you’ve piped in your cheesecake mixture into all your molds or glasses, gently tap them on the counter. This step might seem trivial, but it’s crucial for eliminating any air bubbles trapped within your filling. Those little bubbles can disrupt the silky texture you’re aiming for and lead to cracks once chilled. After tapping them down gently, you should see any air bubbles rise to the surface and pop—a satisfying sight indeed! Now comes another layer of patience: cover each tower with plastic wrap and place them in the refrigerator for at least 4 hours—or better yet, overnight if time permits. Why chill? Chilling allows those flavors to meld beautifully together while also giving your cheesecake its perfect firmness.
Step 7: The Blackberry Topping – A Burst of Flavor
While our delicious towers are chilling away in their cool sanctuary, let’s turn our attention to crafting that exquisite blackberry topping. In a small saucepan over medium heat, combine fresh blackberries (about 1 cup) with ¼ cup sugar and just enough water to cover them (about 2 tablespoons). As you heat this mixture gently, you’ll witness something magical begin to happen—the blackberries will break down and release their vibrant juices, creating what I like to call liquid gold. Stir occasionally and allow this bubbling symphony of flavors to simmer for about 10 minutes until it thickens slightly and coats the back of a spoon.
This step is vital because it transforms those tart blackberries into an intoxicating sauce that adds both sweetness and acidity—two crucial components that balance out our rich cheesecake towers perfectly. While it simmers away, allow yourself to be enveloped in that sweet aroma wafting through your kitchen; it’s nothing short of inviting! Once thickened slightly, remove from heat and let your blackberry sauce cool completely before drizzling over each tower later on. Remember: patience is key here! Letting everything cool down ensures that when we pour this topping onto our cheesecakes later on, it won’t melt their beautiful layers away.
Step 8: The Grand Assembly – Bringing It All Together
Now comes my favorite part—the assembly! Once your cheesecake towers have chilled thoroughly (and trust me; they should feel firm yet slightly jiggly), remove them from the refrigerator with great anticipation. Carefully lift each tower out of its mold or glass—you might need a gentle nudge with a knife around the edges if they’re feeling stubborn. Place them on individual serving plates or your chosen presentation dish; don’t rush this step—take time arranging them so they look as stunning as they taste!
With each tower nestled comfortably on its plate, it’s time for that luscious blackberry topping we prepared earlier. Drizzle generously over each cheesecake tower—don’t be shy here! The bold contrast between the deep purple-black of the blackberries against the creamy pale greenish hues of pistachio creates an absolutely picturesque dessert that screams indulgence without saying a word. If you’re feeling adventurous (and I encourage you), you can even add extra fresh blackberries around each plate for an added pop of color—it becomes an edible masterpiece waiting just for you!
Final Touches – Presenting Your Masterpiece
As we draw near to completing these Pistachio & Blackberry Cheesecake Towers, don’t forget about those finishing touches that elevate this dessert from delightful to truly extraordinary! Consider garnishing with crushed pistachios sprinkled lightly atop each tower—this adds not only crunch but also enhances those nutty flavors we adore within our cheesecake filling. You may also want to whip up some coconut cream or dairy-free whipped topping as an alternative garnish if you’re looking for something lighter yet equally satisfying.
Once adorned beautifully with toppings galore, serve these towers cold straight from their resting place in the fridge—it’s definitely where they shine brightest! And oh my goodness—the first bite? It’s like poetry; every element harmonizes perfectly—the creamy richness of pistachio balanced by tangy blackberry bliss sends waves of happiness throughout your senses. Trust me when I say sharing these beauties will create unforgettable memories among friends and family alike—these are not just desserts; they’re moments crafted with love.
So go ahead—delight in every bite knowing you’ve created something truly special today! Enjoy every morsel because after all this hard work—and trust me; it was worth every second—you deserve nothing less than pure bliss served right there on your plate!
Storage and Enjoyment Tips for Your Pistachio & Blackberry Cheesecake Towers
Now that your stunning Pistachio & Blackberry Cheesecake Towers are complete, it’s time to revel in the joy of sharing this exquisite treat with your loved ones! But before you dive in and indulge, let’s chat about how to preserve any leftovers—if there are any! Trust me, knowing how to store these beauties properly will ensure every bite tastes just as delightful as the first. You’ll want to keep that creamy texture and vibrant flavor intact, which is absolutely non-negotiable for a dessert like this.
Storing Leftover Pistachio & Blackberry Cheesecake Towers
To keep your Pistachio & Blackberry Cheesecake Towers fresh and delicious, I recommend placing them in an airtight container. This is crucial because it prevents any unwanted odors from invading their delicate flavors. When stored correctly in the refrigerator, these towers will stay delightful for about 3-5 days. If you’re wondering about maintaining that perfect texture, here’s a little pro tip: place a slice of bread inside the container alongside your cheesecake towers. This trick helps retain moisture and keeps your cheesecake from drying out. After a couple of days, the cheesecake may firm up slightly in the fridge but don’t fret—it will still taste utterly intoxicating! Simply let it sit at room temperature for about 15-20 minutes before serving again; this little waiting period allows those luscious flavors to shine through once more.
Freezing Pistachio & Blackberry Cheesecake Towers for Later
If you find yourself with extra towers—or if you just want to have a sweet surprise waiting for you later—you can easily freeze these delightful treats! To do this, wrap each cheesecake tower individually in plastic wrap and then place them in a freezer-safe container or bag. This double wrapping is essential to protect against freezer burn while locking in all those incredible flavors. When frozen properly, they can last up to three months without losing their magical charm. The beauty of this method is that when you’re ready to enjoy them, simply transfer a tower from the freezer into the fridge for several hours or overnight to thaw gently. The convenience factor here cannot be overstated; having these decadent delights on hand makes spontaneous celebrations all the more special!
Dessert
Pistachio & Blackberry Cheesecake Towers
- Total Time: 40 minutes
- Yield: Serves 8
Description
Indulge in the exquisite delight of Pistachio & Blackberry Cheesecake Towers, a dessert that beautifully combines rich flavors and elegant presentation. These delightful towers are layered with a creamy filling made from luscious cream cheese, mascarpone, and vibrant pistachio paste, all set atop a crunchy digestive biscuit crust. Topped with a burst of fresh blackberry sauce, every bite offers a symphony of nutty sweetness and tangy fruitiness that is sure to impress at any gathering. Perfect for summer soirées or cozy family dinners, this dessert not only satisfies your sweet tooth but also creates unforgettable moments around the table. Elevate your dessert game with this showstopper recipe today!
Ingredients
- 1 cup digestive biscuits, crushed
- 6 tablespoons unsalted butter, melted
- 1 cup cream cheese, softened
- 1 cup mascarpone cheese
- 1 cup pistachio paste
- 1/2 cup sugar
- 1 cup fresh blackberries
Instructions
- Preheat your oven to 350°F (175°C). Crush the digestive biscuits and mix with melted butter until well combined. Press into the bottom of a springform pan to form the crust and bake for about 10 minutes until golden.
- In a mixing bowl, beat together softened cream cheese and mascarpone until smooth. Gradually add sugar and pistachio paste, folding until fully incorporated.
- Mash half of the blackberries and gently fold into the cheesecake mixture.
- Pour half of the filling over the cooled crust, then repeat with remaining filling. Smooth out the top and refrigerate for at least 4 hours or overnight.
- Prepare the blackberry sauce by simmering fresh blackberries with sugar and a splash of water until thickened. Cool before drizzling over chilled cheesecake towers.
- Carefully remove from springform pan, slice, and serve garnished with additional blackberries if desired.
- Prep Time: 30 minutes
- Cook Time: 10 minutes
- Category: Dessert
- Method: Baking
- Cuisine: American
Nutrition
- Serving Size: 1 tower (118g)
- Calories: 320
- Sugar: 22g
- Sodium: 170mg
- Fat: 20g
- Saturated Fat: 10g
- Unsaturated Fat: 8g
- Trans Fat: 0g
- Carbohydrates: 28g
- Fiber: 2g
- Protein: 5g
- Cholesterol: 40mg
Leave a Comment