Discovering the Joy of Cottage Cheese Queso
Cooking is so much more than just combining ingredients; it’s about creating moments, evoking memories, and sharing joy. Whenever I whip up this easy Cottage Cheese Queso, I’m transported back to cozy evenings spent with friends, laughter bouncing off the walls, and the irresistible aroma of melted cheese wafting through the air. It’s a humble dish that transforms an ordinary snack into an extraordinary experience. With just three simple ingredients, each bite delivers a delightful explosion of flavors and textures that will leave your taste buds dancing in celebration. The creaminess of the cottage cheese combined with the sharpness of cheddar and a hint of spice from taco seasoning creates a truly magical dip that’s perfect for any occasion—whether it’s movie night or a casual gathering.
What makes this recipe particularly special for me is its simplicity intertwined with endless possibilities. This isn’t just a recipe; it’s an invitation to get creative! You can garnish it with fresh pico de gallo for a refreshing crunch, drizzle some salsa for extra tang, or sprinkle cilantro for that aromatic touch. The beauty lies in its adaptability—each version becomes uniquely yours. Trust me on this: every time you prepare this Cottage Cheese Queso, you’re not just making a snack; you’re crafting memories that will linger long after the last chip has been dipped.
Cottage Cheese Queso: A Delightful Dip for Every Occasion
Now that we’ve set the stage for this unforgettable experience, let’s dive into how to create this delicious Cottage Cheese Queso together! This snack is as easy to make as it is satisfying, requiring minimal prep time while delivering maximum flavor. Just think about it: in under seven minutes, you can have a bowl of creamy goodness ready to be devoured alongside your favorite tortilla chips. Let’s embark on this culinary journey together!
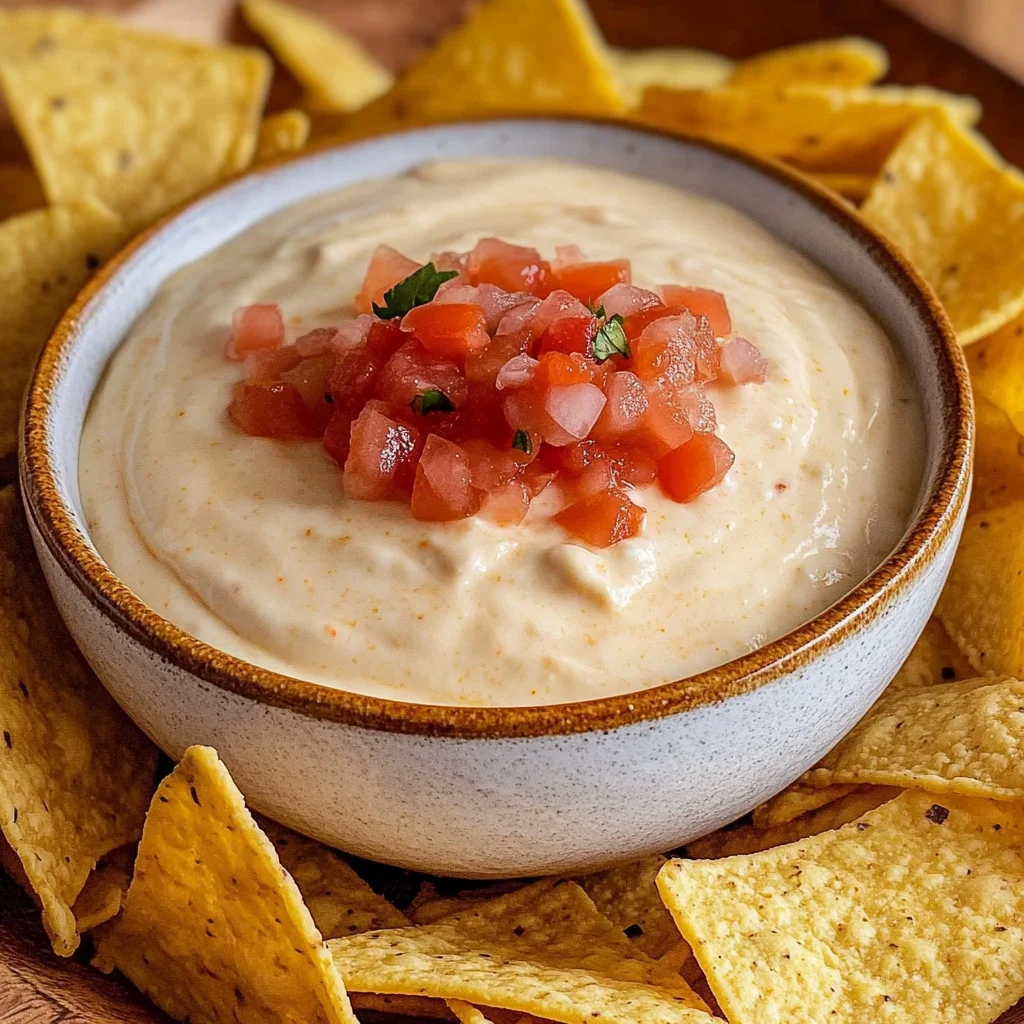
Ingredients:
Before we get started on our savory adventure, let’s gather our star ingredients. Each one plays an essential role in turning simple components into a creamy delight that will have everyone asking for more.
- 1 cup cottage cheese: Cottage cheese is the heart of our queso and what gives it that luscious, creamy consistency. When blended until smooth, it transforms from grainy curds into a velvety base that perfectly complements the other flavors in our dip. Look for full-fat or low-fat options based on your preference; full-fat will yield a richer taste while low-fat offers a lighter option without sacrificing too much creaminess. If you’re feeling adventurous or need to accommodate dietary preferences, Greek yogurt can serve as an excellent alternative—just remember it might alter the flavor slightly!
- 1/2 cup cheddar cheese, shredded: Cheddar cheese is where we get our rich flavors and gooey texture! I love using sharp cheddar because its bold taste really shines through when melted into our queso. When choosing your cheddar, look for aged varieties—they provide deeper flavor profiles which elevate your dip from ordinary to remarkable. If you’re looking to mix things up or avoid dairy altogether, consider using vegan cheese shreds designed to melt well; they work beautifully in this recipe while still keeping everything deliciously creamy.
- 1/2 teaspoon taco seasoning: Taco seasoning adds that essential kick which brings everything together beautifully! It’s like having a fiesta right in your bowl—spicy yet balanced. You can use store-bought blends or make your own at home by mixing chili powder, cumin, garlic powder, onion powder, and paprika; trust me when I say it’s worth it! This little bit of seasoning not only enhances the flavor but also adds warmth and depth that makes every bite utterly intoxicating.
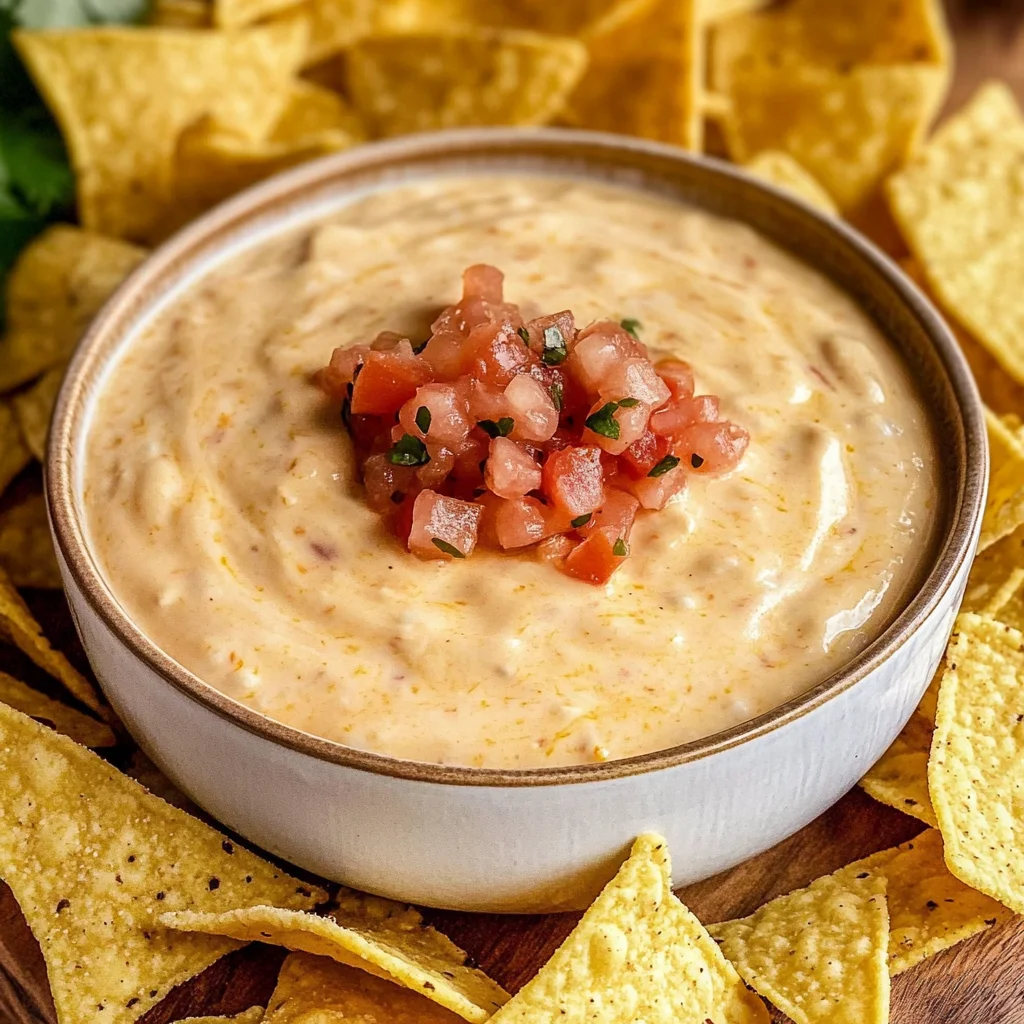
Equipment You’ll Need:
Having the right tools makes all the difference when whipping up something so delightful as our Cottage Cheese Queso! These kitchen partners will ensure everything runs smoothly and helps you achieve queso perfection without any fuss.
- Blender: A trusty blender is essential here—it turns our chunky cottage cheese into a smooth canvas for our dip. If you have a single-serve blender or immersion blender handy, those work wonderfully too! The goal is to create that silky texture before we add any other ingredients.
- Microwave-safe bowl: Since we’re cooking this queso in the microwave (because who has hours to spend waiting?), you’ll need a bowl that can handle heat without warping or breaking. It should be spacious enough to allow some stirring without making a mess; trust me—nobody enjoys cleaning up spilled queso!
- Measuring spoons: Accurate measurements are crucial when crafting dishes like this one because even slight variations can affect flavor balance. Keep these handy when measuring out your taco seasoning and ensure you’re infusing just enough spice into your dip!
With these ingredients and tools at your disposal, you’re all set to create something truly extraordinary!
Preparing the Cottage Cheese Queso
Step 1: Blending for Bliss
Let’s start by adding our cottage cheese into the blender—a step that’s absolutely crucial for achieving that dreamy smooth texture we’re aiming for! Begin by measuring out one cup of cottage cheese and placing it inside your blender pitcher. As you blend away at medium speed (or high if you’re feeling adventurous), watch as those curds slowly transform into liquid gold! This process allows us to break down any lumps while infusing air into our mixture which contributes to its overall lightness once combined with other ingredients. Blend until completely smooth—this step sets the foundation for every subsequent layer of flavor!
Step 2: Mixing Magic
Once you’ve achieved that silky consistency from blending your cottage cheese, it’s time to transfer it into a microwave-safe bowl—the perfect vessel for melding all these incredible flavors together seamlessly! Make sure you scrape down every last bit from the blender so nothing goes wasted; every ounce contributes to making this dip rich and delightful! Now sprinkle half a cup of shredded cheddar on top along with half a teaspoon of taco seasoning directly over your blended base. This combination is where things start getting exciting—the sharpness of cheddar coupled with those vibrant spices creates an utterly intoxicating aroma that’ll have everyone racing towards the kitchen.
Step 3: Heating Harmony
Now comes my favorite part: microwaving our concoction! Pop your bowl into the microwave and set it for one minute on high heat—this initial blast helps begin melting that glorious cheddar so beautifully intertwined within our cottage cheese base. After one minute passes (and trust me—you’ll want to resist peeking too soon), remove the bowl carefully because it’ll be hot! Give everything a good stir right here; this action ensures even melting throughout instead of leaving clumps behind which could disrupt our creamy dreaminess later on.
Step 4: Stirring Into Perfection
After stirring well post-initial heating session, we’ll return our mixture back into the microwave for another thirty seconds before stirring again—and repeat this process until you reach peak queso perfection! Depending on your microwave’s wattage (trust me—it varies!), keep an eye out during these intervals; what we’re aiming for is smoothness without any graininess left behind from unmelted cheese bits lingering around waiting their turn! Continue cooking in thirty-second increments followed by gentle stirring until everything comes together harmoniously—usually around two minutes in total does it justice!
With these steps completed thoughtfully together through proper blending techniques & strategic heating methods—we’re nearly there toward enjoying mouthwatering bliss!
Stay tuned as we garnish & serve our creation next…
Step 5: The Art of Melting Cheese to Perfection
Now, let’s dive into the melting magic that truly transforms our Cottage Cheese Queso from a simple blend of ingredients into a creamy, dreamy dip that you’ll want to devour by the spoonful! Once you’ve transferred your blended cottage cheese to a microwave-safe bowl, it’s time to sprinkle that glorious shredded cheddar on top, along with the taco seasoning. I cannot stress enough how important it is to use freshly shredded cheese—this makes all the difference in texture and taste! Pre-shredded cheese often contains anti-caking agents, which can interfere with how beautifully it melts. So, trust me on this; grab that block of cheese and give it a good shred yourself!
Next comes the microwave moment. Pop the bowl into your microwave and set it for just one minute. I know it seems like such a short time, but this initial blast of heat is crucial for starting the melting process. While you’re waiting, take a moment to inhale the comforting aroma wafting from your microwave—that’s the scent of cheesy goodness beginning to unfold! After that minute is up, pull out the bowl (careful not to burn yourself!) and give everything a vigorous stir. You want to fully incorporate the melted cheese with the cottage cheese base—you’ll notice that they might not look totally combined at first, and that’s okay! It’s all part of the journey towards queso perfection.
Step 6: The Stirring Ritual
This next step is where we really hone in on achieving that velvety-smooth consistency we crave in our Cottage Cheese Queso. After your first minute in the microwave and a good stir, pop it back in for another 30 seconds. This interval is so important because it allows even heat distribution—think of this as coaxing your dip into absolute creaminess without rushing it! You might start noticing how those curds from the cottage cheese begin to break down further as they warm up; how exciting is that?
Each time you pull it out for a stir, take the opportunity to feel its texture change; it should start becoming more cohesive with each round. If you find it’s still looking clumpy after two rounds in total (one minute plus two thirty-second intervals), don’t fret! Just keep microwaving in those 30-second bursts until you reach that silky smoothness—it can usually take anywhere between two and four rounds depending on your microwave’s wattage. And remember—patience here pays off tenfold! You’re creating something utterly intoxicating.
Step 7: The Final Blend for Ultimate Creaminess
Once you’ve achieved what looks like pure liquid gold—a smooth, creamy consistency that begs to be paired with crunchy tortilla chips—it’s time for an optional yet delightful finishing touch. If you’re feeling adventurous (and I wholeheartedly encourage this!), consider incorporating some fresh pico de gallo or salsa right into your dip before serving. This not only adds a vibrant burst of flavor but also offers a refreshing contrast against the rich creaminess of your queso.
Just think about how those bright tomatoes, fragrant cilantro, and zesty onions will dance together with each scoop! However, if you choose to go this route, do remember to fold these extras gently into your queso rather than mixing too vigorously; we want those beautiful chunks to remain intact while still blending harmoniously with all that cheesy goodness. This step is critical because every bite should be an explosion of flavors and textures—utterly extraordinary!
Step 8: The Grand Reveal
Now comes my favorite part—the moment you get to present your Cottage Cheese Queso! Carefully transfer your creation into a serving bowl where its golden hue can truly shine. At this point, I love garnishing my queso with fresh cilantro for an aromatic lift and visual appeal. A few sprigs placed artfully on top transforms this humble dip into something worthy of any gathering or cozy night in.
But wait—don’t forget about those tortilla chips! Serve them alongside your dip while they’re still crisp and warm; there’s nothing quite like that satisfying crunch paired with creamy cheesiness! Trust me when I say this: watching friends and family dive into this dish brings such joy—it becomes an experience rather than just a snack. As they scoop up their first bites accompanied by laughter and joyful noises, you’ll know you’ve created something profoundly satisfying.
Final Touches: Making It Your Own
As we wrap up our Cottage Cheese Queso journey together, let me leave you with some personal tips for making this recipe uniquely yours! Feel free to play around with different seasonings—perhaps a pinch of smoked paprika or even some chopped jalapeños if you’re craving heat. Experimenting allows you to infuse flavors that resonate deeply with you or elevate special occasions!
Whatever path you choose on this culinary adventure, remember—the heart of cooking lies in sharing love through food. I promise you nothing quite compares to seeing others enjoy something you’ve poured your soul into creating. So gather around friends or family and let this Cottage Cheese Queso bring warmth and joy to your table. Happy dipping!
Storage and Enjoyment Tips for Your Cottage Cheese Queso
Now that you’ve whipped up this delightful Cottage Cheese Queso, it’s time to dive in and savor every creamy, cheesy bite! The richness of the cottage cheese combined with the melty cheddar creates a dip that’s simply irresistible. But I know life can get busy, and sometimes we need to think about how to keep this deliciousness around for another day. So let’s talk about how to store your leftovers without losing that fabulous flavor!
Storing Leftover Cottage Cheese Queso
To ensure that your Cottage Cheese Queso stays fresh and tasty, transfer any leftovers into an airtight container—this is absolutely crucial! A glass container not only seals in the flavor but also allows you to see that beautiful golden hue of the queso when you reach for it next. Stored properly in the refrigerator, your queso should last about 3-4 days. Now, here’s a little pro tip: if you find yourself with a half-eaten loaf of bread hanging around, toss a slice in with your queso before sealing it up. This clever trick helps keep moisture levels just right and prevents that dreaded crusty top from forming. As for the taste after storage? I promise you, it remains profoundly satisfying—just give it a quick stir before serving again! When it’s time to reheat, pop it in the microwave in short intervals, stirring thoroughly each time until it’s smooth and ready to enjoy.
Freezing Cottage Cheese Queso for Later
If you’re like me and love having easy snacks on hand, why not freeze some of that Cottage Cheese Queso for later? To do this effectively, pour your cooled queso into freezer-safe containers or bags—just be sure to leave a little space at the top because liquids expand when frozen. It will keep beautifully for about 2-3 months. When you’re ready to indulge again, simply thaw it overnight in the fridge or pop it into the microwave straight from the freezer on low power until warmed through. The convenience factor here is absolutely fantastic; imagine coming home after a long day and knowing there’s a cozy bowl of queso waiting for you! There’s something so comforting about always having a stash of this delectable dip ready to go.

Cottage Cheese Queso
- Total Time: 7 minutes
- Yield: Approximately 4 servings 1x
Description
Cottage Cheese Queso is a delightful twist on the classic cheese dip, offering a creamy and flavorful experience without the guilt. With just three main ingredients, this easy-to-make queso brings together the richness of cottage cheese, the sharpness of cheddar, and a zesty kick from taco seasoning. Perfect for movie nights or casual get-togethers, it’s not just a dip—it’s a memory-maker that can be garnished with fresh pico de gallo or drizzled with salsa for added flair.
Ingredients
- 1 cup cottage cheese
- 1/2 cup shredded cheddar cheese
- 1/2 teaspoon taco seasoning
Instructions
- Blend one cup of cottage cheese until smooth.
- Transfer to a microwave-safe bowl and mix in half a cup of shredded cheddar and half a teaspoon of taco seasoning.
- Microwave for one minute; stir well and then continue microwaving in 30-second intervals until fully melted and creamy.
- Optionally, add fresh pico de gallo or salsa before serving.
- Prep Time: 5 minutes
- Cook Time: 2 minutes
- Category: Snack
- Method: Microwaving
- Cuisine: American
Nutrition
- Serving Size: 1/4 cup (60g)
- Calories: 100
- Sugar: 2g
- Sodium: 320mg
- Fat: 5g
- Saturated Fat: 3g
- Unsaturated Fat: 2g
- Trans Fat: 0g
- Carbohydrates: 6g
- Fiber: 0g
- Protein: 9g
- Cholesterol: 20mg

Leave a Comment