Cooking is so much more than just preparing a meal; it’s a beautiful tapestry of flavors, aromas, and memories that brings us together. When I think about my Hawaiian Chicken Bowl, I’m transported to sun-soaked beaches and vibrant gatherings with friends and family. Imagine the tender marinated chicken thighs glazed in a luscious honey-teriyaki sauce, nestled on a bed of nutty brown rice, and topped with sweet pineapple chunks and crunchy vegetables. This dish isn’t just food; it’s an experience—a celebration of tropical flavors that dances on your palate. I promise you, every bite of this Hawaiian Chicken Bowl is like a little vacation on your plate!
What makes this recipe truly special is its balance of sweet and savory elements, perfectly capturing the essence of Hawaiian cuisine. The tender chicken thighs absorb the marinade beautifully, infusing each bite with that irresistible umami flavor we all crave. And let’s not forget about the toppings! The creamy avocado, crisp bell pepper, and snap peas add not only texture but also a burst of freshness that harmonizes so well with the rich flavors below. Whether you’re serving this at a summer barbecue or enjoying it as a cozy weeknight dinner, this bowl is bound to become a beloved staple in your kitchen.
Hawaiian Chicken Bowl: A Tropical Escape on Your Plate
Get ready to embark on a culinary journey with this delightful Hawaiian Chicken Bowl! As we dive into the ingredients and instructions, I’ll share my tips and tricks to ensure your dish turns out absolutely perfect every time. The combination of tender chicken, vibrant veggies, and fragrant rice will have everyone asking for seconds—and maybe even thirds! So let’s roll up our sleeves and get cooking!
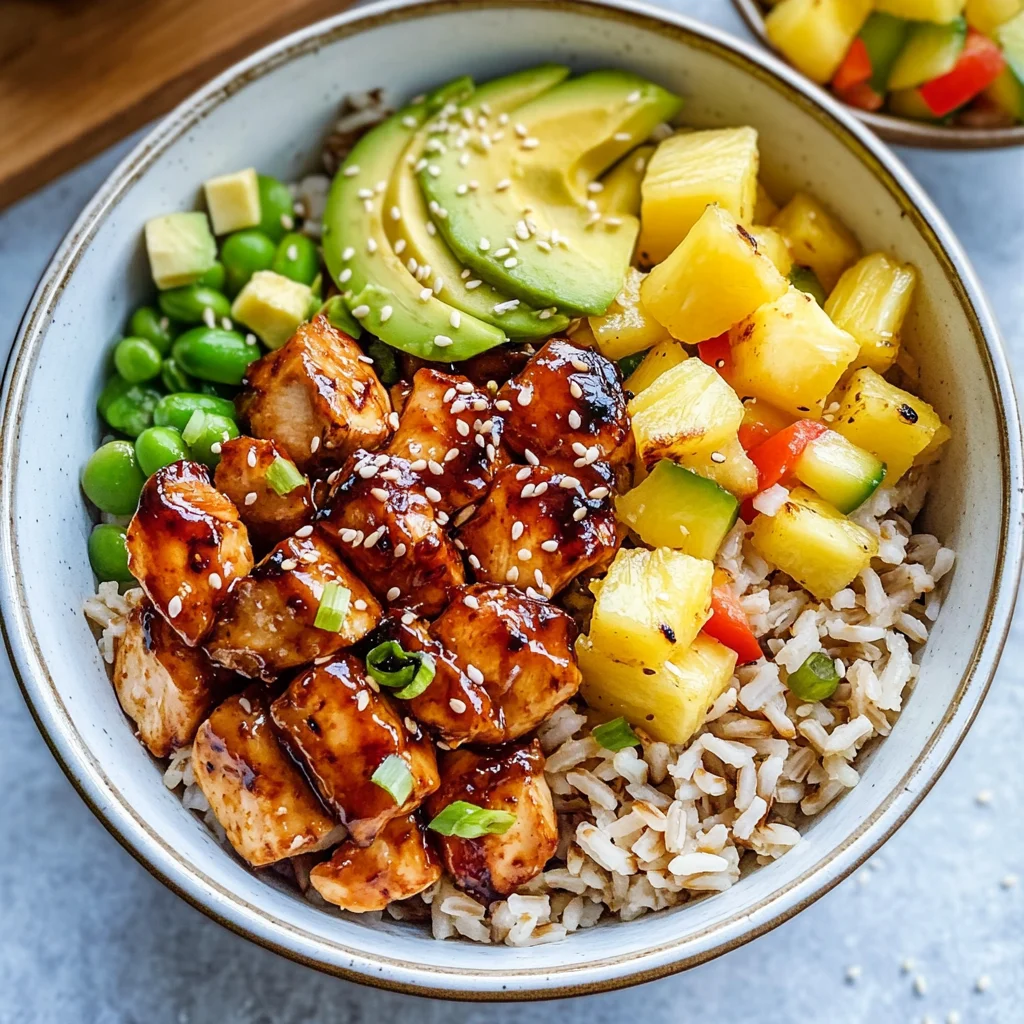
Ingredients:
Every great dish begins with quality ingredients, and I can’t stress enough how essential each component is for our Hawaiian Chicken Bowl. Let’s explore what we’ll need to create this tropical delight!
- 1 lb boneless, skinless chicken thighs. These are my go-to for this recipe because they remain juicy and flavorful even after cooking. Unlike chicken breasts which can dry out quickly, thighs offer a tenderness that’s simply irresistible when marinated properly. Look for thighs that are plump and free from any discoloration—freshness matters! If you prefer white meat or are looking for lighter options, you could substitute chicken breasts instead; just keep an eye on cooking time to avoid them drying out.
- 2 tablespoons soy sauce. This ingredient is non-negotiable as it adds depth and richness to our marinade. Soy sauce brings out the natural umami in the chicken while lending a wonderful saltiness without overpowering it. Opt for low-sodium soy sauce if you’re watching your salt intake—trust me; it still packs a flavorful punch while allowing us to control how salty the dish becomes.
- 2 tablespoons teriyaki sauce. Ahh, the sweet allure of teriyaki! This sauce provides that perfect balance of sweetness along with additional complexity from its blend of spices. It’s like liquid gold in our marinade! If you happen to have homemade teriyaki sauce on hand—bravo! Use it here for even more depth.
- 1 tablespoon honey. Honey acts as both a sweetener and a natural glaze that caramelizes when cooked, giving our chicken that lovely shiny finish we all love to see. Plus, its floral notes complement the other flavors beautifully. If you’re in need of alternatives due to dietary restrictions or personal preference, maple syrup could work as an excellent substitute here.
- 1 tablespoon olive oil. A splash of olive oil helps to bind our marinade together while providing moisture during cooking—a crucial step for keeping our chicken succulent! Choose extra virgin olive oil for its robust flavor profile; it not only enhances the taste but also carries healthy fats which are important in any balanced meal.
- 1 teaspoon garlic powder. Garlic powder is one of those magical ingredients that elevates almost any dish! It offers deep flavor without having to chop any fresh garlic—how convenient is that? Make sure you’re using fresh garlic powder (not outdated), as stale spices lose their potency over time.
- 1 teaspoon ginger powder. Ginger adds warmth and brightness to our dish; its zesty notes are what make this Hawaiian Chicken Bowl feel so vibrant! If you have fresh ginger lying around, feel free to grate some—you’ll find it provides an even more intense flavor.
- Salt and pepper to taste. These two simple staples serve as essential seasoning agents in our recipe—they help enhance all the other flavors at play here! Always taste as you go; proper seasoning can make or break your dish!
- 2 cups cooked brown rice. Brown rice is my choice here because it’s hearty and nutty—a perfect canvas for all those delicious toppings! Not only does it provide fiber but also complements the sweetness from pineapple wonderfully. If time is short or you prefer something different like quinoa or jasmine rice—go ahead! Just adjust cooking times accordingly.
- 1 cup pineapple chunks (fresh or canned, drained). Pineapple adds that quintessential tropical sweetness—its juicy texture contrasts beautifully against the savory elements in our bowl. Fresh pineapple will give you that vibrant flavor pop while canned varieties offer convenience without losing too much quality—just be sure they’re packed in juice instead of syrup for healthier options.
- 1 red bell pepper, diced. Sweet bell peppers are not only colorful but also add crunch alongside their subtle sweetness which balances nicely with everything else going on in this bowl! Choose firm peppers without wrinkles or blemishes—the fresher they are, the better!
- 1 cup snap peas or green beans. Snap peas provide such delightful crunch while adding freshness—plus they’ve got such gorgeous color too! If snap peas aren’t available when you’re making this dish—or if green beans are more accessible—they’ll work equally well here!
- 1 avocado, sliced. Creamy avocado slices elevate this bowl beyond measure—its richness wraps around each ingredient like a warm hug! Look for ripe avocados (they should yield slightly when pressed) to ensure maximum creaminess; if they aren’t quite ready yet don’t fret—you can always mash them instead!
- 2 green onions, sliced. Green onions lend brightness alongside their mild oniony flavor which rounds off everything perfectly at serving time—don’t skip them! They add color contrast too (which visually appeals) so be generous when sprinkling them over your bowls.
- Sesame seeds for garnish. Finally… sesame seeds bring both texture and visual appeal when sprinkled atop your finished creation—they’re like confetti celebrating your culinary success! Toasting them lightly before garnishing elevates their nutty flavor even more—a small but impactful step!
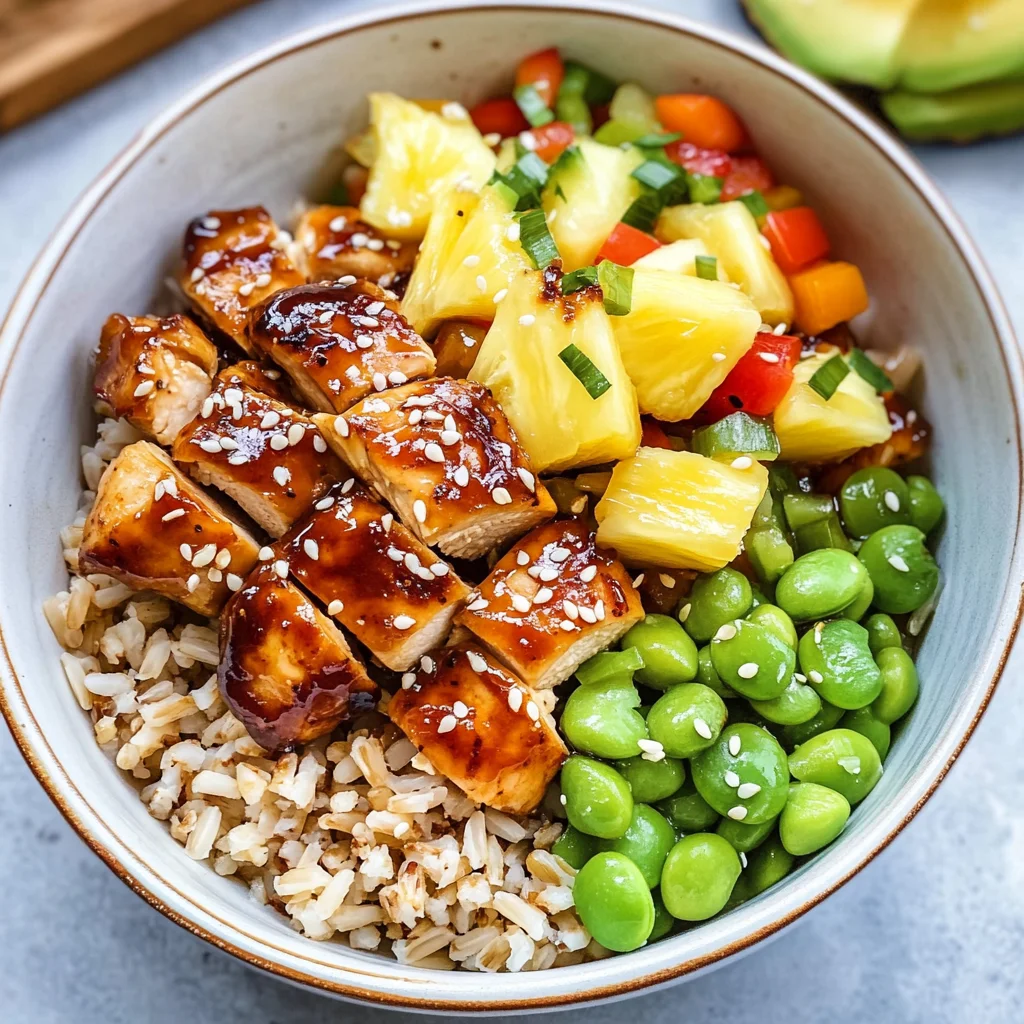
Equipment You’ll Need:
Cooking can be an art form made smoother with just the right tools by your side! While these items aren’t technically ingredients themselves—they play crucial roles in helping us achieve culinary success with our Hawaiian Chicken Bowl!
- **Mixing bowl – A sturdy mixing bowl is indispensable when we whip up our marinade; choose one large enough to comfortably accommodate all those ingredients without spilling over during mixing sessions! Ideally opt for glass or stainless steel—it allows you see how well things incorporate together while being easy-to-clean afterward!
- **Resealable bag or shallow dish – You’ll want either option handy when marinating those chicken thighs—either will do fine as long as they secure tightly around food during refrigeration time! Resealable bags minimize cleanup since they’re disposable afterward—but shallow dishes allow easier access later when it’s grilling/sautéing time!
- **Grill or skillet – Depending on what equipment you’ve got at home—a grill pan works wonders here if you’d like those beautiful char marks… But if stovetop cooking suits better; use an iron skillet instead—it retains heat effectively ensuring consistent results throughout cooking process without burning anything due too uneven temperatures
- **Meat thermometer – Trust me; investing in one pays off big-time—it guarantees perfectly cooked chicken every single time by measuring internal temps accurately rather than guessing based solely off visual cues alone!
Preparing the Hawaiian Chicken Bowl / Making the Marinade
Step 1: Crafting Your Flavorful Marinade
Let’s start by creating that magical marinade which serves as both tenderizer and flavor booster for our chicken thighs! In a medium-sized mixing bowl (preferably one that’s deep enough), combine soy sauce, teriyaki sauce, honey, olive oil garlic powder ginger powder salt & pepper together until fully blended into one cohesive mixture—this step sets up a solid base layer taste-wise before we even touch meat itself!
Why take care during this part? Because good marinades don’t just coat—they penetrate into proteins developing deeper flavors throughout entire piece over time spent soaking away patiently inside fridge later down line… So stir until everything looks uniform—you want no clumps remaining whatsoever: consider smoothness paramount here!
This mixture should smell utterly intoxicating at this stage—it’ll transport both mind body alike straight towards lush tropical lands far away…Once blended properly pour generously over those beautiful boneless skinless thighs placed within resealable bag/dish mentioned earlier before sealing tight making sure air gets squeezed out completely ensuring maximum exposure happens across surface area possible.
Step 2: Marinating Time
Now comes perhaps one most significant elements involved: patience (yes patience!). Allowing those marinated beauties rest ideally between 30 minutes – 2 hours inside fridge enables absorption magic happen fully—it gives time necessary allowing flavors meld together seamlessly whilst breaking down fibers resulting tenderness desired ultimately once cooked up later on heat source chosen previously mentioned…
But why chill? Colder temperatures slow down enzymatic reactions meaning pieces won’t cook prematurely before hitting grill/skillet later… So please resist urge opening bags repeatedly poking around checking progress unless absolutely necessary—that leads only frustration rather than satisfaction come serving hour later down line where everything needs come forth together harmoniously…
Step 3: Preparing Fresh Vegetables
While we wait patiently through marination period let’s shift focus onto prepping all those colorful vibrant vegetables waiting patiently nearby: grab sharp knife + cutting board then dice red bell pepper into bite-sized pieces ensuring uniformity maximizes presentation factor seen once finished plating takes place afterward…
Next up? Snap peas/green beans whatever chose—as long they’re crisp firm which brings brightness crunchiness alongside juicy sweetness from pineapples too—we want textures contrasting nicely against moistness coming from meats used earlier… Don’t forget slicing up creamy avocados & scattering green onion tops afterwards because trust me—they truly elevate final presentation factor significantly making each scoop visually appealing along tastewise once assembled properly later down line too!”
Step 4: Preheating Your Cooking Surface
Now let’s get things heated up shall we?! Preheat either grill pan/skillet over medium-high heat until sizzling hot before placing marinated thighs directly onto surface after removing excess liquid back into bowl where leftover marinade resides waiting patiently behind scenes… Why preheating matters? Well…it helps develop crispy exterior outside edges whilst locking moisture inside resulting perfectly cooked juicy meat ready devoured moments soon thereafter…
Keep close eye during first few minutes watching closely till golden browning starts developing underneath surface signs appearing indicating readiness flipping occurs next after roughly 6–8 minutes depending thickness overall size pieces chosen initially prior setup assembly…
I hope you’re getting excited about assembling your very own Hawaiian Chicken Bowl because we’re just getting started! Each step has been crafted with love—and soon you’ll find yourself savoring every last bite filled bursting flavors dancing around delightfully across palate altogether creating unforgettable experiences shared amongst friends family alike gathered round table enjoying feast made heartfully right here today!”
Stay tuned as we continue unfolding secrets behind crafting ultimate masterpiece next few steps leading closer towards achieving mouthwatering results everyone awaits eagerly end result awaited eagerly ahead…
Step 5: Searing to Perfection
Now, it’s time to bring that beautiful marinated chicken to life! Preheat your grill or skillet over medium-high heat. This step is absolutely crucial because the high temperature will create a gorgeous sear on the chicken, locking in all those mouthwatering flavors from the marinade. You want to hear that satisfying sizzle as soon as the chicken makes contact with the hot surface—trust me, it’s music to your ears! Remove the chicken thighs from their flavorful bath, allowing any excess marinade to drip off; we don’t want any soggy bites here!
Cook the chicken for about 6-8 minutes on each side, but remember, cooking times may vary based on the thickness of your thighs and the heat of your grill or stove. The goal is to reach an internal temperature of 165°F (75°C). So, use a meat thermometer if you have one—it’s a game changer! You’re looking for that perfect golden-brown crust forming on each side; this caramelization is where all that deep flavor comes from. Don’t rush this step; allow yourself to enjoy the aroma wafting through your kitchen or backyard as it transforms into something utterly intoxicating.
Step 6: The Essential Resting Period
Once cooked through, remove those glorious chicken thighs from the heat and let them rest for a couple of minutes. Yes, resting is non-negotiable! During this time, juices redistribute throughout the meat, ensuring each bite remains juicy and tender rather than dry and chewy. Think of it as giving your chicken a little spa day before serving it up; it deserves every moment of relaxation after its time over the heat!
While you wait—and I know it can be tempting to dive right in—slice your chicken into bite-sized pieces after about five minutes of resting. This helps maintain its juiciness and makes for easier serving in those beautiful Hawaiian Chicken Bowls you’re creating. Plus, when you slice against the grain, you ensure even more tenderness with each forkful. Feel free to admire how perfectly cooked your chicken looks; I promise you’ll be proud of what you’ve created!
Step 7: Building Your Flavorful Base
Now comes one of my favorite parts—layering everything together to create a stunning Hawaiian Chicken Bowl that’s as pleasing to the eyes as it is to the palate! Start by taking your cooked brown rice—this nutty grain serves as the nourishing foundation for our bowl. Spoon generous amounts into each bowl so that it’s ready to soak up all those vibrant flavors coming next.
To build upon this base, layer on your sliced chicken—don’t skimp here! Each piece should be artfully arranged so that every bite has equal opportunity for flavor explosion. Next up are those luscious pineapple chunks: whether fresh or canned (just make sure they’re drained if using canned), they add an essential sweetness that balances beautifully with our savory teriyaki-marinated chicken. Follow this with a sprinkle of diced red bell pepper and snap peas or green beans—they not only add pops of color but also crunch and freshness that elevates the entire experience.
Step 8: The Finishing Touches
Oh, we’re almost there! The final touches are where we can really elevate our bowls from delicious to extraordinary. Drizzle any remaining teriyaki sauce over your assembled bowls; this rich glaze is like liquid gold and brings everything together harmoniously. It’s not just about flavor here; it’s about creating an inviting presentation that will make anyone who sees it feel excited about digging in.
Next, don’t forget to garnish with sliced green onions and sesame seeds—these tiny details are absolutely paramount! They add lovely texture and a burst of flavor that complements everything else beautifully. If you’re feeling extra fancy (and who wouldn’t?), consider adding slices of creamy avocado atop each bowl for richness that’s simply divine. Trust me on this one—the creaminess balances out all those bright flavors perfectly.
As you serve these delightful bowls immediately, take a moment to appreciate all your hard work—the colors are vibrant, the aromas intoxicating, and I guarantee each bite will feel like a warm hug from Hawaii itself! Enjoy every mouthful—you’ve earned it!
Storage and Enjoyment Tips for Your Hawaiian Chicken Bowl
Now that you’ve crafted this delightful Hawaiian Chicken Bowl, it’s time to dig in and relish every bite! But let’s be real—sometimes we make a little extra, or we want to enjoy these vibrant flavors later. So, whether you’re meal prepping for the week or simply saving some for tomorrow’s lunch, I’m here to guide you on how to store your creations without losing a hint of that heavenly taste. Trust me, with a few simple tips, you can keep your Hawaiian Chicken Bowl as delicious as the moment it came off the grill.
Storing Leftover Hawaiian Chicken Bowl
When it comes to preserving your Hawaiian Chicken Bowl, choosing the right container is absolutely crucial. Opt for airtight glass containers or high-quality plastic ones; these will not only keep your food fresh but also prevent any unwanted odors from mingling in your fridge. If stored properly in the refrigerator, your leftovers can stay tasty for up to three days. To maintain that wonderful texture of the rice and chicken, consider placing a slice of bread in the container; this little trick helps absorb excess moisture and keeps everything just right. And let me tell you—when you reheat it gently in the microwave or on the stove, those flavors come back alive! You’ll find that while the freshness may fade slightly, the essence of that sweet-tangy honey-teriyaki glaze still sings through every mouthful.
Freezing Components for Later
Freezing components of your Hawaiian Chicken Bowl is a fantastic option if you want to enjoy this tropical delight down the line! To do this properly, allow everything to cool completely before portioning out your chicken and veggies into freezer-safe bags or containers. Make sure to squeeze out as much air as possible before sealing—this helps prevent freezer burn and keeps your meal vibrant and flavorful. When frozen correctly, your chicken should last up to three months without losing quality. The great thing about freezing is that when you’re ready to indulge again, all you need is a quick defrost in the refrigerator overnight or a spin in the microwave on low power. This convenience means you can whip up a nutritious meal with minimal effort while still savoring those delightful island flavors. Seriously, how awesome is that?
Hawaiian Chicken Bowl
- Total Time: 30 minutes
- Yield: Serves 4
Description
Indulge in a tropical escape with this Hawaiian Chicken Bowl, a delightful fusion of flavors and textures that will transport you straight to sun-soaked beaches. Tender marinated chicken thighs are glazed in a luscious honey-teriyaki sauce, perfectly complemented by a bed of nutty brown rice. Fresh pineapple chunks and vibrant vegetables like red bell pepper and snap peas add bursts of sweetness and crunch, creating a satisfying meal that’s as nourishing as it is delicious. Whether for a summer barbecue or an easy weeknight dinner, this bowl is sure to become a cherished favorite in your kitchen.
Ingredients
- 1 lb boneless, skinless chicken thighs
- 2 tablespoons soy sauce
- 2 tablespoons teriyaki sauce
- 1 tablespoon honey
- 1 tablespoon olive oil
- 1 teaspoon garlic powder
- 1 teaspoon ginger powder
- Salt and pepper to taste
- 2 cups cooked brown rice
- 1 cup pineapple chunks (fresh or canned)
- 1 red bell pepper, diced
- 1 cup snap peas or green beans
- 1 avocado, sliced
- 2 green onions, sliced
- Sesame seeds for garnish
Instructions
- In a mixing bowl, combine soy sauce, teriyaki sauce, honey, olive oil, garlic powder, ginger powder, salt, and pepper to create the marinade.
- Pour the marinade over the chicken thighs in a resealable bag or shallow dish. Seal and refrigerate for at least 30 minutes to 2 hours.
- While the chicken marinates, chop the vegetables and prepare your cooking surface—grill or skillet preheated over medium-high heat.
- Remove excess marinade from the chicken and cook on the grill or skillet for about 6–8 minutes on each side until golden brown and cooked through (internal temperature of 165°F).
- Let the chicken rest for a few minutes before slicing it into bite-sized pieces.
- To assemble your bowls: start with brown rice as the base, top with sliced chicken, pineapple chunks, bell pepper, snap peas or green beans, avocado slices, green onions, and sesame seeds.
- Prep Time: 15 minutes
- Cook Time: 15 minutes
- Category: Dinner
- Method: Grilling/Pan-Frying
- Cuisine: Hawaiian
Nutrition
- Serving Size: 1 bowl (approx. 420g)
- Calories: 520
- Sugar: 18g
- Sodium: 720mg
- Fat: 20g
- Saturated Fat: 3g
- Unsaturated Fat: 15g
- Trans Fat: 0g
- Carbohydrates: 62g
- Fiber: 7g
- Protein: 32g
- Cholesterol: 125mg
Leave a Comment