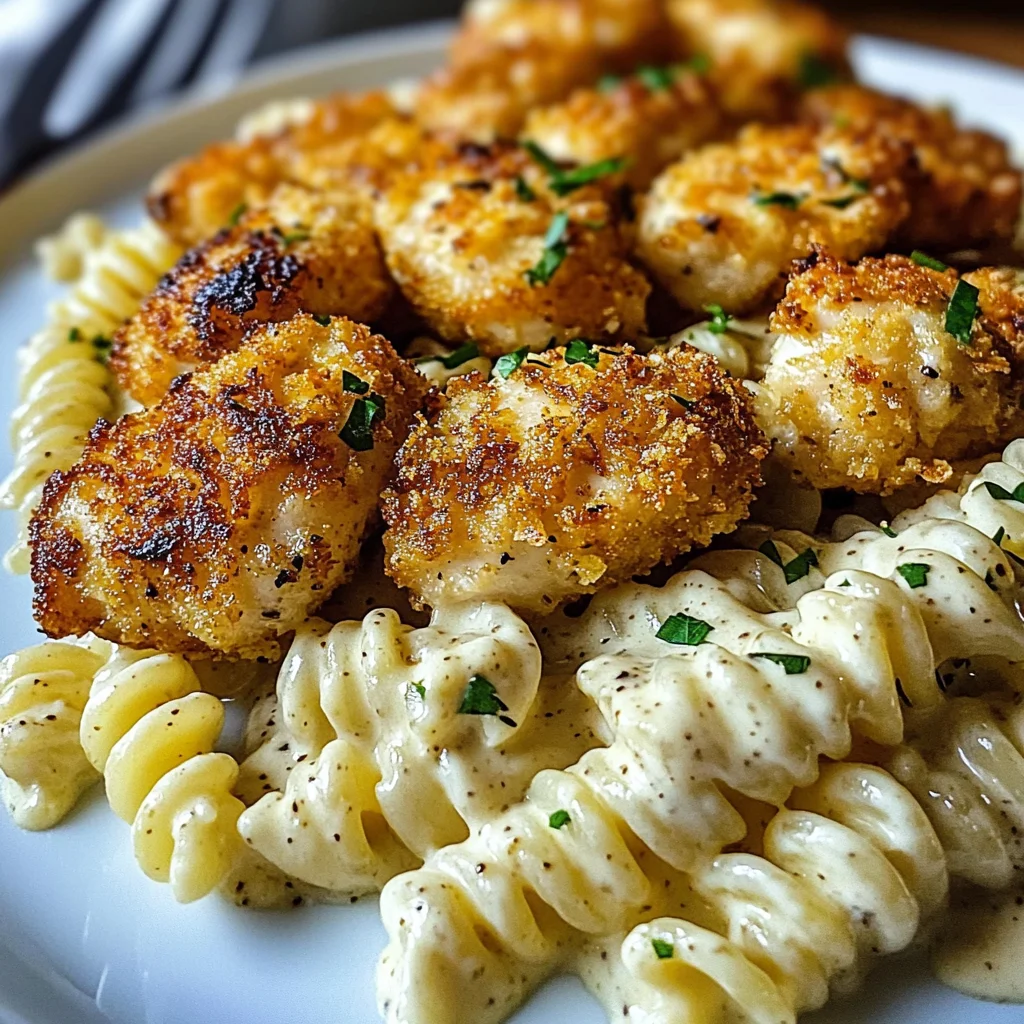
There’s something truly magical about the way food can bring us together, isn’t there? It’s more than just nourishment; it’s a heartfelt experience that wraps us in warmth and comfort. The aroma of sizzling chicken bites mixed with fragrant garlic wafting through the air is nothing short of intoxicating. When you take your first bite of these Garlic Parmesan Chicken Bites with Creamy Rotini, you’ll understand why this dish has become a cherished recipe in my home. The crunchy, cheesy chicken pieces dance atop the creamy, rich rotini, creating a symphony of flavors that will have everyone asking for seconds—and maybe even thirds! I promise you, this isn’t just dinner; it’s a celebration on your plate.
What makes this dish even more special is how it encapsulates both simplicity and indulgence. It’s perfect for a cozy weeknight meal or an inviting gathering with friends and family. The contrast of crispy chicken against the velvety sauce is like a warm hug on a chilly evening. Every element plays its part, from the perfectly seasoned chicken to the luscious cream sauce that clings to every twist of pasta. This recipe embodies love, tradition, and a touch of creativity—because why not elevate our everyday meals into extraordinary experiences?
Garlic Parmesan Chicken Bites with Creamy Rotini: A Comforting Delight
Let’s dive into this delightful recipe together! This Garlic Parmesan Chicken Bites with Creamy Rotini is not just about feeding ourselves; it’s about nourishing our souls and enjoying each moment spent in the kitchen. So roll up your sleeves and get ready for some culinary magic!
Ingredients:
As we embark on this delicious journey, let’s gather our ingredients—each one plays an essential role in crafting this comforting meal.
- 2 large chicken breasts, cut into bite-sized chunks. This is where we start building our foundation. Chicken breasts are lean yet flavorful, making them perfect for our crispy bites. When selecting your chicken, look for firm texture and no discoloration—freshness is key here! If you’re looking to make things even easier, you can opt for pre-cut chicken tenders; just be sure to adjust cooking time accordingly as they may cook faster.
- 1/2 teaspoon salt. Ahh, salt—the unsung hero of seasoning! It brings out all those delicious flavors hiding within the ingredients. Salt also helps tenderize meat during cooking, which ensures that our chicken remains juicy and succulent. Feel free to use sea salt or kosher salt here; both will work beautifully.
- 1/2 teaspoon black pepper. This humble spice adds depth and warmth to every bite of chicken. Freshly ground black pepper is always preferred as it has a much more potent flavor compared to pre-ground varieties—trust me on this one! It brings just the right amount of kick without overwhelming the dish.
- 1/2 teaspoon paprika. Not only does paprika lend vibrant color to our dish, but it also offers a subtle sweetness that rounds out the flavors beautifully. Sweet paprika works wonderfully here, but if you’re feeling adventurous and crave heat, try using smoked paprika for an extra layer of complexity!
- 1/2 teaspoon garlic powder. Garlic plays a pivotal role in our flavor profile! Adding garlic powder along with fresh minced garlic allows us to build layers of garlicky goodness without overpowering anything else on our plate. Plus, garlic powder blends seamlessly into our breadcrumb coating.
- 1/2 cup grated parmesan cheese (for coating). Oh, parmesan cheese—what would we do without its nutty richness? Coating our chicken bites in parmesan creates that irresistible golden crust while adding tons of flavor as it crisps up during frying. Be sure to opt for freshly grated if possible; it melts better than pre-packaged options!
- 1/2 cup panko breadcrumbs. For that delightful crunch! Panko breadcrumbs are lighter and crispier than traditional breadcrumbs due to their unique shape and texture—they’re absolutely paramount in achieving that satisfying crunch when fried.
- 2 tablespoons olive oil (for frying). This liquid gold not only helps fry our chicken bites evenly but also contributes its own subtle flavor that complements everything beautifully! Use high-quality extra virgin olive oil if you can—it elevates our dish even further!
- 8 oz rotini pasta. These delightful corkscrew-shaped noodles are perfect for catching every bit of that creamy sauce we’re about to whip up! If you don’t have rotini on hand, feel free to substitute with any pasta shape you love—the important thing is that it holds onto that sauce well.
- 1 tablespoon butter. Butter adds richness and depth when sautéing garlic—a crucial step for building flavor in our creamy sauce! Make sure it’s unsalted so we can control the overall saltiness later on.
- 3 cloves garlic, minced. Freshly minced garlic will fill your kitchen with an intoxicating aroma as it cooks—absolutely heavenly! The key here is not to let it brown too much since burnt garlic can turn bitter; we’re aiming for fragrant perfection.
- 1 cup heavy cream. This luscious ingredient transforms our simple sauce into something utterly extraordinary! Heavy cream provides a velvety mouthfeel while allowing us to create a luxurious consistency that’s perfect for coating each spiral of pasta generously.
- 1/2 cup grated parmesan cheese (for sauce). Just when you thought we were done with parmesan… think again! Incorporating more cheese into our creamy sauce deepens flavor while adding richness—it’s non-negotiable!
- Optional: chopped parsley for garnish. While parsley doesn’t alter taste significantly in this dish—it brings freshness and brightness visually! A sprinkle goes a long way toward making your plate look beautiful!
Equipment You’ll Need:
Having the right tools at your disposal makes all the difference when cooking—and trust me; you want everything running smoothly as you create this masterpiece! While these might not be ingredients per se, consider them essential partners in crafting something wonderful.
- Sharp knife: A good chef’s knife allows you to cut your chicken evenly into bite-sized chunks effortlessly—a crucial step in ensuring even cooking throughout.
- Cutting board: Choose a sturdy surface—preferably one dedicated solely for meats—to keep things sanitary as you chop away!
- Large skillet: A wide skillet ensures ample space for frying those glorious chicken bites without crowding them together—which could lead to steaming instead of crisping!
- Medium pot: Perfectly suited for boiling water before adding rotini pasta—it should be large enough so that water won’t boil over once added!
- Measuring cups & spoons: Precision matters when cooking—you’ll want these handy as we measure out ingredients accurately throughout every step!
Now that we’ve gathered everything we need let’s dive into preparing those Garlic Parmesan Chicken Bites with Creamy Rotini!
Preparing the Garlic Parmesan Chicken Bites with Creamy Rotini
Step 1: Seasoning the Chicken
First off, let’s give those lovely pieces of chicken some love by seasoning them generously with salt, black pepper, paprika, and garlic powder in a large bowl or directly on your cutting board if preferred. Why season at this stage? Well, seasoning early allows those flavors to penetrate deeply into each piece before we fry them up later—a trick I’ve learned over countless dinners shared amongst friends who can’t resist asking how I achieve such bold flavors! Make sure each piece gets coated evenly; focus on rubbing those spices into every nook and cranny because trust me—it makes all the difference when they hit hot oil later on!
Step 2: Creating the Crispy Coating
In another bowl (yes—we’re dirtying up some dishes!), combine panko breadcrumbs with grated parmesan cheese until mixed well—you want everything evenly distributed here so every bite will pack a flavorful punch! The reason behind using panko? Its airy texture leads us toward achieving maximum crunchiness after frying—something I absolutely adore about these bites! Once thoroughly mixed together (a couple quick stirs should do), set aside until ready for use because patience pays off big time when frying later on—we don’t want cold crumbs ruining hot oil!
Step 3: Coating Your Chicken
Now comes one of my favorite parts: giving each seasoned piece of chicken their crispy armor by rolling them in that breadcrumb mixture lovingly prepared earlier! Take each bite-sized chunk individually; press gently yet firmly into those crumbs ensuring complete coverage—the key lies within adhering properly so none fall off during frying (and boy will they if rushed!). This technique locks moisture inside while allowing outer layers to fry beautifully golden brown—it’s truly transformative watching raw protein turn into crispy perfection right before your eyes!
Step 4: Frying Until Golden Brown
Heat up some olive oil over medium-high heat in your skillet until shimmering but not smoking—that sweet spot where magic happens begins now! Carefully place coated chicken bites side by side without overcrowding (you may need batches depending on pan size) allowing space around them ensures proper browning occurs rather than steaming instead—definitely what we’re avoiding here today after all hard work put forth thus far! Fry approximately three minutes before flipping over gently using tongs or spatula letting other side sizzle away until equally golden brown (another three-four minutes usually does trick). Keep an eye out though—they shouldn’t take long—we’re talking about tender juicy goodness inside paired perfectly crunchy outside begging for attention immediately upon arrival onto plate shortly thereafter…
And there you have it—a delightful beginning towards creating Garlic Parmesan Chicken Bites with Creamy Rotini that’ll leave everyone craving more warmth from shared moments around table filled laughter memories made heartily enjoyed together! Stay tuned as we continue down path towards finishing touches making dish divine perfection all around…
Step 5: Cooking the Rotini to Perfection
Now that we have our chicken bites golden and crispy, it’s time to turn our attention to the rotini pasta, which will serve as a luscious canvas for our creamy sauce! Bring a large pot of water to a rolling boil and make sure to add a generous pinch of salt—think of this as your first opportunity to season the pasta. Salt not only enhances the flavor but also ensures that the pasta itself has a lovely taste, rather than just serving as a vehicle for your sauce. Once the water is boiling, gently drop in the rotini. Keep an eye on the clock and cook it for about 8-10 minutes until it reaches al dente perfection. You want it tender but with a slight bite; this gives your dish texture and prevents it from becoming mushy when combined with that decadent sauce.
As you cook the pasta, don’t rush through this step! Stir occasionally so that it doesn’t stick together—this small detail can make all the difference in creating a delightful eating experience. When you drain the pasta, remember to reserve about half a cup of that starchy cooking water. This liquid gold is essential because it can be added back into your sauce if needed, helping to achieve that beautifully creamy consistency we’re after. Trust me on this: having that extra starch on hand can elevate your dish and help bind everything together beautifully.
Step 6: Sautéing Garlic for an Aroma Explosion
With your rotini cooking away, let’s move on to creating that utterly intoxicating garlic cream sauce. In the same skillet you used for frying those scrumptious chicken bites, melt 1 tablespoon of butter over medium heat. As soon as you see it bubbling and foaming slightly, toss in those minced garlic cloves and let them sauté for just about 30 seconds. This process is truly magical; you will begin to notice an aroma wafting through your kitchen that evokes warmth and comfort—it’s like wrapping yourself in a cozy blanket on a chilly day.
But here’s where patience comes into play—you don’t want your garlic to brown too much because burnt garlic can introduce a bitter flavor that will disrupt the harmony of our dish. So keep stirring gently and watch closely; you’re looking for that fragrant, golden hue! Once you’ve achieved this aromatic stage, it’s time to introduce 1 cup of heavy cream into the skillet. The contrast between the rich butter and vibrant garlic creates an enticing base that echoes comfort in every spoonful.
Step 7: Creating Your Dreamy Cream Sauce
As soon as you add the heavy cream, bring everything to a gentle simmer while continuously whisking. Don’t rush this step! This process allows all those flavors—the buttery richness and piquant garlic—to marry beautifully together. After about 2-3 minutes of simmering, you’ll notice the sauce thickening ever so slightly—that’s exactly what we want! Now it’s time for our next star player: stir in another half cup of grated parmesan cheese. This is crucial because it adds not only rich flavor but also depth and creaminess; think of it as transforming your already lovely mixture into something truly extraordinary.
Keep whisking until all the cheese has melted into that velvety concoction, creating what I can only describe as liquid gold—a creamy delight that’s begging to cling onto every strand of rotini. If at any point you find your sauce too thick or clumpy, don’t hesitate to drizzle in some reserved pasta water bit by bit until you reach your desired consistency. Remember, this balance is non-negotiable; we want each bite coated perfectly without being too soupy or dry!
Step 8: Marrying Pasta with Sauce
Now comes one of my favorite moments—the moment when all elements come together in harmonious unity! Gently add your cooked rotini directly into the creamy garlic parmesan sauce. Use tongs or a large spatula to toss everything together with care; don’t just dump them in! Think about how you’re folding them into each other—this is where those textures start intertwining beautifully! You should see every piece of pasta getting enveloped in that silky sauce, glistening under its creamy embrace.
This isn’t just mixing; it’s about creating an experience where each bite delivers an explosion of flavors—rich creaminess punctuated by hints of garlic and nutty parmesan making their presence known without overpowering one another. I promise you will want every single noodle covered perfectly! If things seem too thick during this process or if you’d like more sauce to coat every delicious inch of pasta, feel free to add more reserved pasta water until everything looks just right—this step is key for achieving that dreamy consistency we’re after!
Next Major Phase – Bringing It All Together
Step 9: Final Touches – The Crispy Chicken Bites Take Center Stage
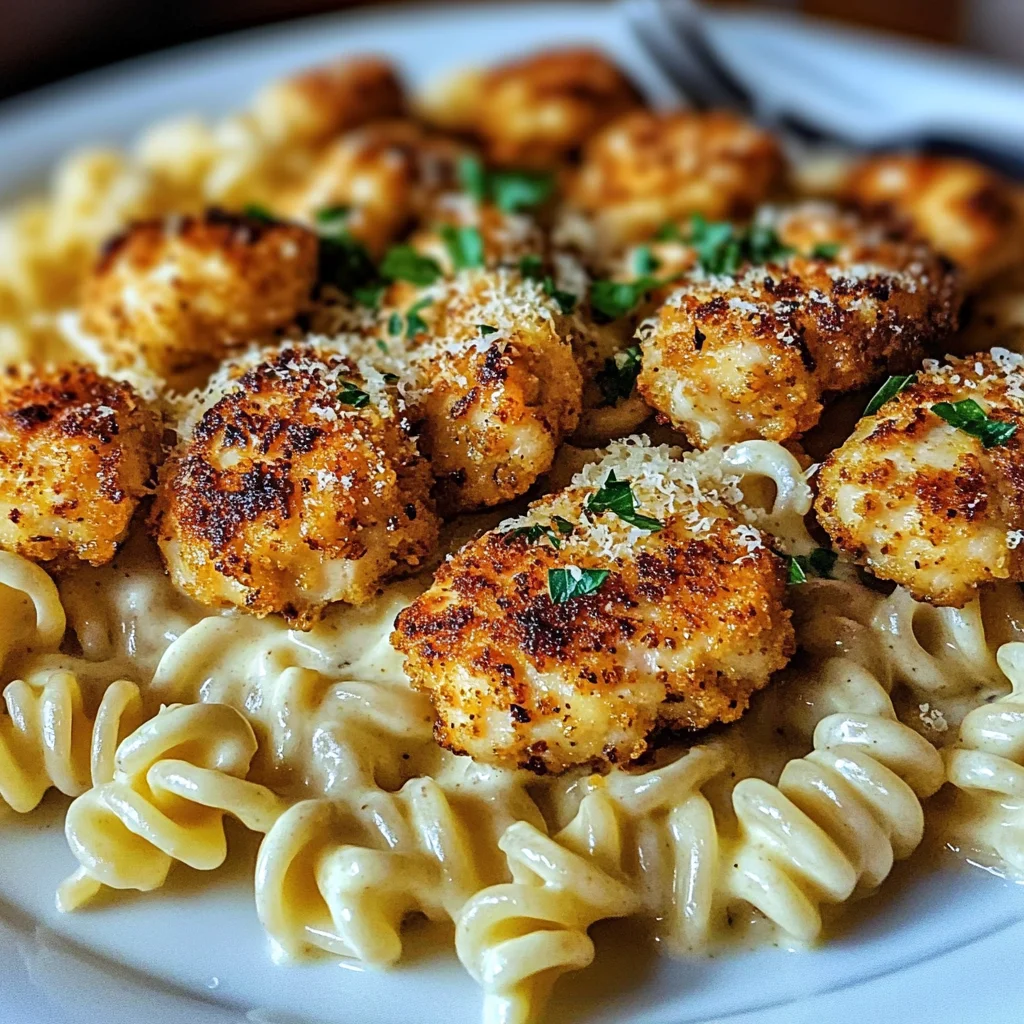
Now that our rotini is beautifully coated with luscious creamy goodness, it’s time for our crispy chicken bites to shine! Carefully plate up generous portions of this comforting pasta creation on warm plates (trust me, warmed plates make all the difference!). As you’re plating up each serving, take care to top them off with those gorgeous chicken bites that you’ve patiently prepared earlier—they deserve their moment in the spotlight! Picture how they sit proudly atop their creamy throne while offering delightful contrast in both color and texture.
For an extra touch of visual appeal (and freshness), sprinkle some chopped parsley over each plate before serving—it’s like adding confetti to a celebration! Not only does this provide pops of color against the creamy backdrop but also adds a light herbal note that cuts through richness beautifully. Finally, before diving into this extraordinary meal you’ve created with love and attention, take just a moment—a silent appreciation for all these flavors coming together so splendidly.
I urge you not just to enjoy this meal alone but perhaps share with loved ones or friends; there’s something profoundly satisfying about gathering around food made from scratch—stories are told over meals like these. What makes these Garlic Parmesan Chicken Bites with Creamy Rotini truly special isn’t just how they taste but rather how they bring everyone together at the table. And trust me when I say…you’ll be craving seconds!
Storage and Enjoyment Tips for Your Garlic Parmesan Chicken Bites with Creamy Rotini
Now that you’ve whipped up this scrumptious dish, it’s time to dig in and relish every bite! The moment you plate those crunchy garlic parmesan chicken bites atop the creamy rotini, your kitchen will be filled with an inviting aroma that beckons everyone to the table. But what if you have leftovers? Fear not! I’ve got some tips to help you savor this delightful meal long after dinner is over.
Storing Leftover Garlic Parmesan Chicken Bites with Creamy Rotini
To preserve your delicious Garlic Parmesan Chicken Bites with Creamy Rotini for later enjoyment, transfer any leftovers into an airtight container. This is essential because exposure to air can lead to dryness or loss of flavor—definitely something we want to avoid! If stored properly in the refrigerator, your tasty creation will keep for about 3-4 days. For maintaining that irresistible crunch of the chicken bites, consider placing a slice of bread in the container along with them; this little trick helps absorb excess moisture and keeps everything fresher for longer. Now, when it comes to reheating, I recommend using an oven or an air fryer if you have one—this method ensures that the chicken retains its crispy texture, heating through evenly without turning soggy. Simply reheat at 350°F (175°C) until warmed through, and trust me; it will taste just as satisfying as when you first made it!
Freezing Garlic Parmesan Chicken Bites with Creamy Rotini for Later
If you’re looking to extend the lifespan of this culinary delight even further, freezing is an excellent option! To freeze effectively, allow the chicken bites and creamy rotini to cool completely before packing them into freezer-safe bags or containers. Make sure to remove as much air as possible before sealing; this prevents freezer burn, which can affect both taste and texture. When frozen properly, your meal can last for up to three months! When you’re ready to enjoy again, simply thaw in the refrigerator overnight before reheating as mentioned earlier. This convenience factor makes it a fantastic go-to option for busy weeknights or unexpected guests; imagine pulling a warm, hearty dish from your freezer on a chilly evening—it’s like having a comforting hug waiting just for you!

Garlic Parmesan Chicken Bites with Creamy Rotini
- Total Time: 45 minutes
- Yield: Serves approximately 4 people 1x
Description
Garlic Parmesan Chicken Bites with Creamy Rotini is a heartwarming dish that combines crispy, flavorful chicken bites with silky pasta in a rich garlic cream sauce. This recipe is not just a meal; it’s an invitation to gather around the table and share moments filled with laughter and warmth. The golden chicken pieces, coated in panko and parmesan, provide a satisfying crunch that pairs beautifully with the creamy rotini, creating an unforgettable dining experience. Perfect for weeknight dinners or special gatherings, this dish showcases how simple ingredients can come together to create something extraordinary.
Ingredients
- 2 large chicken breasts, cut into bite-sized chunks
- 1/2 teaspoon salt
- 1/2 teaspoon black pepper
- 1/2 teaspoon paprika
- 1/2 teaspoon garlic powder
- 1/2 cup grated parmesan cheese (for coating)
- 1/2 cup panko breadcrumbs
- 2 tablespoons olive oil (for frying)
- 8 oz rotini pasta
- 1 tablespoon butter
- 3 cloves garlic, minced
- 1 cup heavy cream
- 1/2 cup grated parmesan cheese (for sauce)
- Optional: chopped parsley for garnish
Instructions
- Season chicken chunks with salt, black pepper, paprika, and garlic powder.
- In a bowl, mix panko breadcrumbs and grated parmesan cheese.
- Coat seasoned chicken pieces in the breadcrumb mixture.
- Heat olive oil in a skillet over medium-high heat and fry the chicken until golden brown.
- Cook rotini pasta according to package instructions until al dente; reserve some cooking water.
- In the same skillet, melt butter, sauté minced garlic briefly, then add heavy cream and simmer.
- Stir in more parmesan cheese until melted and combined.
- Toss cooked rotini in the cream sauce; add reserved pasta water if needed for consistency.
- Serve creamy rotini topped with crispy chicken bites and garnish with parsley.
- Prep Time: 20 minutes
- Cook Time: 25 minutes
- Category: Main
- Method: Frying
- Cuisine: Italian
Nutrition
- Serving Size: 1 plate (approximately 400g)
- Calories: 620
- Sugar: 4g
- Sodium: 750mg
- Fat: 35g
- Saturated Fat: 15g
- Unsaturated Fat: 18g
- Trans Fat: 0g
- Carbohydrates: 45g
- Fiber: 3g
- Protein: 36g
- Cholesterol: 150mg

Leave a Comment