There’s something magical about the way food brings us together, isn’t there? It’s more than just sustenance; it’s an experience that can evoke memories, share love, and create joy. Today, I’m absolutely thrilled to share my recipe for Garlic Parmesan Chicken Tenders (air fryer or baked). Imagine sinking your teeth into crispy, golden tenders, their surface crackling ever so slightly as you bite through to reveal tender chicken bathed in rich, buttery garlic and a sprinkle of parmesan. Trust me when I say that this dish is a revelation—an effortless bridge between comforting tradition and the excitement of modern cooking methods. Whether you’re serving it at a family dinner or enjoying it solo with a side of your favorite dipping sauce, these tenders promise to deliver a profoundly satisfying experience.
With every crunch, you’ll be transported to a place where flavors meld beautifully—where the warmth of garlic mingles with the nuttiness of parmesan cheese. This isn’t just another chicken recipe; it’s a symphony of flavors that resonates with everyone who takes a bite. And whether you choose to whip them up in an air fryer or bake them in the oven, I promise you won’t be disappointed. These Garlic Parmesan Chicken Tenders are perfect for game days, weeknight dinners, or whenever those cravings hit! So let’s roll up our sleeves and dive into this culinary adventure together.
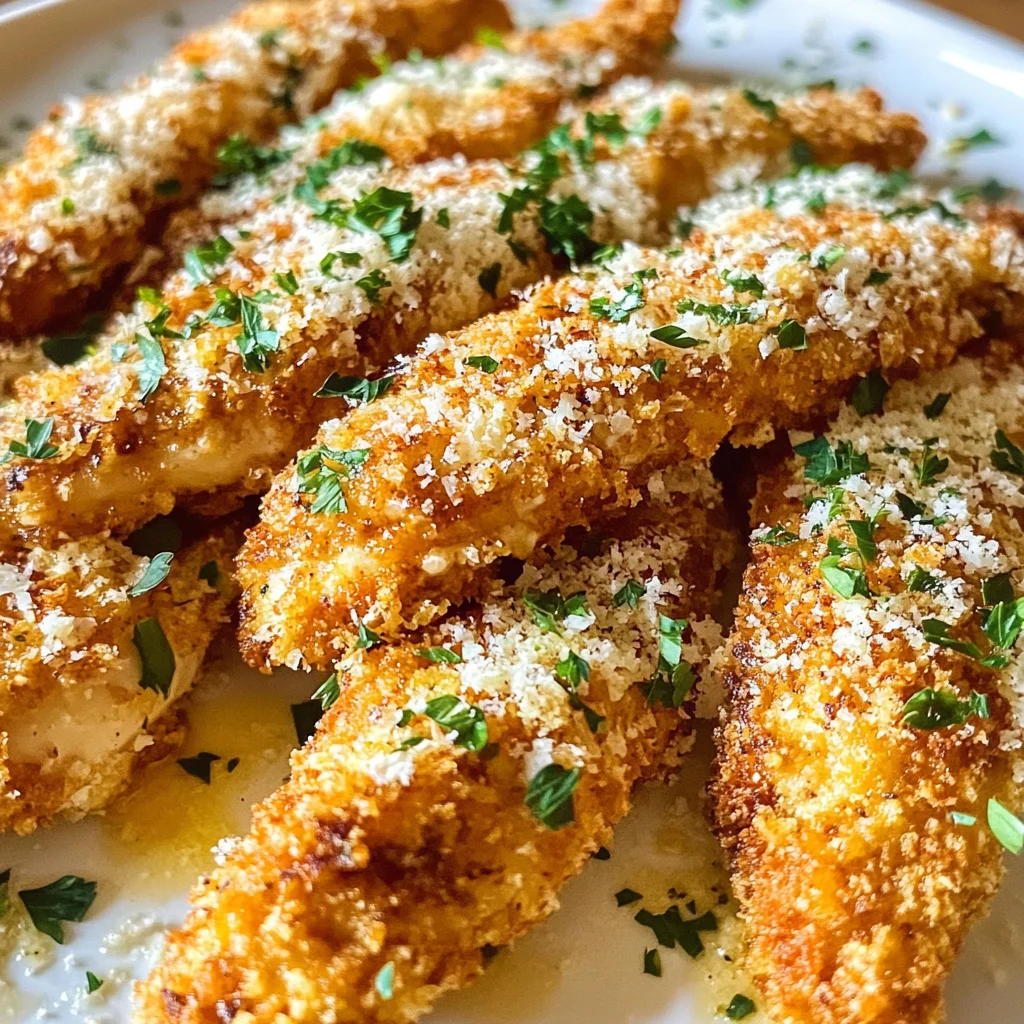
Garlic Parmesan Chicken Tenders (air fryer or baked): Crispy Perfection Awaits!
These Garlic Parmesan Chicken Tenders are not only delightfully easy to make but also incredibly versatile! Whether you have an air fryer or prefer the classic oven method, this recipe has got you covered. The result? Juicy chicken tenders enveloped in a crunchy cornflake coating and drenched in a luscious garlic parmesan butter sauce that will leave you craving more. Are you ready to turn your kitchen into a flavor-packed haven? Let’s get started!
Ingredients:
Embarking on this culinary journey means gathering fresh ingredients that will sing in harmony to create something truly extraordinary. Each component plays its own vital role in achieving those deliciously crispy and cheesy chicken tenders we’re after.
-
1 lb chicken breasts (sliced into tenders). The star of our show! Opt for high-quality chicken breasts—look for those that are firm and pale pink without any dark spots. Slicing them into tenders allows them to cook evenly while ensuring they remain juicy on the inside. If you’re looking for alternatives, turkey breast can work beautifully as well!
-
2 eggs (whisked). Eggs act as our binding agent here, helping the cornflakes adhere beautifully to the chicken tenders. They add richness and moisture, which is essential for succulent bites. Make sure to whisk them until they’re smooth and frothy; this helps create an even coating on each tender.
-
2 cups cornflakes (crushed). This is the secret weapon behind our irresistible crunch! Cornflakes provide an airy texture and golden color when cooked. Crush them nicely—aim for a mixture that’s not too fine but not too chunky either; think breadcrumbs! Feel free to substitute with panko breadcrumbs if that’s what you’ve got handy—they’ll give you an equally delightful crunch.
-
1 tsp garlic powder. Garlic powder enhances the flavor profile without being overwhelming. It offers that unmistakable aroma and taste associated with comfort food while ensuring an even distribution throughout our dish. Always opt for fresh garlic powder if possible, as it provides a more robust flavor compared to older stock.
-
1 tsp salt. Salt is crucial—it enhances all other flavors present in our dish. Make sure it’s evenly distributed across your seasoning mix; this step ensures every bite bursts with flavor rather than tasting bland.
-
1/2 tsp smoked paprika. This adds depth and complexity with its sweet smokiness—a non-negotiable ingredient if you’re aiming for layers of flavor! If you don’t have smoked paprika on hand, regular paprika will still lend beautiful color but miss out on that smoky essence.
-
1/2 tsp black pepper. Freshly cracked black pepper brightens up all those rich flavors we’re working with while adding just enough heat to awaken your palate without overpowering it.
-
4 tbsp butter (melted). This golden liquid adds richness and creates that mouthwatering garlic butter sauce we’re going for at the end! Use unsalted butter so you have control over the saltiness of your dish; it’s paramount when making sauces like this one.
-
4 cloves garlic (minced). Freshly minced garlic is absolutely intoxicating in this recipe—it infuses warmth into our butter sauce and deeply complements the parmesan cheese later on. Be generous here; there’s nothing quite like biting into beautiful roasted garlic goodness!
-
1/2 tsp salt (for sauce). Just like before, this little pinch will enhance our garlic butter sauce—making it utterly irresistible as it coats each tender.
-
Freshly grated Parmigiano Reggiano (around ¼ cup). Now here’s where we elevate these tenders from ordinary to extraordinary! Freshly grating cheese ensures maximum flavor release—you’ll experience nutty notes alongside creamy richness in every bite! Avoid pre-grated versions if possible—they often contain anti-caking agents that detract from pure cheesiness.
-
Chopped parsley for garnish. While parsley is often seen as just decoration, it actually brings brightness and freshness that cuts through the richness of all those flavors—plus it makes everything look gorgeous on the plate!
Equipment You’ll Need:
Having the right tools makes cooking smoother and more enjoyable—and trust me; it’s worth investing in good equipment when pursuing culinary greatness! Here are some essential partners you’ll need during our cooking adventure:
-
Air fryer or oven: The true stars of our cooking process! The air fryer will give us that fabulous crispiness quickly without deep frying while retaining moisture inside—the perfect method for busy weeknights! However, using an oven can yield equally delicious results; simply adjust cooking times accordingly depending on your chosen method.
-
Microwave-safe bowl: This is where we’ll combine our melted butter and minced garlic before tossing everything together later on—it needs to be microwave-safe so you can safely heat it up without any worries!
-
Whisk: A trusty whisk will help combine your eggs seamlessly before dipping each tender—this step ensures even coverage when breading!
-
Baking sheet lined with parchment paper: If opting for oven-baked tenders, lining your baking sheet prevents sticking while making cleanup effortless afterward!
-
Wire rack: Using a wire rack atop your baking sheet allows hot air circulation around each tender during baking leading to maximum crispiness—we want every bite perfectly crunchy!
Now that we’ve gathered everything we need let’s dive right into preparing those scrumptious Garlic Parmesan Chicken Tenders!
Step 1: Seasoning the Chicken
First things first—we need to season our chicken breasts well before anything else! Take your sliced chicken tenders and place them in a large mixing bowl where they’ll get thoroughly coated with flavor magic! Sprinkle over the garlic powder along with salt, smoked paprika, and black pepper—all these elements work synergistically to enhance each tender’s taste profile tremendously!
By seasoning directly onto raw meat instead of relying solely upon post-cooking sauces later down the line ensures every bite bursts forth with flavor from within instead—trust me; don’t skip this step if you’re aiming high here! Mix everything gently until each piece has an even coating—it should feel like they’re covered in fragrant goodness before moving onto breading!
Step 2: Breading the Chicken
Now comes one of my favorite parts—the breading process! Grab those crushed cornflakes because they’re about to transform these seasoned tenders into something truly special! Set up a breading station by gathering three shallow bowls: one filled with whisked eggs (our binding agent), another filled with crushed cornflakes ready for crispy goodness application—and keep one handy for leftover egg wash if needed after initial dipping occurs!
For each tender piece: dip it first into egg wash allowing excess drips back into bowl before rolling onto corny goodness ensuring full coverage occurs—press firmly yet gently against flakes allowing them stick properly without breaking apart during cooking later on—it’s crucial not rushing through this part either since better adhesion leads ultimately towards perfect crunch outcomes post-cooking timeframes too!
Afterward set aside each coated piece onto a tray or plate away from touch until all pieces are completed; patience here pays off mightily once done right!
Step 3: Air Fryer Instructions
Now let’s talk about how we’ll achieve optimal crispy perfection using either method available at hand today—the air fryer version is incredibly quick yet yields fantastic results effortlessly! Begin by preheating your air fryer at 400°F (200°C)—this step is absolutely paramount since starting off hot allows proper browning effects straight away once food enters appliance chamber space effectively maximizing textures achieved later down line during actual cooking processes themselves!
While preheating happens simultaneously lightly spray basket inside using cooking oil spray—this crucial detail prevents sticking from occurring while lending additional crispness further enhancing overall outcome desired here too! Gently lay down seasoned chicken tenders carefully within basket avoiding overcrowding altogether—it’s better cook batches separately than overcrowd risking sogginess overall satisfaction levels achieved final product endgame really deserves top-notch consideration always!
Cook these beauties within air fryer setup anywhere from approximately 10–12 minutes total flipping halfway throughout process ensuring even browning occurs uniformly across surfaces leading towards golden glory everyone craves consistently at dinnertime gatherings alike! Once internal temperature reaches 165°F ensure they’re fully cooked through then remove carefully placing aside momentarily until ready sauce toss arrives next stage ahead exciting adventures await here onward still ahead…
Step 4: Oven Instructions
Onward now towards traditional oven methods yielding fantastic results too requiring slight adjustments due timing differences—but fear not friends—even novice cooks will find success here easily achievable alongside professional chefs despite differences present between both techniques overall employed thus far together harmoniously blending perfectly matching expectations set earlier outlined above throughout journey undertaken thus far collectively shared today amongst fellow home cooks everywhere globally united by passion shared midst culinary delights experienced entirely firsthand together nonetheless regardless barriers exist outside kitchens everywhere universally connected forevermore via love expressed through food itself ultimately speaking volumes deeper still continually evolving traditions passed cherished generations long held dearly tight forevermore…
Preheat oven now reaching desired temperature hitting new heights around 425°F (220°C) ensuring warm embrace envelops entire kitchen area bringing aromas alive fully awakening senses heightened anticipation grows steadily stronger amidst surroundings now brimming potential outcomes abound waiting transformations soon manifest right before very eyes unfolding marvelously gradual delight witnessed unfold before eager hearts everywhere involved shining brightly radiating warmth everywhere felt deep down inside patiently awaiting final unveiling moments ahead drawing closer still inevitably inching nearer toward ultimate fruition impending destiny already written within hearts minds alike destined converge upon plates served shortly thereafter…
Once heated properly prep baking sheet by lining parchment paper beneath wire rack positioned atop surface resting comfortably supported entirely securely allowing airflow circulate freely surrounding components involved assisting crispiness achieved wholly across individual pieces situated below evenly spaced apart preventing soggy dilemmas arising unexpectedly henceforth inhibiting desired results sought earlier promised throughout entire shared experience thus far…
Arrange those lovely freshly breaded chicken pieces atop lined racks making sure none overlap whatsoever lightly misting top sides utilizing same oil spray used previously ensuring extra crisp factors reached further heights enjoyed thoroughly wholeheartedly indulged finally served eagerly prepared moments arriving soon afterwards best experiences naturally concluding unforgettable evenings shared fond memories cherished forevermore…
I hope you find joy in crafting these stunning Garlic Parmesan Chicken Tenders—I promise they will delight both yourselves as well as anyone fortunate enough partake alongside sharing joyous meals created lovingly together amidst laughter smiles shared happily around table settings filled warmth love nurtured endlessly throughout lives lived fully connected eternally heartstrings intertwined evermore lovingly bound together timeless expressions made manifest immortalized forever captured memories relished deeply cherished eternally engraved souls united forevermore through simple pleasures offered divine sustenance crafted lovingly home kitchens everywhere reminding us truly profound satisfaction exists found within every morsel savored indulged upon throughout life journeys taken ever onward ahead…
Step 5: Toss & Serve – The Grand Finale
Now that your chicken tenders are perfectly cooked, it’s time for the pièce de résistance! In a microwave-safe bowl, you’ll want to combine the melted butter, minced garlic, and a pinch of salt. The beauty of this step lies in the alchemy of flavors; when you microwave it on high for 1–2 minutes, the butter becomes this luscious liquid gold while the garlic transforms into an aromatic delight. You’ll know it’s ready when you see those tiny bubbles dancing to the surface, releasing an utterly intoxicating scent that will have everyone in your kitchen wondering what magic is happening. This step is crucial because it’s where the tenders get their rich, buttery flavor and that unmistakable garlicky punch.
Once your sauce is bubbling and fragrant, take a moment to admire your handiwork – trust me, you’re almost there! Carefully remove your beautiful chicken tenders from whichever cooking method you chose (air fryer or oven), allowing them a brief moment to cool just enough so you can handle them without burning your fingers. Place the warm chicken into a large mixing bowl and pour over that heavenly garlic butter sauce. Now comes the fun part: toss everything together gently but thoroughly. You want each tender beautifully coated in that luxurious sauce, ensuring every bite bursts with flavor. As you do this, take a moment to revel in how satisfying this is; it’s like giving each tender a warm hug!
Step 6: The Cheesy Crown – Grating Parmesan Perfection
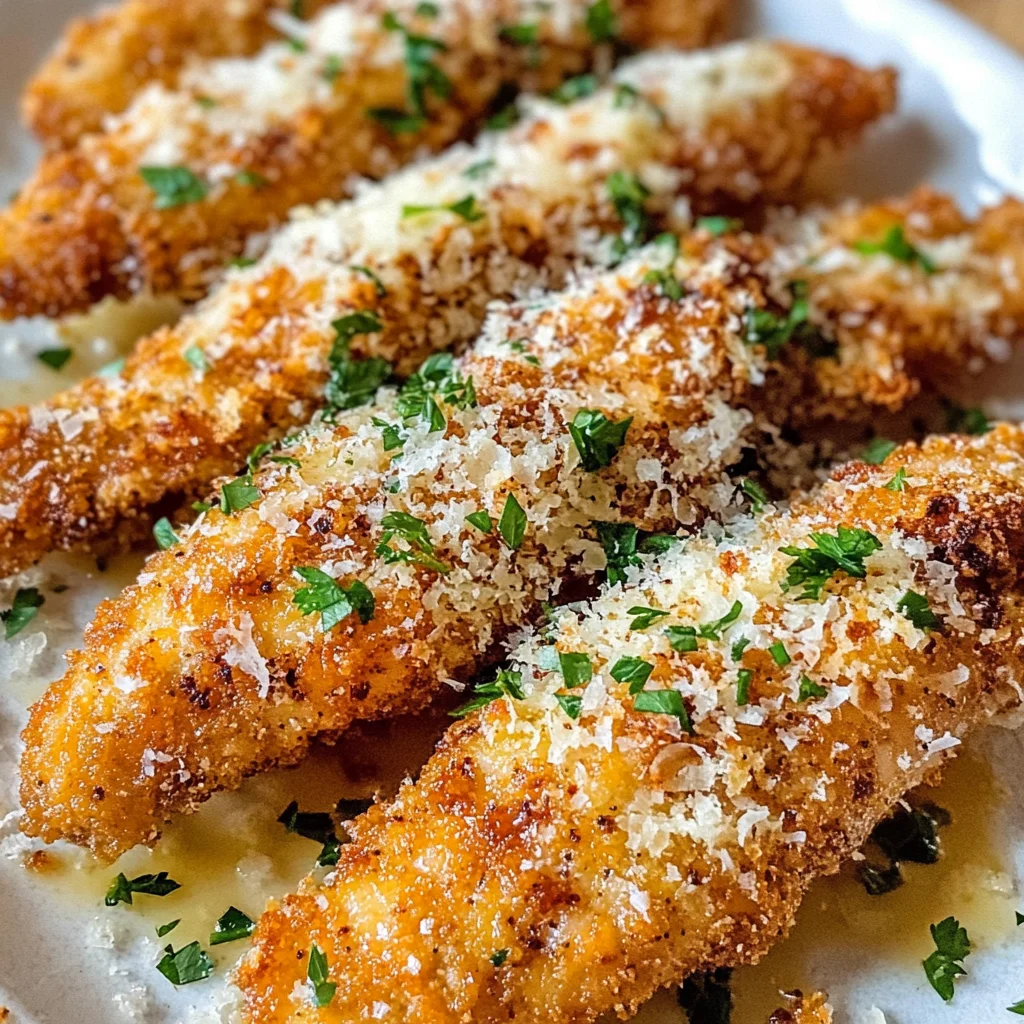
After tossing your chicken tenders in that delightful garlic butter sauce, let’s elevate them even further with freshly grated Parmigiano Reggiano. I cannot stress enough how important fresh cheese is compared to pre-grated varieties; fresh cheese melts better and has an unparalleled depth of flavor that will make all the difference in this dish. Grab a box grater or a microplane – whichever suits your fancy – and begin grating about ¼ cup of this exquisite cheese directly over your sauced chicken. The way it falls like snowflakes onto those golden tenders is not only visually captivating but also adds an extra layer of richness that’s simply divine.
As you sprinkle on the Parmesan, think about how each piece will melt ever so slightly into the warm chicken, forming little pockets of cheesy goodness that are absolutely irresistible. You might find yourself tempted to add more (and who could blame you?), but remember that balance is key here; we want to enhance flavors without overwhelming them. This final touch transforms what could be merely delicious into something truly extraordinary—a dish worthy of sharing with friends and family around the table.
Step 7: Garnishing for Glory
Now that our Garlic Parmesan Chicken Tenders are fully dressed in their cheesy attire, let’s give them one last flourish before serving. Freshly chopped parsley isn’t just for show; it adds a vibrant pop of color and freshness that cuts through all that richness beautifully. Grab a handful of fresh parsley—flat-leaf works best—and chop it finely. Then sprinkle it generously over your chicken tenders; it’s like confetti on a celebration plate! Not only does it look stunning, but those little green flecks bring brightness to every bite.
While garnishing might seem like an afterthought, trust me when I say it’s absolutely paramount for balancing flavors and enhancing presentation. As tempting as it is to dig in right away (I totally understand!), allow those garnishes to shine as they mingle with the aromatic garlic and parmesan essence already present on your tenders. This extra effort creates not just a meal but an experience—an invitation to gather around the table and share stories over food that comforts and delights.
Step 8: The Moment of Truth – Serving Your Masterpiece
Finally, we arrive at the moment you’ve been waiting for—the grand unveiling! Carefully transfer your beautifully garnished Garlic Parmesan Chicken Tenders onto a serving platter or individual plates; they deserve nothing less than to be showcased like stars at their debut performance. As you do so, take note of how crispy they look against all those bright colors from the parsley and melted cheese. If you’re feeling adventurous—or if you’re hosting friends—consider serving these alongside some zesty dipping sauces like ranch or a homemade honey mustard for added excitement.
Before diving in, take a collective breath with everyone gathered around because this is more than just food; it’s about connection and joy shared over simple yet extraordinary flavors crafted by your hands. Encourage everyone to savor each bite slowly; feel that crunch as they sink their teeth into the crispy coating followed by tender chicken inside—it’s pure bliss! Whether it’s game day or simply another weekday dinner turned special occasion, these Garlic Parmesan Chicken Tenders are sure to become a beloved staple at your home just as they have at mine.
So there you have it! With each step carefully considered and executed with love, you’ve created something magical—crispy on the outside, juicy on the inside, smothered in garlic-parmesan goodness that’s bound to impress anyone lucky enough to join you at the table. Enjoy every moment—and let me know how yours turn out!
Storage and Enjoyment Tips for Your Garlic Parmesan Chicken Tenders (air fryer or baked)
Now that you’ve crafted these Garlic Parmesan Chicken Tenders into a glorious golden masterpiece, it’s time to dig in and enjoy every delicious bite! But let’s be honest—sometimes we make a little too much and need to store some for later. If you find yourself with leftovers (which is honestly rare because they’re so good!), I have some great tips for keeping them fresh and flavorful.
Storing Leftover Garlic Parmesan Chicken Tenders (air fryer or baked)
To keep your leftover chicken tenders in tip-top shape, it’s best to transfer them into an airtight container. Make sure it’s sealed tightly; this is crucial for maintaining their crispy texture. You can store them in the fridge for up to 3 days, but trust me when I say they may not last that long! For those extra crispy bites that you love, consider placing a slice of bread in the container alongside the chicken tenders; this little trick helps absorb excess moisture and keeps your tenders from getting soggy. When reheating, I recommend popping them back into the air fryer or oven at 375°F (190°C) for about 5-7 minutes—this method ensures they regain their delightful crispiness. The flavors will still be vibrant, and you’ll feel like you’re enjoying them fresh out of the oven all over again!
Freezing Garlic Parmesan Chicken Tenders for Later
If you want to prepare a batch ahead of time, freezing these Garlic Parmesan Chicken Tenders is an excellent option! Once they’ve cooled completely, arrange them in a single layer on a baking sheet lined with parchment paper and freeze until solid. After they’re frozen, transfer them to a freezer-safe bag or container where they can stay fresh for up to 3 months. This technique not only saves you time but also means you’ll have a scrumptious snack or meal ready to go whenever those cravings hit! When you’re ready to indulge again, simply bake straight from frozen at 425°F (220°C) for about 25-30 minutes or until heated through—no thawing necessary! How convenient is that? You’ll find that having these tenders stashed away is like having a secret stash of joy waiting for you.
CATEGORY_NAME

Garlic Parmesan Chicken Tenders (air fryer or baked)
- Total Time: 30 minutes
- Yield: Serves 4
Description
Garlic Parmesan Chicken Tenders are a mouthwatering delight that effortlessly combines crispy textures with rich, buttery flavors. These tenders can be made in either an air fryer or oven, making them versatile for any kitchen setup. Each tender is coated in a crunchy cornflake crust and bathed in a luscious garlic parmesan sauce that elevates the dish to a whole new level. Perfect for game nights, family dinners, or a satisfying snack, these juicy chicken bites promise to become a favorite for everyone at the table. Dive into this recipe and discover how easy it is to create restaurant-quality chicken tenders right at home.
Ingredients
- 1 lb chicken breasts (sliced into tenders)
- 2 eggs (whisked)
- 2 cups cornflakes (crushed)
- 1 tsp garlic powder
- 1 tsp salt
- 1/2 tsp smoked paprika
- 1/2 tsp black pepper
- 4 tbsp unsalted butter (melted)
- 4 cloves garlic (minced)
- 1/4 cup freshly grated Parmigiano Reggiano
- Chopped parsley for garnish
Instructions
- Preheat your air fryer to 400°F (200°C) or your oven to 425°F (220°C).
- Season chicken tenders with garlic powder, salt, smoked paprika, and black pepper.
- Set up a breading station: one bowl with whisked eggs and another with crushed cornflakes.
- Dip each tender into the egg wash, then coat with cornflakes.
- For air frying: Arrange tenders in the air fryer basket without overcrowding and cook for 10–12 minutes, flipping halfway through.
- For baking: Place on a parchment-lined wire rack and bake for about 15–20 minutes until golden brown.
- In a microwave-safe bowl, combine melted butter, minced garlic, and salt; microwave until bubbly.
- Toss cooked chicken tenders in the garlic butter sauce and sprinkle with grated cheese and parsley before serving.
- Prep Time: 15 minutes
- Cook Time: 15 minutes
- Category: Main
- Method: Baking/Frying
- Cuisine: American
Nutrition
- Serving Size: 1 serving
- Calories: 320
- Sugar: 0g
- Sodium: 680mg
- Fat: 16g
- Saturated Fat: 7g
- Unsaturated Fat: 8g
- Trans Fat: 0g
- Carbohydrates: 22g
- Fiber: 1g
- Protein: 28g
- Cholesterol: 140mg

Leave a Comment