There’s something utterly enchanting about the magic of a meal that brings together vibrant flavors, fresh ingredients, and a sense of community. Greek Chicken Bowls are not just a dish; they are an experience, a delightful journey through the heart of Mediterranean cuisine, where each bite tells a story—a story of long, sun-drenched days, laughter shared over good food, and the joy of nourishing ourselves with wholesome ingredients. Imagine the crispness of fresh cucumbers, the sweetness of ripe tomatoes, and succulent chicken bathed in a tangy marinade that dances on your palate. These bowls are a beautiful blend of textures and flavors, making them perfect for any occasion—be it a cozy dinner at home or a lively gathering with friends.
As we dive into this recipe, I want you to feel the warmth and love that goes into each step. The best part is how versatile these Greek Chicken Bowls are; they can be tailored to suit your taste buds while still holding onto that authentic Greek essence that makes them so special. Plus, with homemade tzatziki drizzled generously over everything, you’re not just eating—you’re celebrating! Let me share my cherished secrets so you can create these bowls that will undoubtedly become a staple in your kitchen.
Greek Chicken Bowls: A Flavorful Feast for All!
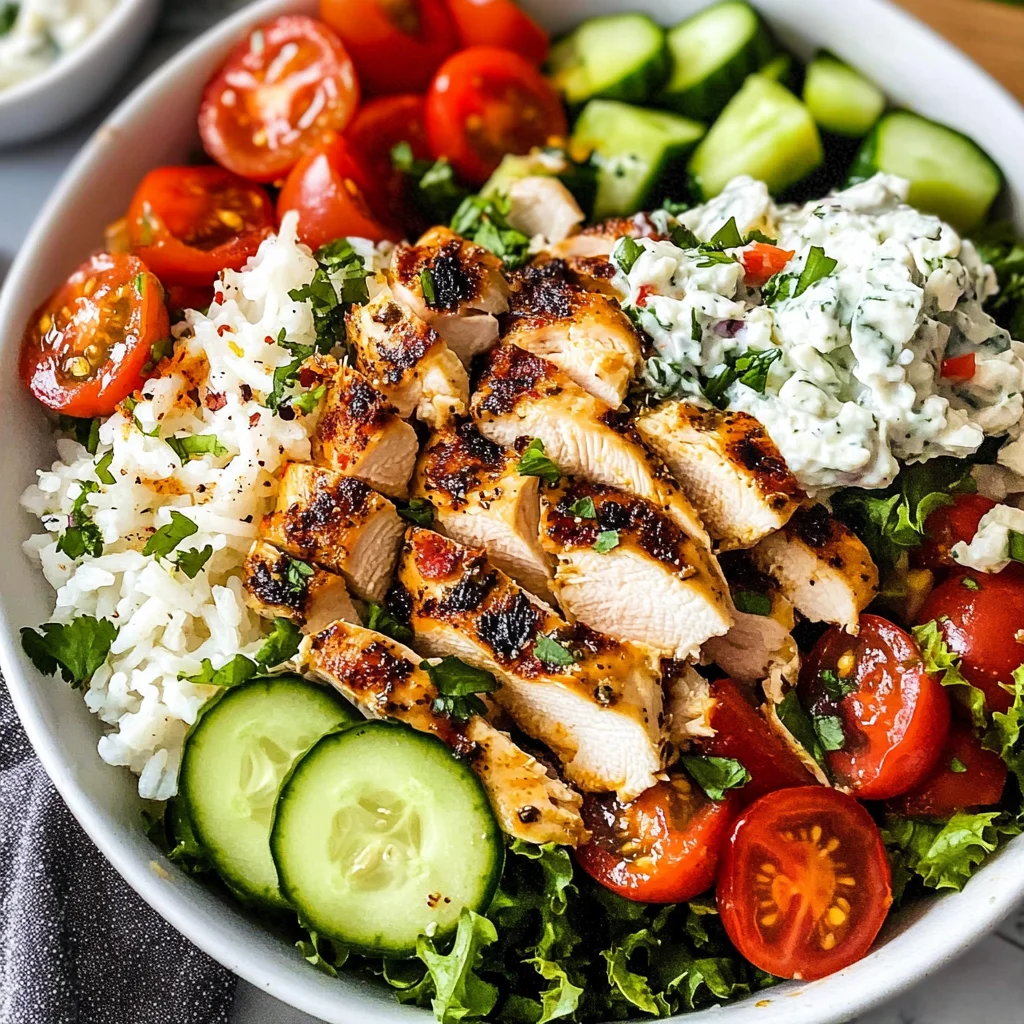
These simple Greek Chicken Bowls pack an abundance of flavor and textures into one easy-to-make meal. Perfect for meal prep and loaded with veggies and homemade tzatziki, they offer both satisfaction and nourishment in every bite. Trust me; once you try this recipe, you’ll find yourself returning to it time and again!
Ingredients:
As we embark on this culinary journey together, let’s take a moment to appreciate the ingredients that will help us craft our delicious Greek Chicken Bowls. Each component plays a vital role in creating that harmonious symphony of flavors we all crave.
- 1 1/4 pounds boneless skinless chicken breasts. This lean protein is the canvas for our dish—it absorbs all those wonderful marinade flavors beautifully! When selecting chicken breasts, look for ones that are plump and have no visible blemishes or odor. They should be firm to the touch but not too hard; remember to keep them as fresh as possible for juicy results.
- 1/4 cup olive oil. Often referred to as liquid gold in cooking circles, olive oil adds richness and depth while helping to tenderize the chicken during marination. A high-quality extra virgin olive oil will elevate your dish with its fruity notes, enhancing every single bite. It’s also essential for drizzling over your finished bowls—don’t skimp on this!
- 1 tablespoon lemon zest. This ingredient brings brightness and freshness like nothing else can! The zest contains essential oils from the lemon peel that provide an aromatic punch without the acidity of juice alone. Always use organic lemons when possible since their peels are free from pesticides; it truly makes a difference in flavor.
- 2 tablespoons lemon juice. Freshly squeezed lemon juice balances out the richness of the chicken and olive oil while adding that quintessential tangy flavor we associate with Mediterranean dishes. Avoid bottled lemon juice here—freshness is key!
- 2 tablespoons honey. This natural sweetener balances out the tartness of the lemon juice beautifully and adds complexity to our marinade. Honey also helps create a nice caramelization on the chicken when cooked—a must-have for flavor!
- 1 teaspoon garlic powder. Garlic powder is convenient when you want those savory notes without chopping garlic cloves! It infuses depth into our marinade while ensuring even distribution throughout—just remember not to substitute it with garlic salt unless adjusting other salt levels accordingly.
- 1 1/2 teaspoons dried oregano & 1 1/2 teaspoons dried basil. These herbs are quintessentially Mediterranean; they bring warmth and aromatic qualities that make our bowls sing! Dried herbs offer concentrated flavors which meld beautifully with our other ingredients—the oregano pairs particularly well with tomatoes too!
- 1 teaspoon salt, 1/4 teaspoon black pepper, & 1/2 teaspoon red pepper flakes. Salt enhances every ingredient’s natural flavor while helping tenderize proteins as they marinate; don’t skip it! The black pepper adds warmth without overwhelming heat, while red pepper flakes give just enough kick to keep things exciting—adjust according to your spice tolerance!
- 2 cups cooked rice or quinoa (or your preferred grain). Serving as a hearty base for our bowls, both rice and quinoa soak up all those incredible flavors from above while providing fiber-rich sustenance that’ll keep you feeling full longer! Quinoa is particularly nutritious if you’re looking for gluten-free options.
- 2 cups halved grape or cherry tomatoes, & 2 cups diced or chopped cucumber. These fresh vegetables provide crunch and juiciness that contrast beautifully with warm chicken! When selecting tomatoes, choose ones that feel heavy for their size—they should be firm yet slightly yielding at peak ripeness.
- 4 cups shredded romaine lettuce & 1 cup sliced red onion. The lettuce offers crispness—a refreshing contrast against our warm elements—while red onion introduces sweetness along with its sharp bite; I recommend soaking them briefly in cold water if you’d like to tone down their intensity.
- 1/2 cup feta cheese (optional). This crumbly cheese adds briny notes which complement all other elements fantastically! If you’re looking for dairy-free alternatives here, try using vegan feta made from nuts or tofu—it’s becoming increasingly popular!
- For our tzatziki sauce: 1 cup plain Greek yogurt, 1/2 cup grated cucumber, 1 tablespoon lemon juice, 1 tablespoon olive oil, 1 teaspoon minced garlic, & 1 tablespoon fresh chopped dill (plus additional salt). The yogurt is creamy yet tangy—the foundation of this classic sauce—while grated cucumber adds refreshing texture alongside dill’s herbaceous presence! Be sure to squeeze out excess moisture from cucumbers before mixing for best results.
Having gathered these glorious ingredients ready at hand makes all subsequent steps easier—and trust me when I say you’ll absolutely enjoy every moment spent preparing this delight!
Equipment You’ll Need:
As we prepare our Greek Chicken Bowls together, having the right tools will make your culinary experience smoother and more enjoyable! These essential partners help bring out each ingredient’s best qualities while ensuring success along the way.
- Mixing bowl – A sturdy mixing bowl allows you ample space for whisking together marinades or combining tzatziki ingredients without any spills—a larger bowl can also double up as storage during marination!
- Whisk or fork – You’ll need something reliable to combine those marinade ingredients thoroughly—whisks work wonderfully due to their design promoting aeration plus even mixing throughout.
- Meat mallet or rolling pin – Pounding down chicken helps ensure uniform thickness across pieces resulting in even cooking later on—this tool is indispensable if you want tender bites bursting with flavor!
- Air fryer (or skillet) – An air fryer produces perfectly crispy results with less oil needed compared to traditional frying methods—it’s worth considering investing in one if you haven’t yet! However, don’t fret if not available; frying them slowly over medium heat achieves similar outcomes too!
- Chef’s knife & cutting board – A sharp chef’s knife paired with an appropriately-sized cutting board ensures smooth slicing through vegetables whilst minimizing risk involved—all important aspects when prepping food safely plus efficiently!
Now that we’ve established our list of equipment needed let’s move forward into crafting these spectacular bowls together step-by-step…
Step 1: Marinating Magic
To start this flavorful adventure off right, let’s create an unforgettable marinade for our chicken! In your mixing bowl (or ziplock bag), whisk together olive oil, lemon zest, lemon juice, honey, garlic powder along with dried oregano & basil seasoning mix you’ve chosen earlier along salt & pepper—as well as those addictive red pepper flakes if desired! This process allows flavors from each element meld beautifully into one another—creating an enticing aroma that’ll set your taste buds tingling long before cooking begins.
Next comes one crucial step: pound each piece of chicken breast until about half an inch thick using either meat mallet or rolling pin wrapped in plastic wrap (to prevent mess). Why do we do this? By ensuring uniform thickness across pieces promotes even cooking throughout which translates directly into juicy tenderness rather than dry edges—nobody wants tough bites after all! Once pounded properly add those lovelies straight into prepared marinade making sure every nook gets coated entirely then seal tightly before refrigerating anywhere between thirty minutes up until several hours depending on how much time permits today—it’s okay if left overnight too because flavorful rewards await regardless!
Step 2: Preparing Tzatziki Sauce
While waiting patiently for marinated goodness basking within flavorsome embrace let’s turn attention towards assembling complementary tzatziki sauce that’ll elevate overall experience even further! Begin by combining plain Greek yogurt alongside grated cucumber (make sure excess moisture has been squeezed out first), fresh dill along minced garlic plus drizzle some olive oil followed by splash of lemon juice then sprinkle pinch more salt based upon personal preference level desired here…This refreshing dip/dressing serves dual purposes elevating both protein itself as well as entire vegetable ensemble served during assembly later on so embrace generosity here—I promise it’ll be worth every second invested stirring together until creamy perfection achieved!
Step 3: Rice or Quinoa Prep
Next up comes prepping base layer beneath…choose either fluffy rice/quinoa depending upon personal preference—and don’t worry if unsure how best cook either option available since instructions usually exist directly packaged within bags themselves but alternatively here’s my go-to method: rinse grains under cold water briefly beforehand removing excess starch then boil water separately adding chosen grain plus simmer gently covered until done (usually around fifteen minutes), fluffing occasionally using fork till light airy texture reached ultimately resulting mouthwatering contrast against heavier components above waiting eagerly below…Feel free experiment adding herbs/spices during cooking cycle too enhancing overall character throughout plate presentation later coming together!
Step 4: Cooking Chicken
Once marinated enough time has passed—with tantalizing aromas filling kitchen already preheat air fryer setting temperature around three hundred eighty degrees Fahrenheit ahead time allowing optimal heating conditions achieved swiftly thereafter once placed inside machine basket itself conveniently lined parchment paper underneath preventing sticking issues happening later down road—it’s okay though if adapting skillet technique instead utilizing medium-low heat where heated oil/butter awaits pan nearby containing meat pieces evenly spaced apart avoiding overcrowding issues leading uneven results post-cooking phase…Cook first side approximately seven minutes flipping midway through achieving golden brown color appearing across surface then repeat process another three-four minutes until internal temperature reading reaches minimum safe threshold around one sixty-five Fahrenheit confirming doneness level reached adequately ensuring proper safety regulations followed throughout entire preparation cycle thus guaranteeing satisfaction experienced finally served forthwith…
And there we have it—the first few steps toward crafting these beautiful Greek Chicken Bowls filled with love tradition locals embody daily around Mediterranean regions annually celebrating heritage preserving culture among communities worldwide sharing delicious recipes alike… Now let me guide further alongside remaining directions tailoring finish touches completing dish awaiting eagerly final assembly time ahead shortly afterwards guarantee delightful discovery awaiting ahead once served promptly everyone gathered round table sharing smiles accompaniment mutual enjoyment created lovingly crafted meals together exchanging stories laughter alike creating memories cherished forevermore amongst family friends alike…
Step 5: Prep Your Vibrant Veggies and Rice
Now that your chicken is marinating beautifully, it’s time to dive into the colorful world of fresh vegetables and hearty grains. This step is where the magic begins to unfold, as you prepare the base of your Greek Chicken Bowls. If you’re using rice or quinoa, make sure it’s cooked according to package instructions before you start assembling your bowls. The fluffy grains will provide a delightful texture and an excellent canvas for all those vibrant ingredients. You want about two cups of cooked goodness per bowl, so feel free to make extra if you’re planning on leftovers—trust me, they’ll be even better the next day!
While your grains are cooking, let’s chop those veggies! Grab your halved grape or cherry tomatoes and diced cucumber; their refreshing crunch will add a perfect contrast to the tender chicken. As you slice through those tomatoes, notice how their sweet juices burst forth, releasing an aroma that whispers summer in every bite. And don’t forget about that romaine lettuce! Shredding it into bite-sized pieces not only makes it easier to eat but also allows it to envelop the other flavors like a soft hug. If you’re a fan of red onion (and I absolutely am!), slice some thinly for a sharp kick that cuts through the richness of the tzatziki later on. By preparing these ingredients ahead of time, you’re setting yourself up for a seamless assembly process later, ensuring that each bowl is as beautiful as it is delicious.
Step 6: Cooking Your Chicken to Perfection
With your chicken now marinated for at least thirty minutes—though if you’ve been patient enough to let it sit for a few hours, oh boy, are you in for a treat! Marinating is crucial because it allows those flavors to penetrate deeply into the chicken while also tenderizing the meat. The acidity from the lemon juice works its magic by breaking down proteins, making each bite succulent and juicy. Now, let’s get cooking! Preheat your air fryer to 380°F (or about 193°C) while you take a moment to mentally prepare for the fragrant symphony that’s about to fill your kitchen.
Once preheated, place your marinated chicken breasts in the basket and set the timer for seven minutes on one side. This method gives them an irresistible golden-brown crust thanks to that hot circulating air—like magic! After those seven minutes are up, flip them over gently with tongs; this ensures even cooking without losing all that precious marinade flavor. Cook for another three to four minutes until they reach an internal temperature of 165°F (let’s not skimp on safety here!). If you don’t have an air fryer handy, no worries! Simply heat some oil or butter in a skillet over medium-low heat and cook them just as detailed above. The key here is patience; resist the urge to crank up the heat too high because that can lead to burnt outsides and raw insides—a real tragedy when we want perfectly cooked chicken!
Step 7: Allowing Your Chicken to Rest
Once those lovely chicken breasts have cooked through and achieved a glorious golden hue on both sides—oh my goodness, if only you could smell this—you must let them rest away from heat for about five minutes before slicing. This step might seem trivial at first glance, but trust me when I say it’s absolutely paramount! When meat cooks, its fibers tighten up due to heat; resting allows those fibers to relax again and redistribute juices throughout the chicken instead of having them spill out onto your cutting board when sliced. I promise you; this will yield far juicier slices than if you were impatient and dove right in.
As you let them rest, take this time to reflect on all your hard work thus far! Maybe put on some music or sip on something refreshing—it’s essential not just physically but mentally too! After five minutes have passed (don’t rush this part!), grab a sharp knife and slice against the grain into enticing strips that will adorn your bowls beautifully. Each cut should be smooth; look at how succulent they appear inside! That’s what we’re aiming for—juicy perfection.
Step 8: Assembling Your Greek Chicken Bowls
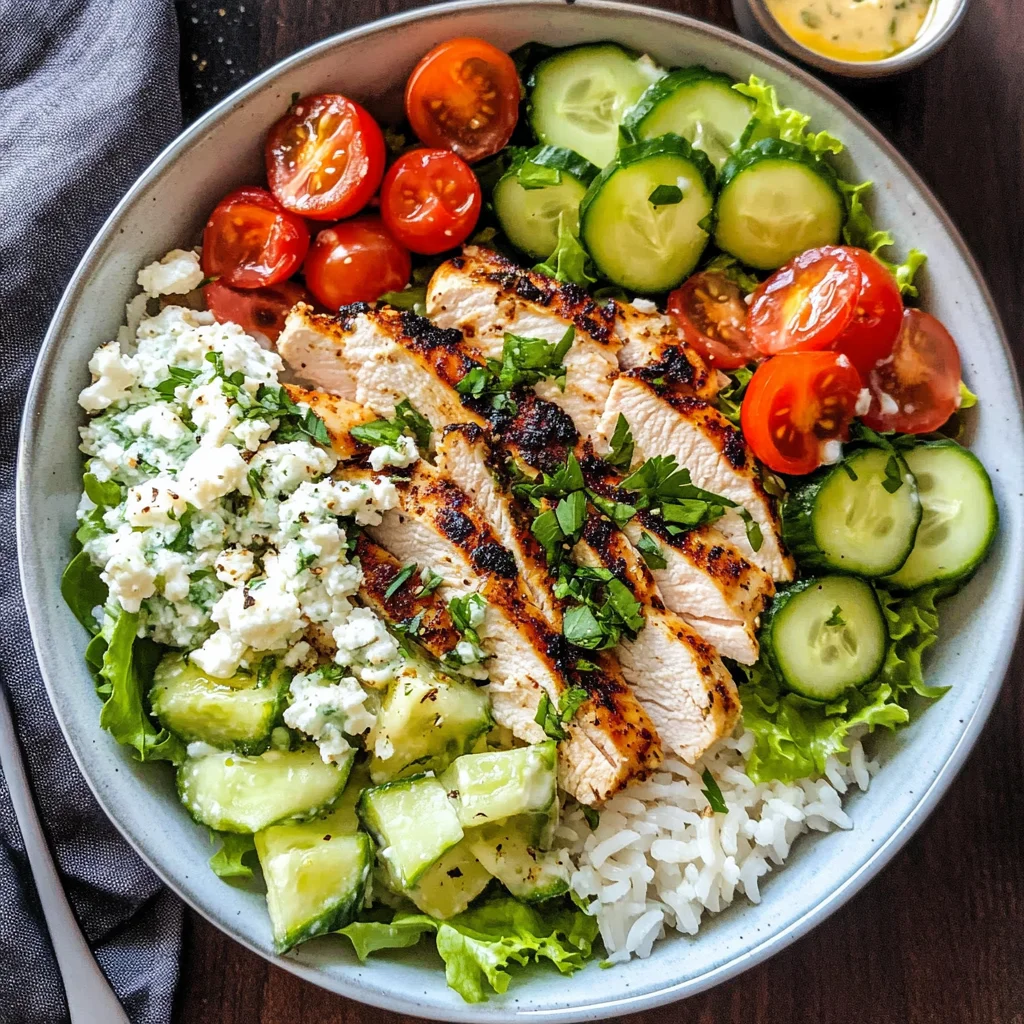
Now comes perhaps my favorite part—the assembly! Picture this: A beautifully arranged bowl full of colors and textures beckoning you closer like an artist’s palette bursting with life. Start by spooning two cups of warm rice or quinoa into each bowl as your base; this creates a cozy nook for all those gorgeous toppings you’ll pile high next! Next, begin layering in your freshly chopped veggies—the shredded romaine lettuce acts as a crisp foundation while those halved tomatoes pop with color and sweetness alongside cool cucumber bites.
Once you’ve added some sliced red onion—use it sparingly unless you’re keen on its bold flavor—you can now place generous slices of that rested chicken right on top; look at how beautifully they glisten under their layers of fresh produce! Oh my goodness, I can already taste how harmonious these flavors will be together! But we can’t forget about our homemade tzatziki sauce—it’s like liquid gold drizzled over everything! Spoon dollops generously across each serving—I particularly love adding extra olive oil and lemon juice drizzle at this stage because it brightens everything up so wonderfully. And if you’re feeling adventurous (which I wholeheartedly encourage), don’t hesitate to drizzle on some lemon tahini dressing too—it adds such depth!
Final Touches: Enjoying Every Flavorful Bite
The moment has arrived—your Greek Chicken Bowls are ready for devouring! As you gaze down at your culinary masterpiece filled with vibrant colors and tantalizing aromas wafting through the air, take a second just to appreciate all your hard work. Each bite promises not just nourishment but an experience—one where juicy chicken mingles delightfully with fresh vegetables while creamy tzatziki dances across your taste buds like poetry in motion.
What truly makes these bowls special isn’t merely their taste but rather how they bring people together around shared meals filled with laughter and conversation. Whether enjoyed solo during a cozy night in or served at a gathering with friends (perhaps paired with some warm pita bread), I promise they’ll leave everyone asking for seconds—and maybe even thirds! So dig in wholeheartedly—savor every flavor-packed bite because you’ve created something extraordinary today; enjoy every morsel of this journey into deliciousness!
And there you have it—a complete guide on crafting divine Greek Chicken Bowls right from scratch! With vibrant veggies, succulent chicken kissed by Mediterranean flavors topped off with creamy tzatziki sauce—all wrapped up lovingly within colorful bowls ready to nourish both body & spirit alike! Now go forth confidently into your kitchen adventures knowing you’ve mastered yet another timeless recipe full of love & joy!
Storage and Enjoyment Tips for Your Greek Chicken Bowls
Oh, my dear friend, you are in for such a treat with these Greek Chicken Bowls! The vibrant colors, the explosion of flavors, and the delightful textures all come together to create a meal that’s not just food but an experience. Once you’ve assembled these beautiful bowls, the only thing left to do is dig in and enjoy every last bite. But what if there are leftovers? Fear not! These bowls are incredibly easy to store and still taste amazing days later.
Storing Leftover Greek Chicken Bowls
To keep your Greek Chicken Bowls fresh and flavorful, I recommend using airtight containers. These are invaluable for preserving the wonderful tastes you’ve carefully crafted. Store your bowls in the refrigerator where they will stay delicious for up to 4 days. For best results, keep the tzatziki sauce separate until ready to enjoy it again; this ensures that your veggies stay crisp and your chicken remains succulent. A little pro tip from my kitchen: place a slice of bread inside the container with your chicken. It absorbs moisture and keeps everything nice and fresh! When you’re ready to indulge again, just reheat gently in the microwave or on a skillet over low heat to maintain that juicy texture. I promise you, even after storage, each bowl will still sing with those harmonious flavors that make this dish so special.
Freezing Components for Later
Now let’s talk about how we can take this recipe even further by freezing some components for future meals! The beauty of these Greek Chicken Bowls is that many of their elements freeze beautifully, especially the marinated chicken. Simply place your marinated chicken breasts in a freezer-safe bag or container, ensuring you remove as much air as possible before sealing it tight. You can freeze them for up to 3 months, which is absolutely perfect for those busy weeks when cooking feels like a chore. When you’re ready to use it, just thaw overnight in the fridge and cook as instructed; trust me, it’ll be like magic when you pull out that flavorful chicken! This approach not only saves time but also allows you to savor those Mediterranean flavors any night of the week without any hassle.
Greek Chicken Bowls
- Total Time: 45 minutes
- Yield: Serves about four people 1x
Description
Greek Chicken Bowls offer a vibrant and satisfying meal experience that combines the fresh flavors of the Mediterranean in one delightful dish. Each bowl is a colorful medley of seasoned chicken, crunchy vegetables, and creamy homemade tzatziki sauce, all served over a hearty base of rice or quinoa. This recipe is perfect for meal prep, family dinners, or casual gatherings with friends. With its easy-to-follow steps and adaptable ingredients, you can customize these bowls to suit your taste preferences while enjoying the essence of Greek cuisine. Dive into this culinary adventure and enjoy a meal that nourishes both body and soul!
Ingredients
- 1 1/4 pounds boneless skinless chicken breasts
- 1/4 cup olive oil
- 2 tablespoons lemon juice
- 2 tablespoons honey
- 1 teaspoon garlic powder
- 1 1/2 teaspoons dried oregano
- 2 cups cooked rice or quinoa
- 2 cups halved grape or cherry tomatoes
- 2 cups diced cucumber
- 4 cups shredded romaine lettuce
- For tzatziki: 1 cup plain Greek yogurt
- 1/2 cup grated cucumber
- 1 tablespoon lemon juice
- fresh dill
Instructions
- Marinate chicken by whisking olive oil, lemon juice, honey, garlic powder, oregano, salt, and pepper in a mixing bowl. Add chicken breasts and coat thoroughly. Refrigerate for at least 30 minutes.
- While the chicken marinates, prepare tzatziki by combining Greek yogurt, grated cucumber (squeezed dry), lemon juice, minced garlic, and chopped dill in a bowl. Mix well; set aside.
- Cook rice or quinoa according to package instructions.
- Preheat air fryer to 380°F (or heat oil in a skillet). Cook marinated chicken for about 7 minutes per side or until internal temperature reaches 165°F.
- Allow chicken to rest for five minutes before slicing.
- Assemble bowls with rice/quinoa as the base topped with sliced chicken, cucumbers, tomatoes, romaine lettuce, and tzatziki sauce.
- Prep Time: 30 minutes
- Cook Time: 15 minutes
- Category: Main
- Method: Air Frying/Skillet Cooking
- Cuisine: Mediterranean
Nutrition
- Serving Size: 1 bowl (approximately 400g)
- Calories: 525
- Sugar: 8g
- Sodium: 690mg
- Fat: 25g
- Saturated Fat: 4g
- Unsaturated Fat: 20g
- Trans Fat: 0g
- Carbohydrates: 45g
- Fiber: 6g
- Protein: 36g
- Cholesterol: 85mg

Leave a Comment