There’s something so profoundly satisfying about gathering around a table filled with food that sparks joy and nostalgia. Enter the Loaded Smash Burger Bowls, a delightful fusion of flavors reminiscent of classic smash burgers, all nestled in a cozy bowl. Imagine crispy baby Yukon Gold potatoes, golden and crunchy on the outside yet tender within, mingling with juicy, perfectly cooked beef patties. Each bite transports me to sunny backyard gatherings where laughter dances in the air, and the smell of grilled goodness fills our hearts with warmth. This isn’t just a meal; it’s an experience—an ode to comfort food that feels like a warm embrace wrapped in layers of flavor.
Cooking is more than just following steps; it’s an expression of love and creativity. These Loaded Smash Burger Bowls are not only easy to whip up for a busy weeknight dinner but also perfect for casual gatherings with friends or family celebrations. You can play around with toppings, making it customizable for each guest’s palate. The crispy potatoes serve as a lovely base, elevating this dish into something truly extraordinary while showcasing the simple beauty of home cooking. I promise you; once you dive into this bowl of deliciousness, you’ll be hooked!
Loaded Smash Burger Bowls: A Cozy Celebration in a Bowl
Let’s embark on this culinary journey together! The beauty of these Loaded Smash Burger Bowls lies in their simplicity yet complexity—it’s all about layering flavors and textures that harmonize beautifully. Get ready to impress your taste buds!
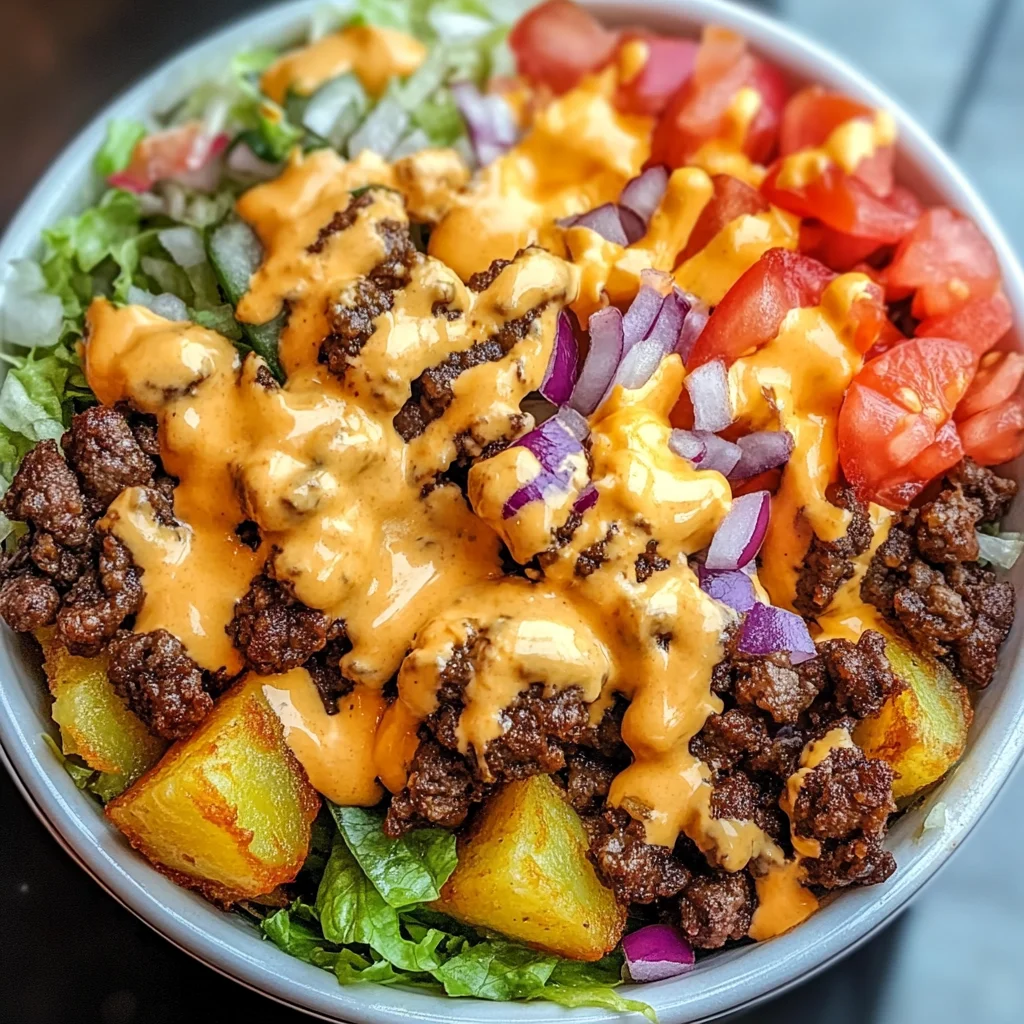
Ingredients:
As we prepare to create this mouthwatering dish, let’s take a moment to appreciate each ingredient that contributes to its deliciousness. Every item plays a pivotal role in crafting those beloved smash burger flavors we adore.
- 1 ½ lbs baby Yukon Gold potatoes. These little gems are gold not just in color but also in flavor! Their creamy texture and buttery taste make them the perfect canvas for roasting. Yukon Golds have a natural sweetness that shines through when cooked until crispy, providing that delightful contrast against savory elements in our dish. When selecting potatoes, look for firm ones without blemishes; they should feel heavy for their size—this indicates freshness.
- 2 tbsp olive oil. This liquid gold is essential for roasting our potatoes to perfection. It not only helps achieve that coveted crispiness but also adds depth of flavor and richness that enhances each bite. Opt for extra virgin olive oil for its robust taste and health benefits—it’s packed with antioxidants! Remember, drizzling too little oil can lead to soggy potatoes; trust me on this one.
- 1 tsp garlic powder. A pantry staple that packs a punch! Garlic powder brings an irresistible aroma and deep umami notes without overwhelming the dish like fresh garlic might when used excessively. It’s convenient and evenly distributes flavor throughout our smashed potatoes, ensuring every bite is bursting with garlicky goodness.
- 1 tsp smoked paprika. This spice adds a smoky depth that’s utterly intoxicating! It gives our dish that signature barbecue flair reminiscent of summer cookouts while imparting beautiful color as well. When purchasing smoked paprika, seek out high-quality brands; you want it vibrant and fragrant—not dull or faded.
- Salt and freshly ground black pepper, to taste. Seasoning is absolutely paramount! Salt enhances flavors while freshly cracked black pepper adds warmth and subtle heat. Don’t hesitate to taste along the way—the right balance will elevate your dish from good to extraordinary.
- 1 lb ground beef (80/20 blend preferred). Choosing an 80/20 blend gives us juicy patties without excessive greasiness—a non-negotiable for creating those smash burger textures we crave! Ground beef provides rich flavor and fat content perfect for searing on high heat, allowing those gorgeous caramelized edges to develop beautifully.
- 1 tsp salt. Just like before, seasoning this meat mixture ensures every bite is flavorful from within. It helps draw out moisture while enhancing the natural beefy goodness we want showcased here.
- ½ tsp black pepper. This adds depth without overpowering our other elements—just enough warmth to keep things interesting!
- 1 tsp Worcestershire sauce. This sauce is an absolute game changer! Its complex blend of tangy, sweet, and savory elevates ground beef like nothing else can by adding layers of flavor while helping bind our patties together.
- ⅓ cup mayonnaise. Mayonnaise isn’t just another condiment here; it acts as the base for our special sauce! Its creaminess provides balance against all those bold flavors while keeping things luscious—who doesn’t love a bit of richness?
- 2 tbsp ketchup & 1 tbsp yellow mustard—these classic condiments bring nostalgia straight from your favorite diner! They balance sweetness with acidity and tanginess that rounds out our sauce beautifully—trust me when I say they’re essential partners in crime!
- 2 tsp pickled relish, 1 tsp apple cider vinegar, ½ tsp garlic powder, ½ tsp onion powder, & pinch of paprika—these ingredients combine harmoniously into what we’ll call “special sauce.” Each component plays its part: relish adds sweetness while vinegar brightens everything up; garlic powder provides depth alongside onion powder’s subtle sweetness—all blending wonderfully together!
- Salt and pepper, again… because seasoning never stops!
- 1 cup shredded iceberg lettuce, 1 large tomato (diced) & ½ small red onion (thinly sliced) bring freshness! These toppings add crunchiness alongside juicy tomatoes – perfect contrasts against crispy potatoes and savory beef!
- 1 cup shredded cheddar cheese adds melty goodness when sprinkled atop everything hot from the skillet—it’s simply irresistible!
- Dill pickle slices (optional) offer tanginess—a classic pairing with burgers—perfect if you want extra zing!
Equipment You’ll Need:
Having the right tools at your disposal makes all the difference between good cooking experiences versus great ones! Let’s gather up some essential partners-in-crime that will help us create these Loaded Smash Burger Bowls effortlessly.
- Large pot – Essential for boiling those baby Yukon Gold potatoes until perfectly tender before roasting them into crispy bites! A heavy-bottomed pot retains heat well during cooking—a must-have for this process.
- Baking sheet lined with parchment paper – This creates an easy release surface when roasting your smashed potatoes so they don’t stick (and let’s be real: clean-up becomes much simpler!). Parchment allows airflow around each potato ensuring even crisping occurs across every piece.
- Spatula or flat glass bottom – You’ll need something sturdy enough to smash down those tender boiled potatoes into flat disks before roasting them until golden brown; it’s crucial for achieving optimal texture!
- Large skillet or griddle – A must-have when searing your burger patties! A cast iron skillet retains heat exceptionally well resulting in beautifully browned crusts while sealing moisture inside—that’s what we’re after!
Step 1: Preheat Your Oven and Prepare Potatoes
Before diving headfirst into this delicious adventure, let’s set ourselves up for success by preheating the oven to 425°F (220°C). This temperature is key because it allows us to achieve maximum crispness on our smashed potatoes—a non-negotiable step if we want that delightful texture contrast against juicy beef! Line your baking sheet with parchment paper now too—it will save us hassle later during clean-up time as well as ensure nothing sticks during roasting.
Once you’ve got everything ready at hand—including boiling water bubbling away in another large pot—let’s move onto prepping those star ingredients: baby Yukon Gold potatoes! Add them carefully into boiling salted water where they’ll cook gently over medium-high heat until fork-tender—about 12–15 minutes depending on their size—you want them soft enough so you can easily flatten them without falling apart entirely but firm enough not mushy either (nobody wants mashed instead!).
Step 2: Smash Those Potatoes
After draining the cooked beauties thoroughly (and letting them cool slightly), arrange them lovingly on your prepared baking sheet spaced apart adequately so they have room to breathe as they roast later on… We don’t want any overcrowding here folks! Now grab either a flat spatula or even better—a glass bottom—and gently press down onto each potato until flattened into approximate disks roughly half an inch thick (no need for precision).
Why do we smash? Well aside from aesthetics—the act creates more surface area which means more crispy edges during roasting… That delightful contrast between textures will make every mouthful truly profound as flavors mingle beautifully together amidst crunchy bits mingling alongside tenderness underneath… Trust me when I say these smashed beauties are worth every ounce of effort put forth now!
Step 3: Season Up Before Roasting
Now drizzle those gorgeous smashed disks generously with quality olive oil—it helps achieve luscious browning while enhancing flavors richly too—we’re aiming for nothing short of perfection here people! Sprinkle liberally with garlic powder followed by smoked paprika along with salt & freshly ground black pepper too—all designed specifically to boost flavor profiles significantly throughout each bite… Don’t rush this step; take care ensuring even coverage across every disk before placing them carefully back onto their parchment-lined bed awaiting their moment in heated glory…
Step 4: Roast Until Golden Brown
Pop them into preheated oven reveling amidst sizzling sounds filling air as they begin transforming towards golden-brown perfection over next 18–22 minutes flipping halfway through ensures even cooking throughout… Keep watch though because ovens vary widely sometimes—but we’re looking primarily at visual cues here folks—the edges should appear crispy whilst centers remain fluffy inside just waiting patiently beneath outer crusts begging eagerly for attention come serving time ahead!!
So there you have it—we’ve laid down foundations towards crafting unforgettable Loaded Smash Burger Bowls filled with love & comfort awaiting final assembly soon enough… Stay tuned—it gets even more exciting ahead!!!
Step 5: Forming the Perfect Burger Patties
Now that your potatoes are roasting away in the oven, it’s time to give attention to the star of our Loaded Smash Burger Bowls—the beef patties. The key here is to handle the ground beef gently; you want to form these patties without overworking the meat. This is absolutely paramount because if you compact the beef too much, you’ll end up with tough burgers instead of juicy, flavorful bites. So, grab a mixing bowl and add your pound of ground beef along with a generous sprinkle of salt, a good grind of black pepper, and a splash of Worcestershire sauce for that extra depth of flavor. The Worcestershire sauce is like liquid gold here, enhancing the umami taste that makes burgers so irresistible.
Using clean hands, gently mix everything together until just combined—no more than necessary! From this mixture, divide it into four equal portions. I find that using a kitchen scale can be helpful if you’re aiming for precision, but eyeballing it works just fine too! Once divided, loosely form each portion into a ball. Remember, we’re not looking for perfection; we want those beautiful irregularities that add character to our patties and help them cook evenly. The magic happens next when we hit the skillet!
Step 6: Cooking Your Smash Burgers
With your patties formed and ready to go, it’s time to heat things up! Place a large skillet or griddle over medium-high heat; let it preheat for about 3-5 minutes until it’s nice and hot—this is crucial for achieving that gorgeous crust on your burgers. When you drop those beef balls onto the pan, they should sizzle like they mean business! If you’re working with a smaller skillet, don’t crowd them; cook in batches if needed to ensure every patty gets enough heat and space to develop its delicious crust.
Once you’ve placed the beef balls in the pan, use a sturdy spatula to smash them down firmly into thin patties. This technique creates that delightful caramelization on the surface as the sugars in the meat break down under high heat—a process known as the Maillard reaction—yielding an utterly intoxicating flavor profile. Cook these beauties for about 2-3 minutes on one side until they’re deeply browned before flipping them over. Look for that golden crust; it’s your visual cue that they’re ready to turn! After another couple of minutes on the other side, they should be cooked through—just make sure not to get distracted during this step; timing is everything here!
Step 7: Whipping Up Your Special Sauce
While those glorious patties are sizzling away, shift your focus back to creating something truly special—the sauce that will tie all these ingredients together in harmonious bliss! In a small bowl (or even better—your favorite jar), combine ⅓ cup mayonnaise with 2 tablespoons ketchup and 1 tablespoon yellow mustard. Add in those zingy pickled relish bits along with apple cider vinegar for brightness. The vinegar cuts through the richness of the mayo and adds a lovely tanginess that balances everything perfectly.
Next comes my favorite part: seasoning! Sprinkle in half a teaspoon each of garlic powder and onion powder along with just a pinch of paprika for an added layer of warmth. Whisk all these ingredients together until smooth and creamy; this sauce is going to be your secret weapon! Don’t forget to taste it—this step allows you to adjust salt and pepper according to your preference. I promise you, once you have this sauce drizzled over your bowls, you’ll understand why it’s called “special”—it elevates every bite into something extraordinary!
Step 8: Assembling Your Loaded Smash Burger Bowls
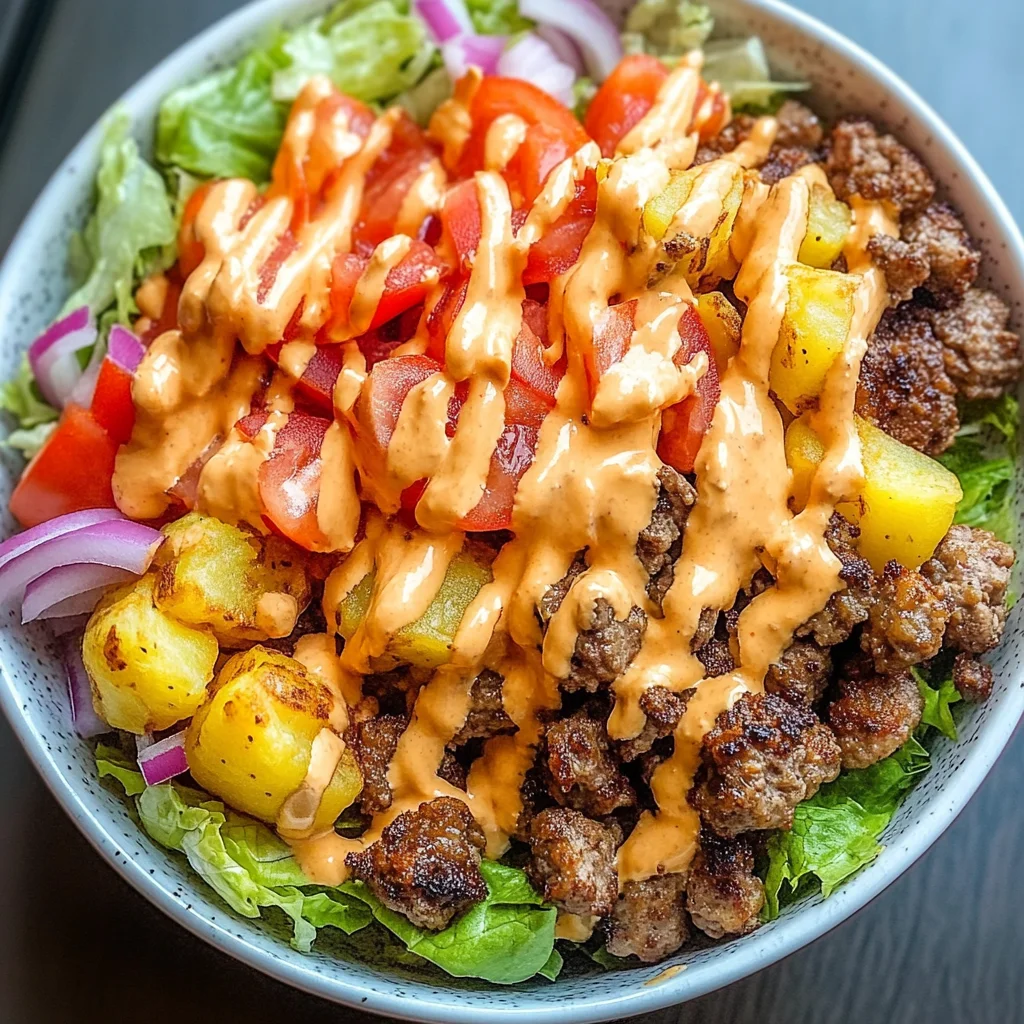
Now comes the moment we’ve all been waiting for—the assembly! Grab four beautiful serving bowls (I always love using bowls that feel good in my hands) and start by dividing those crispy smashed potatoes among them as if they were tiny edible canvases awaiting their masterpiece toppings. Layer them generously with shredded iceberg lettuce—it adds such a satisfying crunch—and then pile on diced tomatoes for freshness and vibrant color.
Next up is the red onion; thinly slice half of one small red onion so you can sprinkle elegant rings over each bowl. This will lend not only flavor but also an eye-catching appeal! Don’t forget about your cheese—shredded cheddar has this wonderful melty quality when warm from the burger patty laid atop it; trust me when I say it’s essential to finish things off right! Finally, lay down your perfectly cooked smash burger patties on top like crowns atop their royal subjects.
Final Touches: Drizzling That Special Sauce
Just when you think these Loaded Smash Burger Bowls couldn’t get any better—you drizzle them lavishly with your special sauce! Go ahead and be generous here; there’s something profoundly satisfying about seeing that creamy goodness cascade over everything below it. Take a moment here—you deserve it—to appreciate how colorful and inviting these bowls look before diving in.
Serve immediately while everything is still hot—the beauty here lies in enjoying those crispy potatoes while they’re fresh out of the oven alongside warm burger patties melting into layers of cheese beneath them. Each bite offers an explosion of flavors and textures—from crunchy vegetables to creamy sauce—that will have everyone at your table swooning with delight.
So there you have it—your very own Loaded Smash Burger Bowls ready for devouring! I can’t wait for you to experience how truly extraordinary this meal is—it’s comfort food at its finest! Enjoy every last bite as it warms both belly and heart while creating memories around your table.
Storage and Enjoyment Tips for Your Loaded Smash Burger Bowls
Now that you’ve created this mouthwatering masterpiece of Loaded Smash Burger Bowls, it’s time to dig in and savor every bite! I can already imagine the delightful crunch of those crispy potatoes, the juicy burger patties, and that creamy special sauce dancing on your taste buds. But what if you have leftovers? Trust me; no one wants to waste such deliciousness! Let’s talk about how to store these bowls properly so you can enjoy them later.
Storing Leftover Loaded Smash Burger Bowls
To keep your Loaded Smash Burger Bowls fresh and flavorful, I recommend placing them in airtight containers. Glass containers work beautifully, but any sealed plastic option will do just fine. Make sure to pop them in the refrigerator where they’ll stay fresh for up to three days. For the best quality, try not to mix all the components together before storing—keeping those crispy potatoes separate will maintain their delightful texture! After a day or two in the fridge, you might notice that the flavors meld beautifully, creating a harmonious blend that’s just as enjoyable as when they were freshly made. When it’s time to reheat, simply pop them in the microwave for a minute or two, stirring halfway through to ensure even warmth. Alternatively, you can warm them up in a skillet over low heat for an even better crisp on those potatoes!
Freezing Components for Later
If you want to take meal prep to another level, consider freezing some components of your Loaded Smash Burger Bowls! Cooked burger patties freeze exceptionally well—just let them cool completely before wrapping each patty tightly in plastic wrap and placing them in a freezer-safe bag. They’ll keep for about three months frozen. When you’re ready to enjoy again, simply thaw them overnight in the refrigerator before reheating on a skillet or griddle until heated through. This is not only a fantastic way to save time but also ensures you always have a delicious meal ready at your fingertips! Just imagine pulling out those perfectly seasoned patties from the freezer on a busy weeknight; it’s convenience at its finest!

Loaded Smash Burger Bowls
- Total Time: 55 minutes
- Yield: Serves 4
Description
Indulge in the comforting flavors of Loaded Smash Burger Bowls, a delightful dish that brings together crispy baby Yukon Gold potatoes and savory beef patties, all served in a cozy bowl. This easy-to-make meal is perfect for busy weeknights or casual gatherings with family and friends. The crispy potatoes serve as a delicious base, while customizable toppings allow everyone to indulge in their favorite flavors. Drizzled with creamy special sauce, this dish is not just food; it’s a warm embrace that sparks joy and nostalgia, making every bite an extraordinary experience.
Ingredients
- 1 ½ lbs baby Yukon Gold potatoes
- 2 tbsp olive oil
- 1 tsp garlic powder
- 1 tsp smoked paprika
- Salt and freshly ground black pepper, to taste
- 1 lb ground beef (80/20 blend preferred)
- 1 tsp salt
- ½ tsp black pepper
- 1 tsp Worcestershire sauce
- ⅓ cup mayonnaise
- 2 tbsp ketchup
- 1 tbsp yellow mustard
- 2 tsp pickled relish
- 1 tsp apple cider vinegar
- ½ tsp garlic powder
- ½ tsp onion powder
- Pinch of paprika
- 1 cup shredded iceberg lettuce
- 1 large tomato (diced)
- ½ small red onion (thinly sliced)
- 1 cup shredded cheddar cheese
- Dill pickle slices (optional)
Instructions
- Preheat the oven to 425°F (220°C). Boil potatoes in salted water until fork-tender, about 12–15 minutes.
- Drain and cool slightly, then smash each potato into disks on a parchment-lined baking sheet.
- Drizzle with olive oil and season with garlic powder, salt, and pepper. Roast for 18–22 minutes until golden brown.
- While potatoes roast, mix ground beef with Worcestershire sauce, salt, and pepper; form into patties.
- Heat skillet over medium-high heat and cook patties for about 3 minutes per side until browned.
- Prepare special sauce by mixing mayo, ketchup, relish, vinegar, garlic powder, and onion powder.
- Assemble bowls by layering smashed potatoes, lettuce, tomatoes, burger patties, cheese, and drizzling with special sauce.
- Prep Time: 15 minutes
- Cook Time: 40 minutes
- Category: Dinner
- Method: Baking/Frying
- Cuisine: American
Nutrition
- Serving Size: 1 bowl (450g)
- Calories: 650
- Sugar: 4g
- Sodium: 800mg
- Fat: 38g
- Saturated Fat: 10g
- Unsaturated Fat: 25g
- Trans Fat: 0g
- Carbohydrates: 52g
- Fiber: 6g
- Protein: 30g
- Cholesterol: 90mg

Leave a Comment