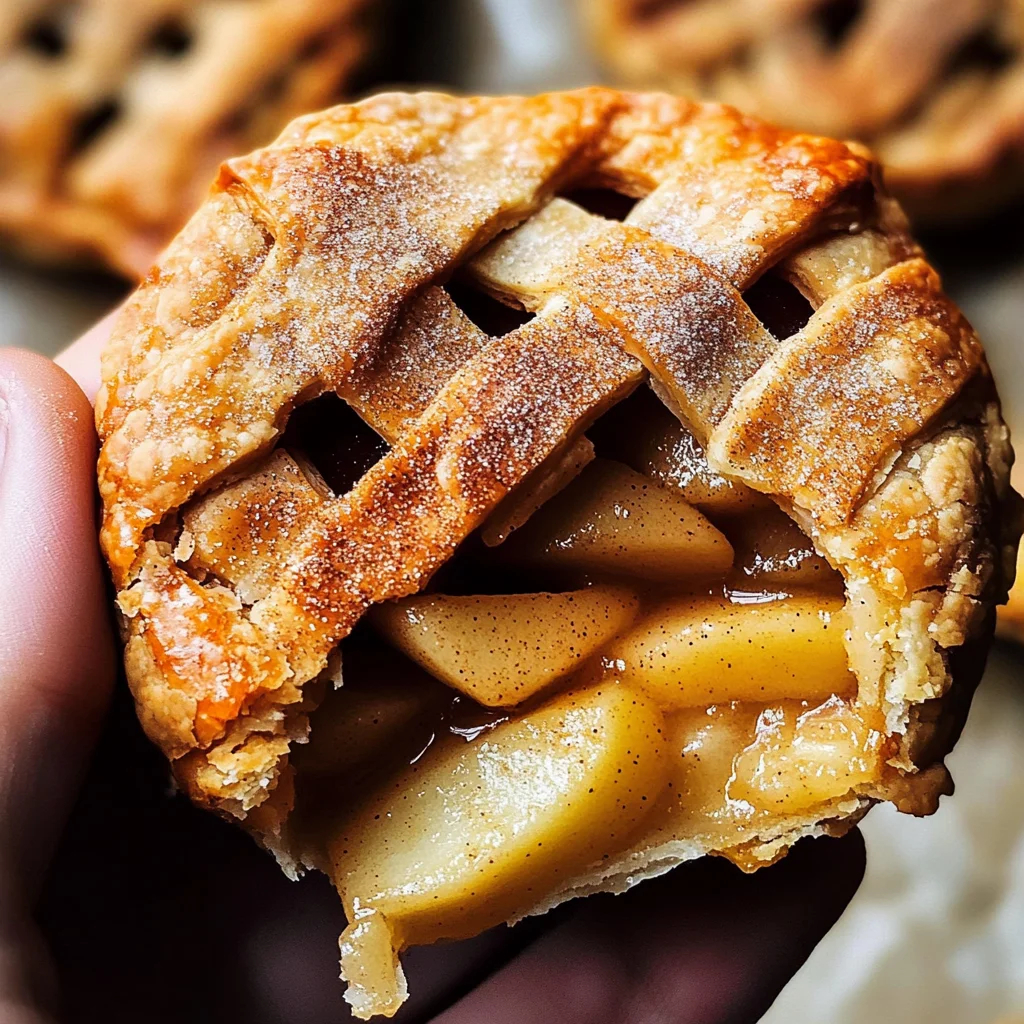
There’s something truly magical about the scent of baking apples wafting through the house, isn’t there? It’s a warm embrace from the kitchen, calling you to gather around and share in a moment of bliss. These Mini Apple Hand Pies are more than just a delightful treat; they encapsulate memories of childhood afternoons spent in the kitchen, where laughter mingled with the sweet aroma of cinnamon and warm butter. Imagine biting into one of these golden treasures, the flaky crust giving way to a luscious filling of tender apples, kissed with just the right amount of spice. Trust me when I say, these hand pies are an experience—a comforting reminder that sometimes the simplest things can bring us the greatest joy.
As we embark on this culinary journey together, I want you to feel every step—the rhythm of preparing ingredients, the anticipation as they meld into something extraordinary, and ultimately, that moment when you take your first bite. This recipe is designed to be approachable yet utterly satisfying, making it perfect for any occasion—from cozy family gatherings to spontaneous dessert cravings. The beauty lies in its simplicity; with just six ingredients for the filling and store-bought pie dough, you’ll have delicious mini apple hand pies ready in under an hour. So let’s dive into this adventure and create something that not only fills our bellies but warms our hearts!
Mini Apple Hand Pies: A Delightful Journey into Comfort Food
These Mini Apple Hand Pies are not just a dessert; they’re little pockets of happiness that promise to transport you back to cherished moments filled with warmth and nostalgia. Picture yourself sharing them with friends or family—a delightful twist on traditional apple pie that allows everyone to enjoy their own little piece. The combination of tender apples and spiced sugar creates a symphony of flavors that dance on your palate, while the flaky crust cradles it all in a loving embrace.
Now, let’s get ready to make some magic in the kitchen!

Ingredients:
As we gather our ingredients for this beautiful endeavor, remember that each component plays a vital role in crafting these delectable mini apple hand pies. Let’s explore them together!
-
1 box store bought pie dough, containing 2 sheets see notes for GF option. Using store-bought pie dough saves time without compromising flavor or texture—an absolute game changer when you’re short on time but craving something homemade. Look for high-quality brands at your local grocery store; they often use simple ingredients without preservatives. If you’re gluten-free or want to explore alternatives, many brands offer gluten-free options that work beautifully here.
-
2 tbsp unsalted butter (reg or plant-based). Butter brings richness and depth to your filling, creating what I like to call “liquid gold” as it melds with the apples during cooking. If you opt for plant-based butter, ensure it has a similar fat content for optimal results. Remember—this is crucial because butter helps achieve that irresistible golden crust when brushed over before baking.
-
2 1/2 cups finely chopped fuji or honeycrisp apples (about 2 large apples). These varieties shine in this recipe due to their perfect balance between sweetness and tartness—Fuji apples provide a crisp bite while Honeycrisp lends juiciness. When chopping your apples finely (think about 1/4-inch pieces), it ensures they cook evenly and fill every nook in your hand pies with flavor.
-
1/4 cup (50g) light brown sugar, packed. The light brown sugar adds a hint of caramel flavor while enhancing the natural sweetness of our apples. Packing it tightly is non-negotiable—it allows us to capture all those delightful molasses notes that will bring depth to our filling.
-
1 tsp ground cinnamon. Oh, cinnamon! This spice is absolutely paramount; its warm aroma dances through your home as these pies bake and elevates every bite with its comforting essence. Choose fresh ground cinnamon if possible—it makes all the difference!
-
Juice of 1/2 lemon. Lemon juice brightens up our filling by adding acidity that balances out the sweetness from both the apples and sugar. It’s amazing how such a small addition can elevate flavors so profoundly—it prevents your filling from tasting too one-dimensional.
-
1/2 tsp cornstarch mixed with 1 tbsp water. This mixture acts as a natural thickener for our apple filling, ensuring it doesn’t become too runny during baking—nobody wants soggy pie! Mixing it with water activates its thickening properties more effectively than adding it directly into hot liquids.
-
1 large egg. This egg works wonders as an egg wash; brushing it onto our pastry gives each hand pie that stunning golden sheen we all crave. It also helps seal everything together nicely!
-
1/2 cup (100g) granulated sugar and 1 tsp ground cinnamon (for topping). This combination creates an irresistible crunchy topping on each pie once baked—every bite will have an exhilarating burst of sweetness! You can adjust this amount based on your preference; however, I encourage you not to skimp on this step!
Now that we’ve gathered our essentials let’s talk about how we’ll bring all these wonderful ingredients together!
Equipment You’ll Need:
Having the right tools at your disposal can transform your cooking experience from mundane to magnificent! While these items aren’t technically “ingredients,” they serve as essential partners in creating something truly special.
-
Large saucepan – A sturdy saucepan is essential for melting butter and combining all those lovely ingredients for our filling evenly without burning anything! Look for one that’s heavy-bottomed as it distributes heat nicely.
-
Rolling pin – A trusty rolling pin helps flatten out our pie dough effortlessly—you’ll want one that’s comfortable in your hands so you can roll out evenly without straining yourself.
-
Apple-shaped cookie cutter or homemade template – Utilizing an apple-shaped cookie cutter makes cutting out perfectly shaped mini pies so much easier—and fun! If you don’t have one handy, don’t worry! You can create your own template using cardboard from the box your pie dough came in—just cut out an apple shape!
-
Baking sheet lined with parchment paper – This is where the magic happens! Lining your baking sheet ensures easy cleanup while allowing those lovely hand pies to crisp up beautifully without sticking.
With all our ingredients prepped and equipment ready to go, let’s dive into making these glorious Mini Apple Hand Pies!
Step 1: Let’s Get Those Apples Cooking!
First things first—remove your pie dough from the refrigerator so it can come to room temperature while we prepare our delicious filling! Timing is everything here; if it’s too cold when you’re ready to roll it out later on, you’ll find yourself wrestling with stiff dough instead of gracefully shaping it into mini masterpieces.
Next up: grab that saucepan! Over medium heat, melt down those two tablespoons of butter until it’s bubbling slightly but not browned—that’s right; we’re looking for liquid gold here! Once melted, add in those finely chopped Fuji or Honeycrisp apples along with packed brown sugar and ground cinnamon followed by freshly squeezed lemon juice (don’t skip this part!). Stir everything together gently until coated—it’ll smell heavenly already! Keep cooking this mixture for about ten minutes until those apples soften beautifully—they should be tender but still holding their shape rather than mushy—as they bubble away joyfully in their juices.
Step 2: Thicken That Filling
Once you’ve reached this point where everything looks divine—a fragrant medley swimming happily together—it’s time for an important step: thickening! Grab that prepared cornstarch-water mixture we made earlier and pour it into our pot filled with simmering apple goodness while stirring continuously. Almost instantly you’ll notice how quickly everything transforms before your eyes—the filling begins thickening like magic after just about thirty seconds on heat! Remove from heat once thickened enough then let cool slightly while we prep our pastry sheets—it’s crucial not rush this step since letting those flavors meld further enhances their deliciousness!
Step 3: Preheat & Prepare
Now would be an excellent time to preheat oven at 400°F (200°C) so it’s nice & hot when we’re ready—we want crispy perfection here folks! Line a large baking sheet using parchment paper which acts like armor against sticking later on…and trust me—you don’t want any precious fillings sacrificed due unnecessary messes!
Then dust lightly floured surface before unrolling one sheet of pie dough onto it gently smoothing out any wrinkles using rolling pin—you’re aiming just enough pressure here so don’t overdo it since we want even thickness throughout without tearing either side apart—it’ll help ensure consistent cooking later too!
Step 4: Get Cutting!
Here comes another fun part—let’s cut out those adorable apple shapes using either cookie cutter or homemade template mentioned earlier…this process really adds charm doesn’t? Simply press down firmly yet carefully through rolled-out dough ensuring bite-sized pieces emerge effortlessly—try aiming around eight per sheet depending upon size so feel free roll scraps again if needed afterward until completely utilized!
Once you’ve cut them all out transfer half onto parchment-lined baking sheet leaving space between each piece—they need room to breathe while rising beautifully during baking time ahead…if space runs low simply refrigerate remaining pieces until batch finishes cooking before proceeding onward together next round ahead along way too!
With everything prepped beautifully already now let’s move forward towards assembling mini delights shall we?
The Joy of Crafting Mini Apple Hand Pies
Step 5: Preheating Your Oven to Perfection
Now that you have your luscious apple filling cooling gently, it’s time to prepare the oven for the grand baking adventure! Preheat your oven to 400°F (200°C). I know it may seem like a simple step, but trust me when I say that preheating is absolutely paramount. This allows your hand pies to bake evenly and achieve that delightful golden-brown crust that we all adore. If you skip this crucial step, you risk ending up with a soggy bottom instead of the crisp, flaky texture that makes these mini apple hand pies truly extraordinary. While the oven is heating up, take a moment to line a large baking sheet with parchment paper. This not only prevents sticking but also makes cleanup a breeze—because let’s be honest, who wants to scrub burnt pastry off their favorite baking sheets?
Step 6: Preparing Your Dough – A Gentle Touch
With your oven warming and your baking sheet prepped, let’s turn our attention back to that lovely pie dough. Lightly dust your work surface with flour; this helps prevent any sticking as we roll out the dough. Unroll one of the sheets of pie dough and place it on your floured surface. Now comes a gentle yet effective technique: using a rolling pin, smooth out any wrinkles or ridges in the dough without flattening it too much. You want just enough pressure to create an even surface; avoid going overboard or you’ll lose that beautiful flaky texture we’re after! Aim for about an eighth of an inch in thickness—think of it like a soft blanket for your apple filling. This step is essential because it creates an inviting pocket for our filling while ensuring even cooking throughout.
Step 7: Cutting Out Your Apple Shapes
Once the dough is ready, grab that adorable apple-shaped cookie cutter or create one using cardboard from the pie box—yes, you can DIY! Cut out as many apples as you can from the first sheet; typically, you’ll manage about eight shapes before needing to roll out any scraps left over. Don’t be afraid to re-roll those scraps; they’re still part of this delicious journey. After cutting out your apples, gently transfer them onto a plate and pop them into the refrigerator while you repeat this process with the second sheet of pie dough. Chilling your cutouts is not just a whimsical idea—it actually helps maintain their shape during baking and prevents them from puffing up too much in the oven. The cooler temperature keeps everything together beautifully so that when they bake, they retain their delightful design and look picture-perfect!
Step 8: Assembling Your Hand Pies – A Moment of Anticipation
Now comes one of my favorite parts—the assembly! Take half of your chilled apple cutouts and place them on the prepared baking sheet, spacing them evenly apart to give each little pie room to shine during baking. If you’re working with limited space on your tray, don’t stress! Just keep those remaining apple shapes cool in the fridge until you’re ready for round two. Each cutout needs its own generous tablespoon of that fragrant apple filling we created earlier; scoop carefully into the center while leaving about half an inch around the edges free from filling—this border is non-negotiable as it ensures a proper seal later on! Once filled, take an egg mixed with water (this will act as our magical glue) and brush it along the borders of each filled apple cutout. This step may seem minor but trust me—it’s vital for achieving those beautifully crimped edges that keep all those glorious flavors tucked inside while they bake.
Baking Your Perfect Mini Apple Hand Pies
Step 9: Sealing the Deal – Top It Off!
For the other half of your apple shapes, it’s time to create some ventilation magic! Carefully cut four small slits in each top piece—this allows steam to escape during baking and prevents any bursting (which would be sad!). Place these vented pieces gently atop their filled counterparts and press down lightly along the seams to seal them tight. Don’t forget to crimp those edges with a fork for added flair! Not only does this enhance presentation but it’s also an extra safety net ensuring no delicious juices leak out while they bake away into golden perfection. Once sealed and crimped, brush these tops with more egg wash for that beautiful shine we all crave in baked goods.
As if things couldn’t get better, sprinkle about a teaspoon of cinnamon sugar on top of each little pie—it’s like giving each one its very own crown! This final touch adds just enough sweetness and warmth to complement those tender spiced apples inside. Now slide these beauties into your preheated oven and allow them to bask in all that heat for about 12-14 minutes. Keep an eye on them as they transform—you’re looking for a deep golden hue on top which indicates they’re perfectly baked through!
Step 10: Cooling Time – An Exercise in Patience
Once baked to perfection, remove those lovely mini hand pies from the oven and let them cool on the baking sheet for a good five minutes before transferring them onto a wire rack. I know how tempting it is to dive right into one—they smell utterly intoxicating—but patience here pays off big time! Allowing them to cool helps set their structure while preventing burns; trust me on this one—you want every bite to be enjoyable rather than scalding hot! After they’ve cooled slightly and are no longer steaming hot, grab one (or maybe two) and take a moment to appreciate what you’ve created: flaky pastry hugging sweet spiced apples—a true labor of love!
And there you have it—the ultimate guide to crafting delightful Mini Apple Hand Pies! I promise you; once you take that first bite, you’ll understand just how special these little treats are—they’re not just food; they’re memories waiting to happen at family gatherings or cozy nights in with friends. Enjoy every scrumptious morsel!
Storage and Enjoyment Tips for Your Mini Apple Hand Pies
Now that your kitchen is filled with the aroma of warm spices and tender apples, it’s time to dig into these delightful Mini Apple Hand Pies! Trust me, the first bite will send you straight to a cozy autumn day, even if it’s July outside. But wait, don’t devour them all just yet! If you find yourself with leftovers (and I promise you won’t regret saving some), let’s talk about how to keep these little treasures fresh and delicious for as long as possible.
Storing Leftover Mini Apple Hand Pies
To keep your Mini Apple Hand Pies in peak condition, store them in an airtight container at room temperature. This helps maintain their flaky crust and delightful filling without drying them out. They’ll stay fresh for about 2-3 days, but I bet they won’t last that long—seriously, they’re that good! If you want to take an extra step toward preserving their deliciousness, consider placing a slice of bread in the container; it absorbs moisture and keeps the pies from getting soggy. When you’re ready to enjoy them again, you’ll be thrilled to find that their flavor is still vibrant and their texture remains wonderfully satisfying. Simply reheat them in the oven for about 5-7 minutes at 350°F until they’re warmed through and their crust is crisp. Trust me on this; there’s something magical about biting into a pie that feels freshly baked!
Freezing Mini Apple Hand Pies for Later
If you’ve somehow managed to have leftovers (or just want to prep ahead), freezing these Mini Apple Hand Pies is a fantastic option! To freeze them properly, allow your hand pies to cool completely before placing them in a single layer on a baking sheet lined with parchment paper. Once frozen solid, transfer them into an airtight freezer-safe bag or container where they can happily rest for up to three months. The convenience of having these sweet delights on hand is absolutely paramount; imagine pulling out a few frozen pies on a chilly evening and popping them into the oven for warm comfort food in no time! When you’re ready to savor one, simply bake from frozen at 400°F for an extra couple of minutes longer than usual—no defrosting necessary. You’ll feel like a culinary wizard conjuring up deliciousness without any fuss!
CATEGORY_NAME

Mini Apple Hand Pies
- Total Time: 34 minutes
- Yield: Makes about 8 hand pies 1x
Description
Indulge in the comforting warmth of Mini Apple Hand Pies, the perfect handheld dessert that captures the essence of autumn in every bite. With a flaky crust enveloping a luscious filling of tender apples, spiced just right with cinnamon and lemon juice, these delightful treats are not only easy to make but also incredibly satisfying. Whether you’re hosting a family gathering or simply looking for a sweet escape, these mini pastries promise to bring smiles to faces young and old. Bake a batch in under an hour and enjoy the nostalgia of home-baked goodness that’s perfect for sharing—or keeping all to yourself!
Ingredients
- 1 box store-bought pie dough (2 sheets)
- 2 tbsp unsalted butter (or plant-based)
- 2 1/2 cups finely chopped Fuji or Honeycrisp apples
- 1/4 cup light brown sugar, packed
- 1 tsp ground cinnamon
- Juice of 1/2 lemon
- 1/2 tsp cornstarch mixed with 1 tbsp water
- 1 large egg (for egg wash)
- 1/2 cup granulated sugar + 1 tsp ground cinnamon (for topping)
Instructions
- Preheat your oven to 400°F (200°C) and line a baking sheet with parchment paper.
- In a saucepan over medium heat, melt butter. Add chopped apples, brown sugar, cinnamon, and lemon juice; cook for about 10 minutes until tender.
- Stir in cornstarch-water mixture until thickened; remove from heat and let cool.
- Roll out pie dough on a floured surface; cut into apple shapes using a cookie cutter.
- Place half of the cutouts on the baking sheet. Add a tablespoon of apple filling to each, brush edges with egg wash.
- Top with remaining cutouts, seal edges by crimping with a fork, and cut slits for ventilation.
- Brush tops with egg wash and sprinkle with cinnamon sugar.
- Bake for 12-14 minutes until golden brown.
- Prep Time: 20 minutes
- Cook Time: 14 minutes
- Category: Dessert
- Method: Baking
- Cuisine: American
Nutrition
- Serving Size: 1 hand pie (60g)
- Calories: 210
- Sugar: 10g
- Sodium: 120mg
- Fat: 9g
- Saturated Fat: 4g
- Unsaturated Fat: 5g
- Trans Fat: 0g
- Carbohydrates: 30g
- Fiber: 2g
- Protein: 2g
- Cholesterol: 30mg
Leave a Comment