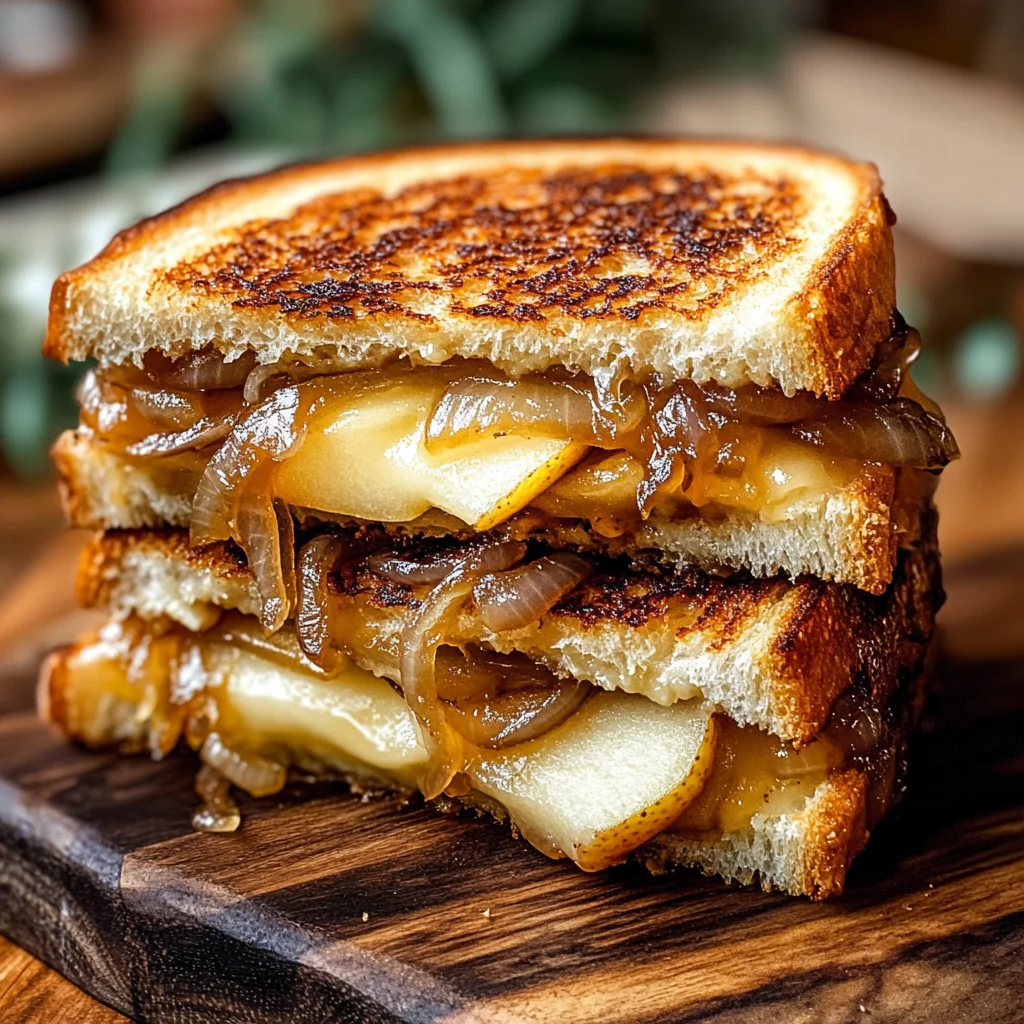
There’s something utterly magical about the simple act of making a grilled cheese sandwich, isn’t there? It’s more than just slapping ingredients between two slices of bread—it’s a heartwarming ritual that weaves together flavors, memories, and the comforting embrace of home. When you take a bite of this Pear & Apple Grilled Cheese With Caramelized Onions, it’s like you’re savoring a moment in time, where sweet meets savory in an absolutely delightful dance. The gooey sharp cheddar melds beautifully with the luscious sweetness of pears and apples while the caramelized onions add depth and warmth. This isn’t just food; it’s an experience that speaks to the soul, a reminder that sometimes, the simplest dishes can bring us the greatest joy.
What makes this recipe so special is how it effortlessly bridges traditional comfort with innovative flair. While grilled cheese often conjures images of childhood lunches and cozy evenings, my version takes those familiar notes and elevates them to something truly extraordinary. The interplay of textures—from the buttery crunch of toasted sourdough to the melty goodness inside—is nothing short of divine. Picture this: as you bite into your sandwich, the sweetness of ripe pears and apples mingles with those rich, caramelized onions, creating a symphony of flavors that will make your taste buds sing. And trust me when I say, once you try it, you’ll never look at grilled cheese the same way again.
Pear & Apple Grilled Cheese With Caramelized Onions: A Wholesome Twist on a Classic
If you’re ready to embark on a culinary adventure that combines nostalgia with creativity, you’ve come to the right place! This Pear & Apple Grilled Cheese With Caramelized Onions is perfect for any occasion—whether you’re looking for a cozy lunch at home or impressing friends at a gathering. Let’s dive into this delicious journey together!
Ingredients:
As we prepare to create this culinary delight, let’s take a moment to appreciate each ingredient that will come together in harmony. Every component plays its unique role in crafting this unforgettable sandwich experience.
- 4 slices sourdough bread. Sourdough is truly a star player in this recipe—the tanginess from its fermentation process balances beautifully with the sweetness of our fruits. Look for sourdough that has a nice crust; it adds an irresistible crunch that contrasts wonderfully with the soft filling inside. If you’re feeling adventurous, consider trying whole grain sourdough for added texture and nutrition—it will elevate your grilled cheese to new heights!
- 2 tablespoons unsalted butter. Butter is absolutely paramount here; it’s what gives our sandwich its golden-brown exterior and rich flavor. Using unsalted butter allows you to control the saltiness of your dish better; after all, we want to enhance flavors without overwhelming them. When melting butter for grilling, ensure it’s over medium heat—this prevents burning while allowing your bread to toast perfectly.
- 1 medium pear, thinly sliced. Pears bring their sweet juiciness into play here—think of them as nature’s candy! Opt for varieties like Bosc or Anjou; they hold their shape well when cooked and provide that lovely sweetness we crave. Be sure to slice them thinly so they soften nicely during grilling without losing their structure.
- 1 medium apple, thinly sliced. Just like pears, apples add another layer of sweet complexity! Choose crisp varieties such as Honeycrisp or Fuji for their balanced sweetness and slight tartness which beautifully complements our other ingredients. Thin slices are key here too; they’ll caramelize slightly without becoming mushy.
- 1 medium onion, thinly sliced. Onions are essential for adding depth and umami flavor through caramelization—a process where natural sugars break down under low heat to create those beautiful golden-brown strands packed with flavor! Always use fresh onions for optimal taste; yellow onions are perfect for this recipe due to their balanced flavor profile.
- 1 cup shredded sharp cheddar cheese. Sharp cheddar is what takes our grilled cheese from ordinary to extraordinary! Its bold flavor mingles perfectly with sweet notes from our fruits while providing that melty goodness we all adore in a gooey grilled cheese sandwich. For maximum melting power, opt for freshly shredded cheese rather than pre-packaged varieties—trust me on this one!
- 1 tablespoon balsamic vinegar. This might seem like an unusual addition for a grilled cheese recipe but hear me out—balsamic vinegar adds an incredible depth of flavor by enhancing sweetness and providing acidity that cuts through richness wonderfully! It elevates our caramelized onions to new heights; don’t skip this step!
- Salt (to taste) and black pepper (to taste). These two are important seasoning agents—they may seem simple but are non-negotiable in bringing out all those vibrant flavors we’ve layered into our sandwich! A sprinkle here or there can make all the difference; just remember to taste as you go along.
Equipment You’ll Need:
Before we delve into assembling this masterpiece, let’s gather our trusty kitchen tools—because having the right equipment can truly enhance your cooking experience!
- Skillet or frying pan – A sturdy skillet is essential for achieving that perfect golden crust on your sandwiches while allowing even heating throughout the cooking process. Cast iron skillets are wonderful choices since they retain heat beautifully but any non-stick skillet will work just fine too!
- Spatula – This handy tool is your best friend when it comes time to flip those sandwiches without losing any precious fillings! A wide spatula ensures stability while turning everything over smoothly.
- Cutting board – Choose a spacious cutting board where you can comfortably slice fruits and assemble your sandwiches without feeling cramped—it makes everything feel less hectic during preparation.
- Chef’s knife – A sharp chef’s knife will make slicing through apples and pears easy-peasy! It’s crucial not only for speed but also safety—dull knives tend to slip more easily.
These tools will be there every step of the way as you craft your Pear & Apple Grilled Cheese With Caramelized Onions—you’ll find they make each part enjoyable!
Preparing the Pear & Apple Grilled Cheese With Caramelized Onions
Step 1: The Artful Process of Caramelizing Onions
To kick off our culinary adventure, let’s begin with caramelizing those onions—the heart and soul behind many great dishes! Start by taking your skillet over medium heat and adding 1 tablespoon of that glorious unsalted butter until it melts into liquid gold before your eyes—a fragrant promise awaits! Toss in your thinly sliced onions along with just a pinch of salt; trust me on this addition as it draws out moisture while enhancing natural sweetness during cooking. Now comes patience—let them cook gently while stirring occasionally for about 10 minutes until they transform into stunning golden strands full of flavor! As they begin browning beautifully, add in that tangy balsamic vinegar which will elevate their sweetness further—cook for another 2-3 minutes until thickened slightly before removing from heat and setting aside.
Step 2: Melting Butter Like Magic
In our same skillet (no need to wash up yet!), melt down another tablespoon of unsalted butter over medium heat—this time it’s all about creating crispy perfection on both sides of our sandwiches! The aroma wafting through your kitchen should already have anyone nearby intrigued—it’s pure bliss already starting here!
Step 3: Layering Flavors Like No Other
Now comes one of my favorite parts—the assembly! Take two slices of your beautiful sourdough bread and lay them side by side on a clean surface like old friends ready for reunion magic! Layer half of your shredded sharp cheddar evenly across both slices—that cheesy goodness sets up base flavors nicely before we introduce other players into our showstopper performance today! Next comes those heavenly caramelized onions spread generously atop followed by perfectly arranged apple slices—aiming for even distribution so each bite has balance between textures too—and then finish off with luscious pear slices resting gently atop everything else before sealing it all under another layer (or two!) of cheddar cheese alongside another slice waiting patiently above ready become golden brown soon enough!
Step 4: Grill Until Golden Brown
With everything layered harmoniously together now safely tucked between pieces bread ready await transformation magic—we’re going back onto stovetop magic once again! Place one assembled sandwich carefully onto heated skillet; allow each side grill undisturbed about four-to-five minutes until perfectly golden brown appears beneath—this step allows all those delicious flavors meld fully together harmoniously inside as well creating crunchy crust outside holding everything within tight embrace too!! I encourage flipping carefully using spatula so contents remain intact when turning over—you want melted-cheese perfection achieved throughout both sides equally ensuring satisfaction upon first bite later!!
I hope you’re feeling inspired because we’re not done yet! We’ll continue exploring these delicious steps next until every bit shines brightly—as always remember: cooking should feel joyful no matter what stage you’re at along way towards delectable success!!
Step 5: Sizzle and Melt – The Art of Grilling Your Sandwich
Now, let’s get to the heart of this delightful creation: the grilling! Once your skillet is warm and the remaining tablespoon of unsalted butter is melted, it’s time to lay down your beautifully crafted sandwich. Take one of those gorgeous sandwiches you’ve assembled—full of that rich cheddar cheese, sweet apple and pear slices, and those luscious caramelized onions—and gently place it in the skillet. You should hear a satisfying sizzle as the bread makes contact with the hot surface; this sound tells you that magic is about to happen! Grill it for about 4-5 minutes on one side. Keep an eye on it; the goal here is a golden-brown exterior that adds a delightful crunch to each bite. This caramelization not only enhances flavor but also creates a beautiful, inviting color that makes your heart sing.
During this time, I recommend resisting the urge to press down on the sandwich with your spatula; while it might seem like a good idea to encourage faster melting, trust me when I say that maintaining a delicate touch allows for better heat distribution. If you press too hard, you risk squeezing out all those glorious fillings and losing those lovely textures we’ve worked so hard on creating. So, be patient! After a few minutes, when you see that golden hue forming on the underside and can smell that intoxicating aroma wafting up from your skillet, it’s time for the flip—a moment of triumph in your cooking journey! Using your spatula, carefully lift one edge and gently turn it over to grill the other side for another 4-5 minutes until it’s equally enchanting.
Step 6: Flip with Finesse – Ensuring Even Perfection
As you grill that second side, take a moment to revel in the delightful scents swirling around you. This is where patience pays off; while it may feel tedious at times waiting for each side to reach perfection, remember that this step is crucial for acquiring that perfect texture—a crispy exterior paired with gooey melted cheese inside. Keep your heat at medium; if you crank it up too high, you risk burning the bread before the cheese has a chance to melt into that gooey goodness we crave.
The key indicators here are visual cues: check for deep golden brown colors developing on both sides. If you notice any signs of burning or if the bread seems too dark too quickly, simply lower your heat slightly. It’s all about achieving balance—allowing time for those flavors to meld beautifully without compromising texture or taste. When both sides are gloriously browned and you’ve caught whiffs of sweet onion mingling with tangy cheese—oh my goodness—you’ll know it’s nearly done! Remember not to rush this step because this golden crust encapsulates all those extraordinary flavors waiting inside.
Step 7: Resting – The Unsung Hero of Sandwich Making
Once both sandwiches are perfectly grilled and have reached their pinnacle of deliciousness, it’s tempting to dive right in—but hold your horses for just a moment! This resting phase is absolutely paramount—it might feel counterintuitive when you’re so excited about devouring these beauties, but giving them just a minute or two off the heat allows everything inside to settle and meld together beautifully. Think about it—when we slice right into something fresh off the grill, all those juicy fillings have nowhere to go but out!
By letting them rest briefly on a cutting board or plate (and trust me when I say you won’t regret this!), you’re allowing those flavors time to marry and creating that incredibly satisfying bite when you finally take a mouthful. During this time, feel free to grab yourself some napkins or set out any accompaniments like a fresh salad or maybe even some homemade tomato soup if you’re feeling adventurous! Just envision sinking your teeth into this warm delight—the patience will pay off tenfold.
Step 8: The Grand Finale – Slicing and Serving Your Masterpiece
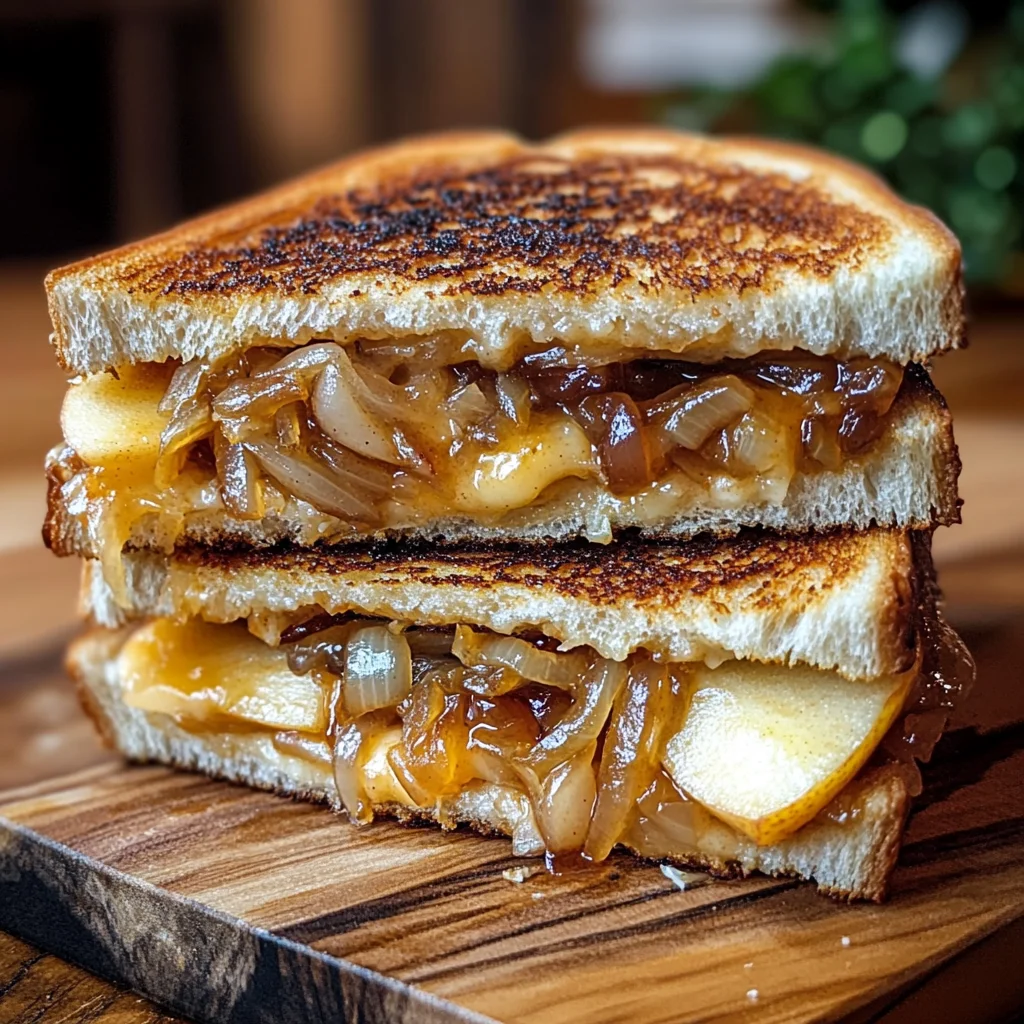
Now comes arguably one of my favorite parts: slicing into these golden treasures! After letting them rest for just a minute or two—enough time for their insides to stabilize—grab a sharp knife and slice each sandwich diagonally from corner to corner. This not only makes for an aesthetically pleasing presentation but also allows more surface area for dipping if that’s your thing! As you cut through that crisp exterior, revealing all those layers of melty cheese alongside sweet pear and apple slices nestled among caramelized onions—it feels like unwrapping a gift!
When plating these sandwiches up for friends or family (or perhaps just yourself because self-love counts!), consider adding some fresh herbs as garnish or even some arugula on top for an extra peppery note that contrasts beautifully against all those rich flavors going on within. And don’t forget about serving suggestions—perhaps alongside crispy baked fries or even some roasted vegetables would complement them wonderfully. Trust me when I say there will be no leftovers after everyone gets their hands on these Pear & Apple Grilled Cheese With Caramelized Onions!
Final Thoughts on Your Pear & Apple Grilled Cheese With Caramelized Onions
With every bite you’ve created an experience bursting with flavor—a true symphony celebrating sweetness blended with savory notes—this sandwich holds memories waiting to be made over cozy lunches or casual gatherings with loved ones. Each ingredient plays its part harmoniously in this culinary masterpiece—from earthy caramelized onions coaxed into rich sweetness to perfectly balanced sharp cheddar melting into creamy bliss alongside tender bites of fruit. So as you serve these delicious creations hot from the pan today, know deeply how special they truly are—not just as food but as moments shared around tables filled with laughter, warmth, and love.
I cannot wait for you to try making these phenomenal sandwiches—I promise they will become an instant favorite in your home just like they did in mine! Enjoy every indulgent bite of your Pear & Apple Grilled Cheese With Caramelized Onions; may they bring joy not only through their incredible taste but through all the cherished memories waiting to unfold around them!
Storage and Enjoyment Tips for Your Pear & Apple Grilled Cheese With Caramelized Onions
What a delightful moment it is when you realize your Pear & Apple Grilled Cheese With Caramelized Onions is ready to enjoy! The tantalizing aroma wafting through your kitchen is simply irresistible, and I can assure you, the first bite will take you on a journey of sweet and savory bliss. But what if you find yourself with leftovers? Fear not, my friend! Let’s talk about how to store this delectable sandwich so you can savor every last morsel.
Storing Leftover Pear & Apple Grilled Cheese With Caramelized Onions
To keep your delicious sandwiches fresh and full of flavor, it’s best to store them in an airtight container. This helps to prevent moisture from making the bread soggy—nobody wants that! Place the sandwiches in the container once they’ve cooled down a bit, and pop it in the refrigerator. They will stay good for about 2-3 days, but trust me when I say they’re best enjoyed fresh. If you’re worried about the bread getting too chewy after storage, consider placing a piece of parchment paper between each sandwich; this little trick works wonders! When reheating, aim for a skillet over medium-low heat; this ensures that the cheese melts beautifully while reviving that golden crust without burning it. The flavors might mellow out slightly in the fridge, but you’ll still be met with those sweet notes of pear and apple dancing alongside the sharp cheddar—truly a comforting experience!
Freezing Components for Later
If you’re looking to extend your enjoyment even further, freezing components of this fantastic grilled cheese is a brilliant idea! You can freeze leftover caramelized onions in an airtight freezer bag or container. Just make sure to let them cool completely before sealing them up tight—this helps preserve their sweet, rich flavor. They’ll keep well in the freezer for about 3 months. When you’re ready for another round of these sandwiches, simply thaw the onions overnight in the fridge or warm them gently on the stovetop before layering them into your sandwich. This option not only saves time on busy days but also means you have a gourmet treat waiting for you whenever that craving strikes—how convenient is that?
By storing and freezing wisely, you’ll ensure that your Pear & Apple Grilled Cheese With Caramelized Onions remains an indulgent delight whenever the mood strikes!

Pear & Apple Grilled Cheese With Caramelized Onions
- Total Time: 30 minutes
- Yield: Serves 2
Description
Indulge in the delicious experience of our Pear & Apple Grilled Cheese With Caramelized Onions, a delightful twist on a classic comfort food. This gourmet sandwich pairs the creamy richness of sharp cheddar cheese with the natural sweetness of ripe pears and crisp apples, all enhanced by the savory depth of caramelized onions. Each bite offers a perfect balance of flavors and textures, with golden-brown sourdough bread providing a crunchy exterior that contrasts beautifully with the gooey interior. Ideal for lunch, dinner, or even as a unique appetizer at gatherings, this recipe is sure to impress!
Ingredients
- 4 slices sourdough bread
- 2 tablespoons unsalted butter
- 1 medium pear, thinly sliced
- 1 medium apple, thinly sliced
- 1 medium onion, thinly sliced
- 1 cup shredded sharp cheddar cheese
- 1 tablespoon balsamic vinegar
- Salt and black pepper to taste
Instructions
- In a skillet over medium heat, melt 1 tablespoon of unsalted butter. Add the sliced onions and a pinch of salt. Cook gently for about 10 minutes until golden brown, then add balsamic vinegar and cook for an additional 2-3 minutes. Set aside.
- Melt the remaining butter in the same skillet over medium heat.
- Assemble the sandwich by layering half of the cheddar on two slices of sourdough bread. Add caramelized onions, apple slices, pear slices, and top with the remaining cheddar. Close with another slice of bread.
- Grill each sandwich in the skillet for about 4-5 minutes per side until golden brown and cheese is melted.
- Allow to rest for a minute before slicing diagonally. Serve warm.
- Prep Time: 15 minutes
- Cook Time: 15 minutes
- Category: Dinner
- Method: Frying
- Cuisine: American
Nutrition
- Serving Size: 1 sandwich (200g)
- Calories: 450
- Sugar: 8g
- Sodium: 620mg
- Fat: 24g
- Saturated Fat: 14g
- Unsaturated Fat: 10g
- Trans Fat: 0g
- Carbohydrates: 42g
- Fiber: 4g
- Protein: 19g
- Cholesterol: 60mg

Leave a Comment