There’s something deeply magical about Vietnamese Fresh Spring Rolls that goes beyond just their incredible taste. They’re not merely a dish; they are a celebration of freshness, color, and texture, wrapped in delicate rice paper that holds a delightful surprise within. As you bite into these rolls, you’ll experience a burst of flavors—from the vibrant crunch of vegetables to the succulent shrimp, all harmonized by fragrant herbs like cilantro and basil. The very act of making these spring rolls is an experience in itself—a meditative journey that invites creativity as you layer each ingredient with care. I promise you, once you roll your first one, you’ll feel like an artist crafting a masterpiece on your plate.
What makes this recipe truly special is not only the fresh ingredients but also the stories woven into each spring roll. Traditionally enjoyed during family gatherings or festive occasions in Vietnam, these rolls embody the spirit of sharing and connection. My friends often gather around the table when I make them, eager to take part in the rolling process—it’s an interactive culinary adventure! The contrast of fresh and cooked elements—the crunchy veggies paired with tender shrimp—creates a symphony of flavors that dance on your palate. And let’s not forget about the dipping sauce; it brings everything together with its rich creaminess and a hint of spiciness. So grab your apron, and let’s dive into this delightful journey of flavor and fun together!
Vietnamese Fresh Spring Rolls Recipe: A Burst of Freshness in Every Bite
These Vietnamese Fresh Spring Rolls are perfect for any occasion—be it a casual family dinner or a festive gathering with friends. They’re light yet satisfying, making them an ideal appetizer that pairs beautifully with your favorite dipping sauce. Plus, they’re gluten-free and can be easily customized with various fillings based on your preferences or what you have on hand. Let me guide you through this wonderful recipe!
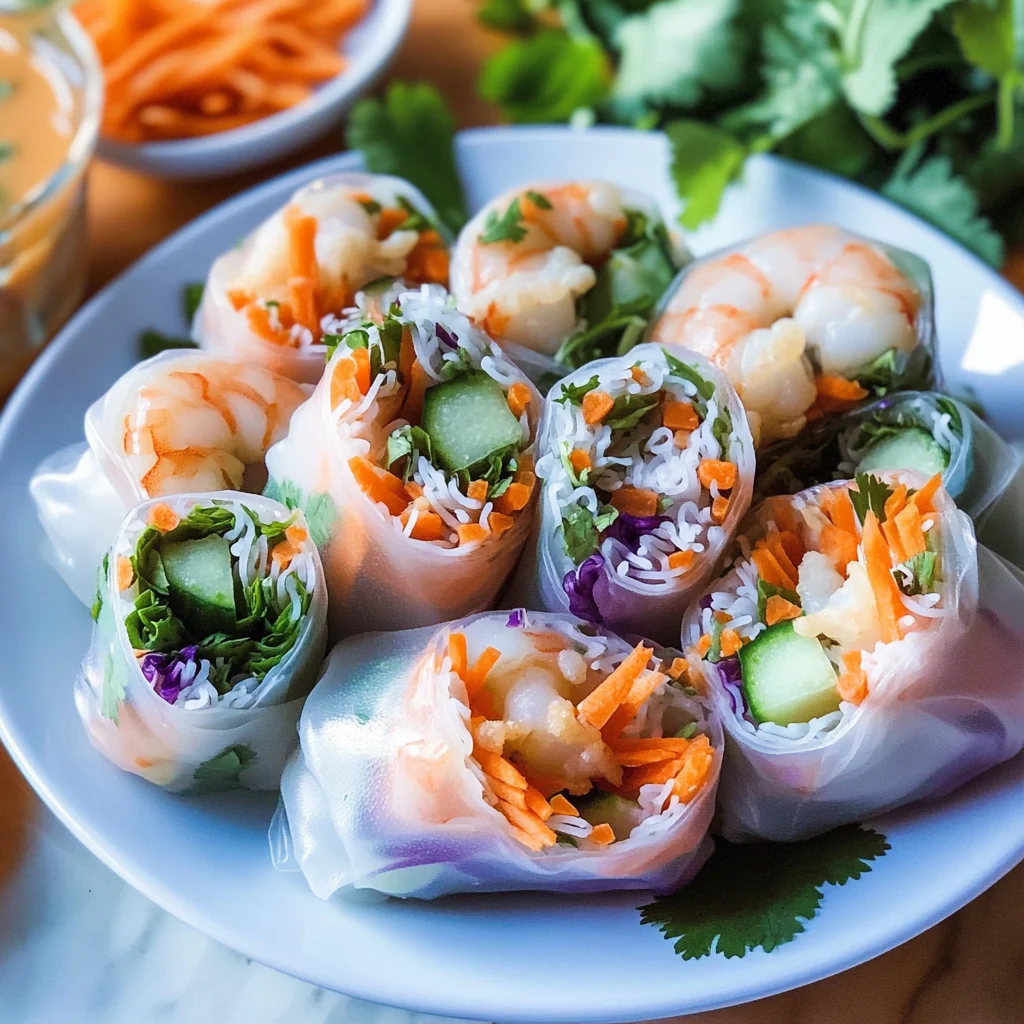
Ingredients:
As we embark on this culinary adventure, let’s take a moment to appreciate each ingredient that will come together to create our stunning spring rolls. Each component plays an essential role in bringing flavor and texture to our dish.
- ½ bunch cilantro (stems removed): This herb is where the magic begins! Cilantro brings a bright, fresh flavor that cuts through the richness of the peanut sauce we’ll be using later. When selecting cilantro, look for vibrant green leaves without wilting or yellowing—a sign of freshness! If you’re not particularly fond of cilantro, feel free to swap it out for mint; both offer aromatic qualities that elevate our rolls.
- 1 ounce basil (sweet or Thai, stems removed): Basil adds another layer of aromatic goodness to our spring rolls. Sweet basil has a mild flavor profile while Thai basil provides a slightly spicier kick—both are fantastic choices! The key here is freshness; opt for basil with firm leaves and no signs of browning for optimal taste.
- 1 pound boiled shrimp (36/40 count, peeled and deveined): Shrimp brings protein and substance to our rolls while offering a tender bite when perfectly cooked. Choose shrimp that are firm to touch and have a slightly sweet smell—avoid those that smell overly fishy! Boiling the shrimp lightly infuses them with flavor without overpowering the other fresh ingredients.
- 4 ounces Vermicelli rice noodles (cooked): These thin noodles provide a lovely chewy texture that complements the crunchiness of our veggies perfectly. They also help bind all the ingredients together inside the rice paper. Make sure to cook them according to package instructions until they’re just tender but still have some bite; nobody likes mushy noodles!
- 2 cups matchstick carrots: Carrots add sweetness and crunch to our spring rolls! When cut into matchsticks, they become incredibly easy to fold into our rolls while providing beautiful color contrast as well. Look for firm carrots without blemishes—freshness is key here!
- 1 large cucumber (seeds removed, cut into 3-inch long ¼-inch strips): Cucumbers offer juiciness and crispness in every bite! It’s crucial to remove seeds so they don’t make your spring rolls soggy; trust me on this one! Opt for firm cucumbers for best results—they should feel heavy for their size.
- 2 cups cabbage (cut into 3-inch long slices): Cabbage brings volume without overwhelming flavors, creating balance within each roll. It adds crunchiness along with its subtle sweetness! Look for tightly packed heads of cabbage without browning edges—it enhances both taste and visual appeal.
- 12 rice papers (gluten-free): These delicate wrappers are what tie everything together! They can be found at most Asian grocers or online; choose high-quality brands for better pliability. Rice paper can dry out quickly if exposed too long to air; keep them covered until ready to use.
- ½ cup peanut butter (smooth): This rich ingredient serves as the base for our dipping sauce—a true crowd-pleaser! Smooth peanut butter blends effortlessly with other ingredients to create an ultra-creamy texture that’s hard to resist. If you’re feeling adventurous, try almond butter or sunflower seed butter as nut-free alternatives!
- 2 tablespoons soy sauce or Tamari (Tamari or gluten-free): This salty element enhances all other flavors while adding depth to our dipping sauce—you won’t want to skip it! If you’re sensitive to gluten, Tamari is an excellent alternative; look for brands labeled as gluten-free if necessary.
- 2 tablespoons packed brown sugar (honey or coconut sugar): Sweetness balances out savory notes beautifully in our sauce—this harmony is absolutely paramount! Brown sugar gives depth due to its molasses content; alternatively, honey provides floral notes while coconut sugar lends caramel undertones.
- 1 tablespoon rice vinegar (or lime juice): A splash of acidity from either option brightens up flavors tremendously—it’s non-negotiable in achieving balance! Rice vinegar adds mild tanginess while lime juice introduces zesty brightness—a matter of personal preference!
- 1 clove garlic crushed: Garlic infuses warmth and pungency making our sauce utterly intoxicating! Crushing it releases oils that enhance aroma significantly—don’t skip this step if you want maximum flavor impact!
- ½-1 teaspoon Sriracha sauce (to taste): This spicy element will elevate your dipping experience—it packs quite the punch! Adjust according to your heat tolerance; start small because it’s easier to add than take away spice!
- 3–6 tablespoons warm water: This magical liquid helps adjust consistency in our peanut dipping sauce; creating that perfect smoothness we crave! Warm water blends better compared cold—trust me on this one!
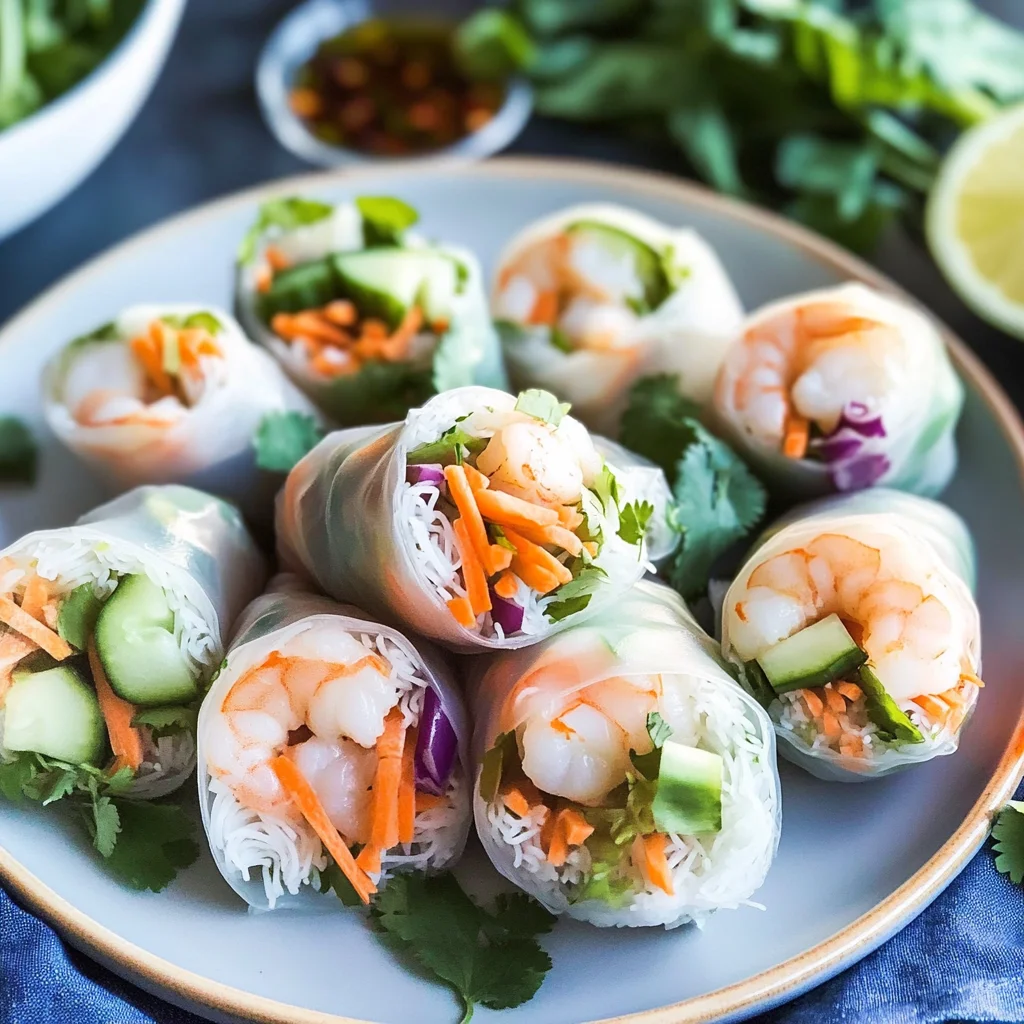
Equipment You’ll Need:
Now that we’ve gathered all our ingredients let’s talk about some essential tools that will make your cooking experience smooth sailing! Having these pieces handy ensures consistent results while allowing creativity to flow freely.
- Cutting board – A sturdy cutting board provides stability while chopping veggies or herbs finely enough so they fit snugly within each roll without overpowering flavors.
- Sharp knife – A sharp chef’s knife will make slicing through raw vegetables seamless—you’ll appreciate how effortlessly it glides through everything from cucumbers to carrots!
- Large mixing bowl – Having enough space is crucial when combining ingredients like noodles or marinated shrimp before assembling—all components need room so they don’t get squashed!
- Tongs – Tongs become invaluable when handling delicate rice papers—they allow you control over how submerged they get during soaking without tearing them apart accidentally.
Let’s get excited about making these delightful Vietnamese Fresh Spring Rolls now—the next steps will guide us through preparing everything perfectly!
Step 1: Prepare Your Ingredients
The first step toward crafting these marvelous spring rolls involves prepping all your components like vegetables and proteins ahead of time—this ensures efficiency during assembly later on! Start by boiling water in a pot large enough so vermicelli noodles can submerge comfortably before cooking them until al dente per package instructions—about 3–5 minutes should do nicely depending on thickness desired here. Drain thoroughly afterward before rinsing under cold water which halts cooking immediately while preventing mushiness later down line when rolling occurs!
Next up? It’s time tackle those veggies—the more vibrant colors present amongst carrots/cucumbers/cabbage combined means added nutrition plus visual appeal within finished product too! Slice matchstick carrots finely using sharp knife technique mentioned earlier then proceed peel away outer skin off cucumber followed removing seeds carefully via spoon method ensuring clean strips remain intact throughout process ahead where precise measurements matter greatly here overall taste profile achieved later down line too…
Step 2: Assemble Your Dipping Sauce
With all ingredients prepped neatly laid out before us now comes exciting part where we create mouthwatering peanut dip accompanying delicious rolls soon made shortly afterward too… Begin measuring smooth peanut butter alongside brown sugar soy sauce/tamari mixture combined then add garlic crushed alongside rice vinegar/lime juice until well mixed together forms creamy consistency emerges beautifully every time guarantees satisfaction upon tasting later once served alongside freshly rolled creations made beforehand here…
Step 3: Prepare Rice Papers
Before diving into assembling actual spring rolls let’s take moment prepare those delicate rice papers ensuring they won’t tear apart easily when filled generously inside later down line either… Fill shallow dish warm water roughly several inches deep then gently place single sheet inside allowing soften up around edges after few seconds before flipping over completely ensuring even hydration throughout entire surface area too…
Step 4: Roll Those Spring Rolls!
Now comes most thrilling part—the actual rolling process itself which requires patience plus practice but yields spectacular results if done correctly every single time trust me here especially when involving multiple layers stacked neatly inside each wrapper formed earlier today… Begin layering first row filling mixture consisting noodles followed by tiny handfuls carrots/cabbage/herbs finally ending shrimp placed strategically atop previous layers arranged neatly ensuring perfect balance achieved across entire width surrounding edge forming way towards bottom corner wraps tightly folding upwards enclosing contents securely within safe keeping until ready serve guests eagerly awaiting enjoyment soon thereafter…
I can’t wait for you all try making these stunning Vietnamese Fresh Spring Rolls at home—I guarantee they’ll become fast favorites among family members friends alike after experiencing such delightful flavors wrapped lovingly together under thin layers fluffy rice papers crafted right kitchen countertops today…
Step 5: Prepare the Rice Paper Wrappers with Love
Now that you have all your vibrant fillings prepped and ready to go, it’s time for one of the most crucial steps in our Vietnamese Fresh Spring Rolls Recipe: preparing the rice paper wrappers. This delicate dance requires a gentle touch, and trust me when I say that patience here will yield beautifully wrapped spring rolls that are as stunning as they are delicious. Fill a shallow dish or a large plate with warm water—about 1 to 2 inches deep should do the trick. The warmth is essential because it softens the rice paper without making it too mushy. The texture of the rice paper is quite unique; it’s almost like a canvas waiting for your culinary artistry!
Gently submerge one rice paper wrapper into the warm water, ensuring it is fully immersed. You’ll want to leave it there for about 10 to 15 seconds—just enough time for it to transform from a stiff disc into a pliable masterpiece. Keep an eye on it, though! If you leave it too long, it’ll become overly soft and difficult to handle, potentially tearing at critical moments when you’re trying to roll everything together. When you feel that it has softened but still has a bit of structure, pull the wrapper out and let any excess water drip off gently before placing it on your work surface. This step is paramount because if your wrappers are too wet, they can stick together or to your rolling surface, leading to frustration rather than joy in this cooking experience.
Step 6: Layering Your Ingredients
Now comes the fun part—the layering! Place your softened rice paper on a clean, flat surface (a cutting board works beautifully). Let’s build our spring rolls layer by layer! Start by placing about two tablespoons of vermicelli noodles horizontally across the center of the wrapper; this will act as your base and provide that delightful chewy texture we crave in spring rolls. Then, add a small handful of matchstick carrots—these not only add a lovely crunch but also bring a vibrant splash of color that makes each bite visually enticing.
Next up is your protein choice! Lay down about three pieces of boiled shrimp right above the noodles and carrots; their gorgeous pink hue will peek through the translucent rice paper like little jewels waiting to be discovered. Don’t forget about herbs! Add a few sprigs of cilantro and basil atop your ingredients for that aromatic freshness that elevates these rolls from good to truly extraordinary. Remember, balance is key! You want each roll to have enough filling so that every bite offers a symphony of flavors without overwhelming the delicate rice paper. It’s like creating art—you want each stroke (or layer) to harmonize beautifully with the others.
Step 7: The Art of Rolling
With all your beautiful ingredients artfully arranged, it’s time for what I call the great roll-up! Starting from the side closest to you, carefully lift the edge of the rice paper over the filling while tucking everything in gently but firmly—think of it as wrapping a precious gift rather than just rolling up some food! As you fold over this first edge, pull back slightly on the filling to keep everything snugly in place. This initial tuck is crucial; it sets up your spring roll’s shape and ensures all those delightful flavors stay encapsulated inside.
Continue rolling away from you until you reach about halfway through the wrapper; then fold in both sides like you’re sealing an envelope—this step keeps all those delicious fillings secure during handling and dipping later on. There’s something incredibly satisfying about this process; trust me when I say that with practice, you’ll find your rhythm! Finally, continue rolling until you reach the end of the wrapper; make sure not to roll too tightly since you want some space for expansion when you bite into them. Don’t be disheartened if at first they aren’t perfect—each roll is unique and has its own character!
Step 8: Resting Your Masterpieces
Once you’ve rolled up all your spring rolls (and trust me, you’ll feel immensely proud!), it’s important to let them rest for at least 10-15 minutes before serving them up—a crucial phase that shouldn’t be overlooked! The resting period allows any residual moisture within each roll to settle and helps prevent them from sticking together or becoming soggy when served later. Picture this: each bite will be perfectly intact and bursting with flavor rather than falling apart!
If you’re making these ahead of time for guests or meal prep, consider laying them out on a platter lined with damp paper towels or lettuce leaves—it keeps them moist while preventing sticking. Cover them lightly with more damp towels or plastic wrap if you’re storing them longer; exposure to air can dry out those delicate wrappers faster than you’d think! Don’t rush this step; patience here yields rewards in both presentation and taste when you’re ready to serve.
Next Major Phase – Dipping Sauce Magic
Every great Vietnamese Fresh Spring Rolls Recipe deserves an equally tantalizing dipping sauce! After all, what’s better than experiencing those fresh rolls accompanied by an utterly intoxicating dip? Let’s dive into making an easy yet delicious peanut dipping sauce that’s sure to elevate every bite!
Step 9: Crafting Your Irresistible Peanut Dipping Sauce
In a mixing bowl, combine half a cup of smooth peanut butter with two tablespoons each of soy sauce (or Tamari) and brown sugar—this combination creates a delightful balance between savory umami notes and sweet caramel undertones that dance on your palate like no other! To bring everything together seamlessly, whisk in one tablespoon of rice vinegar (or lime juice) along with one crushed clove of garlic which introduces an aromatic warmth that’s simply irresistible.
And here’s where we get fun: depending on how thick or creamy you’d like your sauce, gradually stir in warm water—start with three tablespoons and add more until you reach your desired consistency. You want something that’s not too runny but still spoonable; think liquid gold drizzled over those fresh rolls! For an extra kick that’ll send taste buds soaring, add Sriracha sauce according to your heat preference; trust me when I say this little addition transforms your peanut sauce from great to absolutely unforgettable!
Once combined thoroughly—a quick taste test won’t hurt either—set this aside while admiring those lovely spring rolls lined up before you like little edible treasures ready for their moment in the spotlight. Now gather friends or family around because it’s time for everyone to enjoy these beautiful creations wrapped lovingly within their delicate skins. Serve alongside that luscious peanut dipping sauce for an appetizer experience that’s not just food but truly an expression of love shared around the table!
This Vietnamese Fresh Spring Rolls Recipe is more than just an appetizer; it embodies joy, creativity, and connection—a profound reminder that cooking can bring us together in ways we never imagined possible. Enjoy every delicious moment!
Storage and Enjoyment Tips for Your Vietnamese Fresh Spring Rolls Recipe
Now that you’ve crafted these beautiful, vibrant Vietnamese Fresh Spring Rolls, it’s time to dig in and enjoy! However, if you find yourself with any leftovers (which can be rare, let me assure you), I have some great tips to ensure they remain just as delightful for your next culinary adventure. The key is knowing how to store them properly so you can relish their fresh flavors all over again.
Storing Leftover Vietnamese Fresh Spring Rolls Recipe
To keep your stunning fresh spring rolls at their best, I recommend placing them in an airtight container lined with a damp paper towel. This little trick helps maintain the moisture of the rice paper while preventing it from becoming too sticky or dry—trust me, this is crucial! Store the container in the refrigerator where they will keep well for up to two days. Remember, freshness is key here; while they may still be edible after this time, the texture could suffer. If you’re worried about them sticking together, you might want to separate each roll with a piece of parchment paper. When you’re ready to enjoy them again, simply take them out and savor the crispness of the veggies and the tenderness of the shrimp – even after a day in the fridge, they retain that utterly intoxicating flavor!
Freezing Components for Later
If you’re anything like me and love meal prepping for those busy days ahead, freezing components of your Vietnamese Fresh Spring Rolls Recipe is such a fantastic option! You can freeze your cooked vermicelli noodles and boiled shrimp separately in airtight freezer bags. Just lay them flat in the freezer so they’re easy to stack and store without taking up much room. They’ll keep well for up to three months! When you’re ready to whip up another batch of these delicious rolls, simply thaw them overnight in the fridge before assembling. This way, you can enjoy an incredibly fresh spring roll experience whenever you feel like indulging—what could be more convenient? It’s all about making life easier while enjoying some truly extraordinary food!
Vietnamese Fresh Spring Rolls
- Total Time: 40 minutes
- Yield: Serves 4 (8 spring rolls) 1x
Description
Enjoy these vibrant Vietnamese Fresh Spring Rolls Recipe filled with fresh veggies and shrimp – perfect as an appetizer! Dive into flavor today!
Ingredients
- 12 rice papers (gluten-free)
- 1 pound boiled shrimp (peeled and deveined)
- 4 ounces vermicelli rice noodles (cooked)
- 2 cups matchstick carrots
- 1 large cucumber (seeds removed, cut into strips)
- 2 cups cabbage (cut into slices)
- ½ bunch cilantro (stems removed)
- 1 ounce basil (sweet or Thai, stems removed)
- ½ cup peanut butter (smooth)
- 2 tablespoons soy sauce or Tamari (gluten-free)
- 2 tablespoons packed brown sugar (or honey)
- 1 tablespoon rice vinegar (or lime juice)
- 1 clove garlic (crushed)
- ½–1 teaspoon Sriracha sauce (to taste)
- 3–6 tablespoons warm water
Instructions
- Prepare all ingredients: Boil the shrimp and cook vermicelli noodles as per package instructions.
- Assemble the dipping sauce by mixing peanut butter, soy sauce or Tamari, brown sugar, rice vinegar, crushed garlic, and warm water until smooth.
- Soak rice paper wrappers in warm water for 10–15 seconds until pliable.
- On a flat surface, layer vermicelli noodles, vegetables, shrimp, and herbs on the wrapper's center.
- Carefully roll the wrapper from the bottom up while tucking in the sides until fully rolled.
- Repeat until all ingredients are used.
- Prep Time: 30 minutes
- Cook Time: 10 minutes
- Category: Appetizer
- Method: No cooking required
- Cuisine: Vietnamese
Nutrition
- Serving Size: 2 spring rolls (100g)
- Calories: 220
- Sugar: 4g
- Sodium: 350mg
- Fat: 7g
- Saturated Fat: 1g
- Unsaturated Fat: 6g
- Trans Fat: 0g
- Carbohydrates: 30g
- Fiber: 3g
- Protein: 12g
- Cholesterol: 70mg
Leave a Comment