There’s something truly magical about the way food can weave connections between people, isn’t there? That’s precisely what my Sweet & Savory Teriyaki Chicken Veggie Bowl embodies—a delightful blend of flavors that dances on your palate while also offering a sense of warmth and comfort. Imagine sitting down to a bowl brimming with tender chicken, vibrant veggies, and a luscious teriyaki glaze that shimmers like liquid gold. Each bite is not just nourishment; it’s an experience that transports you to a bustling street market in Japan, where the air is rich with the scent of grilling meats and sweet sauces. This dish is not merely about satisfying hunger; it’s about sharing love through food, creating memories, and celebrating the joy of cooking.
When I first stumbled upon the concept of teriyaki, I was captivated by its intriguing balance—a marriage of sweet and savory flavors that feels both familiar and exotic all at once. It’s a timeless classic that has found its way into kitchens worldwide, adapting beautifully to various interpretations. This Sweet & Savory Teriyaki Chicken Veggie Bowl is perfect for any occasion—whether it’s a casual family dinner, meal prep for the week ahead, or even impressing friends at a gathering. I assure you, this bowl packs not only flavor but also a hearty dose of health, thanks to the colorful array of vegetables. Trust me when I say, this isn’t just dinner; it’s a culinary adventure waiting to unfold.
Sweet & Savory Teriyaki Chicken Veggie Bowl: A Heartwarming Delight
Welcome to your next favorite dish! The Sweet & Savory Teriyaki Chicken Veggie Bowl is an absolute treasure in my recipe collection. It’s easy to make yet brimming with flavor that feels complex and rewarding. As we embark on this culinary journey together, know that every ingredient serves a purpose and enhances the overall experience. Let’s dive into crafting this beautiful bowl; you’ll be amazed at how simple it is to create something so utterly intoxicating!
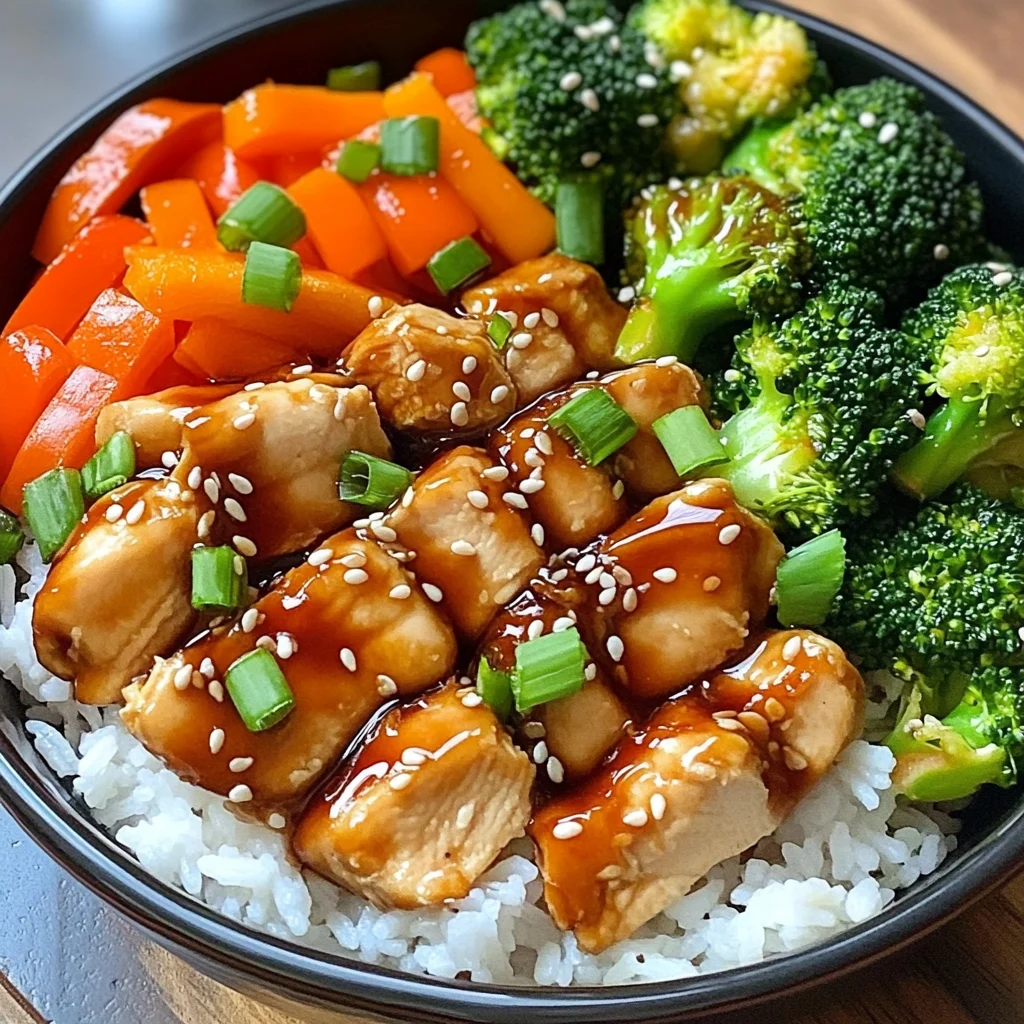
Ingredients:
As we gather our ingredients for this wonderful dish, think of each one as an integral part of a symphony—each playing its role in creating harmony on your plate. Here’s what you’ll need to bring this bowl together and why they matter so much.
- 1 pound (450g) chicken breast, sliced thinly. The star of our show! Chicken breast provides lean protein while absorbing flavors beautifully from the teriyaki sauce and caramelizing perfectly when sautéed. Aim for fresh chicken whenever possible; it makes all the difference in texture and taste. If you’re looking for alternatives due to dietary preferences or restrictions, feel free to swap in firm tofu or tempeh—both will soak up those savory notes wonderfully.
- 2 cups broccoli florets. These little green trees are packed with nutrients and add an amazing crunch to our bowl. Broccoli not only contributes fiber but also brings vibrant color to the mix—making your meal as visually appealing as it is delicious! When selecting broccoli, look for firm florets with bright green color; wilted or yellowing ones should be avoided like the plague!
- 1 bell pepper (any color), sliced. Bell peppers are nature’s candy! They add sweetness along with their crispness which balances beautifully against the savory elements in our dish. Plus, they come in various colors—red, yellow, green—that will make your bowl pop visually! When choosing bell peppers, ensure they are smooth-skinned without blemishes; they should feel heavy for their size.
- 1 cup carrots, thinly sliced or julienned for extra flair. Carrots bring their natural sweetness into play while providing additional crunch alongside the broccoli and bell peppers. They cook quickly but maintain their structure beautifully when added last in our sauté process.
- 3 cloves garlic, minced finely. Garlic offers an aromatic foundation that infuses our dish with flavor right from the start! It’s essential not only for taste but also for its health benefits—garlic has been revered for centuries for its medicinal properties! Fresh garlic cloves will deliver robust flavor far superior to pre-minced varieties.
- 1 tablespoon fresh ginger, minced or grated if you’re feeling adventurous! This spicy root adds warmth and depth that’s simply irresistible in Asian-inspired dishes like ours. Ginger can be slightly tricky to find fresh sometimes; don’t hesitate to buy frozen ginger if it’s more accessible—it works wonders too!
- ½ cup teriyaki sauce (store-bought or homemade). This liquid gold ties everything together! A good teriyaki sauce should offer both sweetness from sugar or honey along with soy sauce’s umami richness—make sure it’s free from any unwanted additives! If you’re making your own at home (which I highly encourage!), combine soy sauce (or tamari) with maple syrup or agave nectar and a bit of sesame oil.
- 2 cups steamed white or brown rice as our comforting base. Rice serves as the canvas upon which we paint our masterpiece! Brown rice offers more fiber and nutrients than white rice but use whichever you prefer based on dietary needs or personal preference—it’s all about what makes you happy!
- Sesame seeds for garnish—a delightful finishing touch that adds nuttiness while bringing some crunch as well! Toast them lightly before sprinkling on top if you’d like an extra layer of flavor.
- Chopped green onions also serve as garnish but elevate both presentation and taste significantly with their mild oniony kick!
Don’t forget: You can customize this bowl however your heart desires by adding other vegetables like snap peas or zucchini—or even tossing in some chili flakes if you crave heat. Cooking should always reflect who you are!
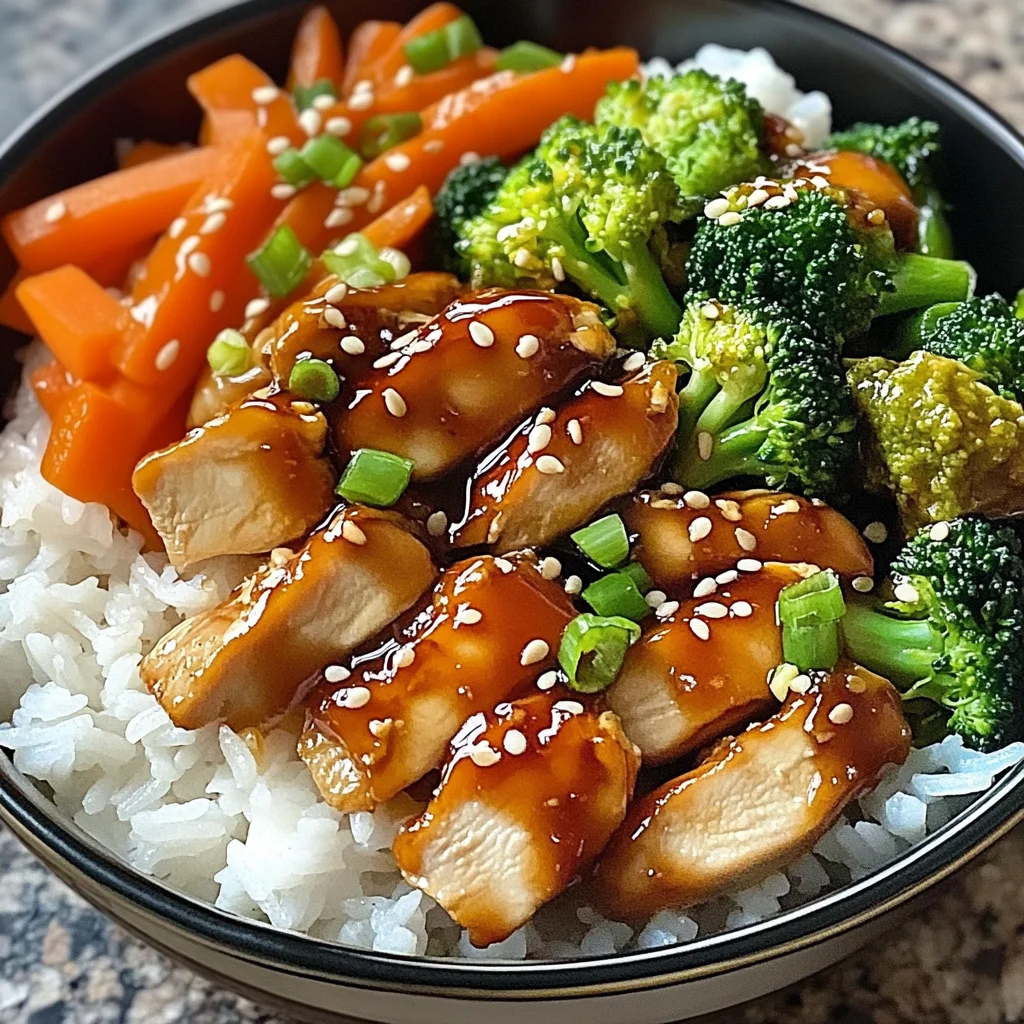
Equipment You’ll Need:
Now that we have gathered all these wonderful ingredients together let’s chat about the tools we’ll be using—they’re just as crucial as anything else in this process! Having the right equipment ensures everything goes smoothly while crafting your Sweet & Savory Teriyaki Chicken Veggie Bowl.
- Large skillet or wok – Your best friend during this cooking adventure! A large skillet allows ample space for sautéing everything evenly without overcrowding—this is vital because overcrowded pans can lead to steaming instead of searing those lovely flavors we want to achieve.
- Cutting board & sharp knife – Essential companions for prepping ingredients efficiently! A good-quality chef’s knife will make slicing through chicken breasts or chopping veggies feel effortless—trust me; it makes all the difference when you’re knee-deep in meal prep!
- Measuring cups & spoons – Precision matters here more than anything else since cooking often relies on ratios within recipes—not just instinct alone! Having these handy will help keep everything balanced from seasoning amounts down to rice servings.
Preparing the Sweet & Savory Teriyaki Chicken Veggie Bowl
Step 1: Sautéing Our Star Player
To begin your culinary journey into creating this delightful bowl, you’ll want first to heat your skillet over medium-high heat until it begins shimmering—not smoking mind you—just enough warmth so that things start sizzling nicely upon contact! Once heated adequately (about 2 minutes), add a splash of oil (I recommend vegetable oil), followed by those perfectly sliced chicken breasts laid out gently across its surface.
This step is crucial because you’re aiming for golden-brown edges—the Maillard reaction creates those enticing flavors while sealing juices inside each piece rather than boiling them away! Allow them time undisturbed on their first side (about 5 minutes) before flipping them over using tongs—this could turn into quite an impressive sear if done patiently without rushing matters along too quickly.
Step 2: Building Layers of Flavor
With chicken nearly cooked through (roughly another 3–4 minutes), it’s time now to introduce minced garlic alongside freshly grated ginger directly into our pan—incredible aromas will soon fill your kitchen like magic! Stir these fragrant aromatics continuously over low heat until they soften slightly—don’t rush this step either since burnt garlic would ruin everything leading up till now!
Once garlic turns fragrant (about 30 seconds), add those gorgeous vegetables: broccoli florets first followed by bell pepper slices then carrot ribbons last—they all cook at different rates so layering ensures perfect doneness across each component without mushiness taking hold anywhere along their journey together inside our skillet!
Step 3: The Grand Finale
Now comes perhaps one of my favorite parts: pouring that beautiful teriyaki sauce over everything once those veggies have softened just enough yet retained crispness (around another 4–5 minutes). Stir vigorously until every morsel is coated evenly—this glossy finish guarantees maximum satisfaction when served atop fluffy bowls filled generously with steamed rice waiting eagerly below!
This final step brings harmony throughout—we want all components melding seamlessly together while still allowing individual textures shine through amidst each mouthful enjoyed later down road ahead…what more could anyone possibly desire?!
Step 4: Plating Up Perfection
Finally, once everything looks glorious—and trust me it will—you’ll want take care plating up portions carefully atop respective bowls filled generously with warm rice beneath ready themselves transform into masterpieces shortly thereafter garnished accordingly using toasted sesame seeds along chopped green onions sprinkled generously over top as finishing touches completing visual allure enhancing enjoyment further beyond imagination itself…
Now sit back proudly admiring efforts realizing how easy delightfully satisfying homemade meals can truly be—all without needing break bank either since homemade always beats store-bought options hands down every single time without fail…enjoy every bite knowing every morsel represents love shared amongst friends family alike gathered around table savoring goodness life has gifted us today!.
Sweet & Savory Teriyaki Chicken Veggie Bowl
Step 5: Sautéing the Chicken to Perfection
Now that our ingredients are prepped and ready to go, it’s time for one of the most crucial steps in creating a truly unforgettable Sweet & Savory Teriyaki Chicken Veggie Bowl: sautéing the chicken. This is where we begin to build layers of flavor that will make your taste buds sing! Heat a large skillet or wok over medium-high heat and drizzle in a tablespoon of oil—canola or vegetable oil works beautifully here as they have a high smoke point, which allows for that glorious golden-brown crust to form on your chicken. Once the pan is hot (you’ll know it’s ready when a drop of water sizzles away instantly), add in your sliced chicken breast.
Cook the chicken for about 5-7 minutes, turning occasionally with a spatula, until it’s perfectly golden on all sides. This step is not just about cooking the chicken; it’s about developing flavor through the Maillard reaction, which occurs when proteins are seared at high heat. Trust me when I say, you want that rich, caramelized surface because it amplifies the overall depth of flavor in your dish! As you watch your chicken transform from raw to golden perfection, take note of how it begins to release its juices—this is normal and absolutely essential for keeping your chicken moist and tender. You want those juices to mingle with the oil and create an aromatic base for your upcoming ingredients.
Step 6: Aromatics That Dance Together
Once your chicken has achieved that beautiful golden hue, it’s time to introduce two of my favorite flavor enhancers: garlic and ginger! Add minced garlic (about 3 cloves) and freshly grated ginger (about a tablespoon) directly into the pan with the sautéed chicken. The magic happens instantly; you’ll notice an intoxicating aroma wafting through your kitchen as these two ingredients begin to sizzle and soften. Stir them together gently for about 1-2 minutes until they become fragrant—don’t let them burn! This is absolutely paramount because burnt garlic can turn bitter, which would throw off the entire balance of flavors in your bowl.
Why do we add aromatics at this stage instead of earlier? Well, while we want their flavors to infuse into our dish, we also don’t want them to overcook before our veggies even get a chance to shine. By introducing them now, we ensure they meld harmoniously with the chicken while still retaining their vibrant essence. After this brief sautéing session, you’ll notice how beautifully aromatic and inviting everything smells—this is what makes cooking such a joy! Now it’s time to introduce our colorful array of vegetables.
Step 7: The Colorful Symphony of Vegetables
With our chicken nicely browned and fragrant aromatics filling the air, it’s time to toss in our vibrant vegetables! Add in bite-sized broccoli florets (about 1 cup), sliced bell peppers (1 cup total; I love using red and yellow for their sweetness), and julienned carrots (1 cup). As you add each vegetable, take a moment to appreciate their colors; this dish isn’t just about taste—it’s also about visual appeal! Stir everything together gently so that the chicken remains on the bottom layer while allowing those gorgeous veggies ample opportunity to absorb all those luscious flavors.
Cook everything together for another 4-5 minutes until the veggies are crisp-tender; you want them vibrant but still with a slight crunch—this texture contrast is what elevates every bite into something truly extraordinary. As they cook, keep an eye out for that beautiful sheen developing as those natural sugars start caramelizing slightly on your vegetables; this adds an extra layer of sweetness that will complement our teriyaki sauce later on. If you’re unsure if they’re done, simply poke a carrot piece with a fork; it should be tender but not mushy. Remember: don’t rush this step! The best Sweet & Savory Teriyaki Chicken Veggie Bowl comes from giving each component its moment in the spotlight.
Step 8: Coating It All in Liquid Gold
Now comes one of my absolute favorite parts—the introduction of teriyaki sauce! Pour about ¾ cup of teriyaki sauce directly over your beautifully sautéed chicken and veggie mixture. As soon as that sauce hits the pan, you’ll hear that delightful sizzle—a sign that all those flavors are beginning to meld together into something magical. Stir everything thoroughly so each piece gets coated evenly; this is where flavor profiles unite into one harmonious blend! Let everything simmer together on medium heat for another 3-4 minutes until the sauce thickens slightly and clings lovingly to each ingredient.
You might be wondering why we let this simmer rather than serving immediately after adding sauce. Well, during this bubbling transformation, not only does the sauce become glossy—as if kissed by culinary fairies—but it also allows all those ingredients to absorb its sweet-and-savory notes fully. Trust me on this: patience pays off here! You’ll know it’s ready when bubbles appear consistently across the surface and you see that delicious sheen forming—a clear indicator that we’ve achieved teriyaki perfection!
Final Touches: Elevate Your Bowl Experience
Step 9: Plating Your Masterpiece
After all that hard work—and oh boy, has it been worth it—it’s time for one final flourish before serving up your Sweet & Savory Teriyaki Chicken Veggie Bowl! Start by fluffing your steamed white or brown rice (about 2 cups should do nicely) with a fork; this simple step makes all the difference in texture—it separates each grain beautifully so they don’t clump together. Now imagine layering this fluffy cloud underneath our colorful stir-fry mixture—the contrast will be stunning!
Spoon generous amounts of your teriyaki-coated chicken and veggies right over that bed of rice. Don’t hold back—let those vibrant colors spill over like an artist’s palette! For an added touch of elegance—and delightful crunch—sprinkle toasted sesame seeds generously across the top along with finely chopped green onions (about 2 stalks). These finishing touches not only enhance visual appeal but also contribute wonderfully contrasting textures and flavors—a little nutty crunch from sesame seeds balanced by zesty freshness from green onions.
And there you have it—the ultimate Sweet & Savory Teriyaki Chicken Veggie Bowl awaits you! Each bite promises layers upon layers of flavor, making every mouthful an experience worth savoring. Serve immediately while warm because nothing beats enjoying a dish straight from the stove when it’s at its peak deliciousness! I promise you won’t regret taking this time—it’s these moments spent crafting meals filled with love that create lasting memories around our tables. Enjoy every single bite!
Storage and Enjoyment Tips for Your Sweet & Savory Teriyaki Chicken Veggie Bowl
Now that you’ve crafted your very own Sweet & Savory Teriyaki Chicken Veggie Bowl, it’s time to revel in the deliciousness of your creation! Whether you’re enjoying it fresh or saving some for later, I can assure you that this dish is a delightful companion, always ready to bring a smile to your face. Let’s talk about how to keep that flavor intact for future meals, because let’s be honest—sometimes one bowl isn’t enough!
Storing Leftover Sweet & Savory Teriyaki Chicken Veggie Bowl
When it comes to storing your leftover Sweet & Savory Teriyaki Chicken Veggie Bowl, opt for an airtight container. This is crucial because we want to lock in all those aromatic flavors and vibrant colors! Keep it in the refrigerator, where it will stay fresh for up to three days. Trust me on this—it tastes almost as good as the first day! To maintain quality, I recommend placing a slice of bread inside the container; it absorbs excess moisture, keeping your veggies crisp and preventing any sogginess. When you’re ready to enjoy your leftovers, simply pop them in the microwave or a skillet over medium heat until warmed through. The teriyaki sauce will come back to life, making every bite just as flavorful as when you first made it!
Freezing Components for Later
If you’re looking to extend the life of your Sweet & Savory Teriyaki Chicken Veggie Bowl, freezing is an excellent option! Just make sure to cool everything completely before transferring it into freezer-safe bags or containers; removing as much air as possible will help prevent freezer burn. You can keep it frozen for up to three months—imagine having this delicious meal waiting for you after a long day! When you’re ready to use from frozen, there’s no need to thaw: just drop the contents into a pot over low heat or microwave until heated through. This flexibility makes meal prep so much easier while ensuring you always have something scrumptious at hand!
Dinner

Sweet & Savory Teriyaki Chicken Veggie Bowl
- Total Time: 35 minutes
- Yield: Serves 4
Description
Discover the irresistible flavors of Sweet & Savory Teriyaki Chicken Veggie Bowl—quick, healthy, and utterly delicious! Try it today!
Ingredients
- 1 pound chicken breast, sliced thinly
- 2 cups broccoli florets
- 1 bell pepper, sliced
- 1 cup carrots, thinly sliced
- 3 cloves garlic, minced
- 1 tablespoon fresh ginger, minced
- ½ cup teriyaki sauce
- 2 cups steamed rice (white or brown)
- Sesame seeds and chopped green onions for garnish
Instructions
- Heat a large skillet over medium-high heat and add vegetable oil.
- Sauté sliced chicken for about 5-7 minutes until golden brown.
- Add minced garlic and ginger; cook for another 1-2 minutes until fragrant.
- Stir in broccoli, bell pepper, and carrots; cook for an additional 4-5 minutes until veggies are crisp-tender.
- Pour teriyaki sauce over the mixture; stir until well combined and simmer for 3-4 minutes.
- Serve over steamed rice, garnished with sesame seeds and green onions.
- Prep Time: 15 minutes
- Cook Time: 20 minutes
- Category: Main
- Method: Sautéing
- Cuisine: Asian
Nutrition
- Serving Size: 1 bowl (approx. 350g)
- Calories: 480
- Sugar: 10g
- Sodium: 780mg
- Fat: 10g
- Saturated Fat: 2g
- Unsaturated Fat: 8g
- Trans Fat: 0g
- Carbohydrates: 76g
- Fiber: 6g
- Protein: 32g
- Cholesterol: 85mg

Leave a Comment