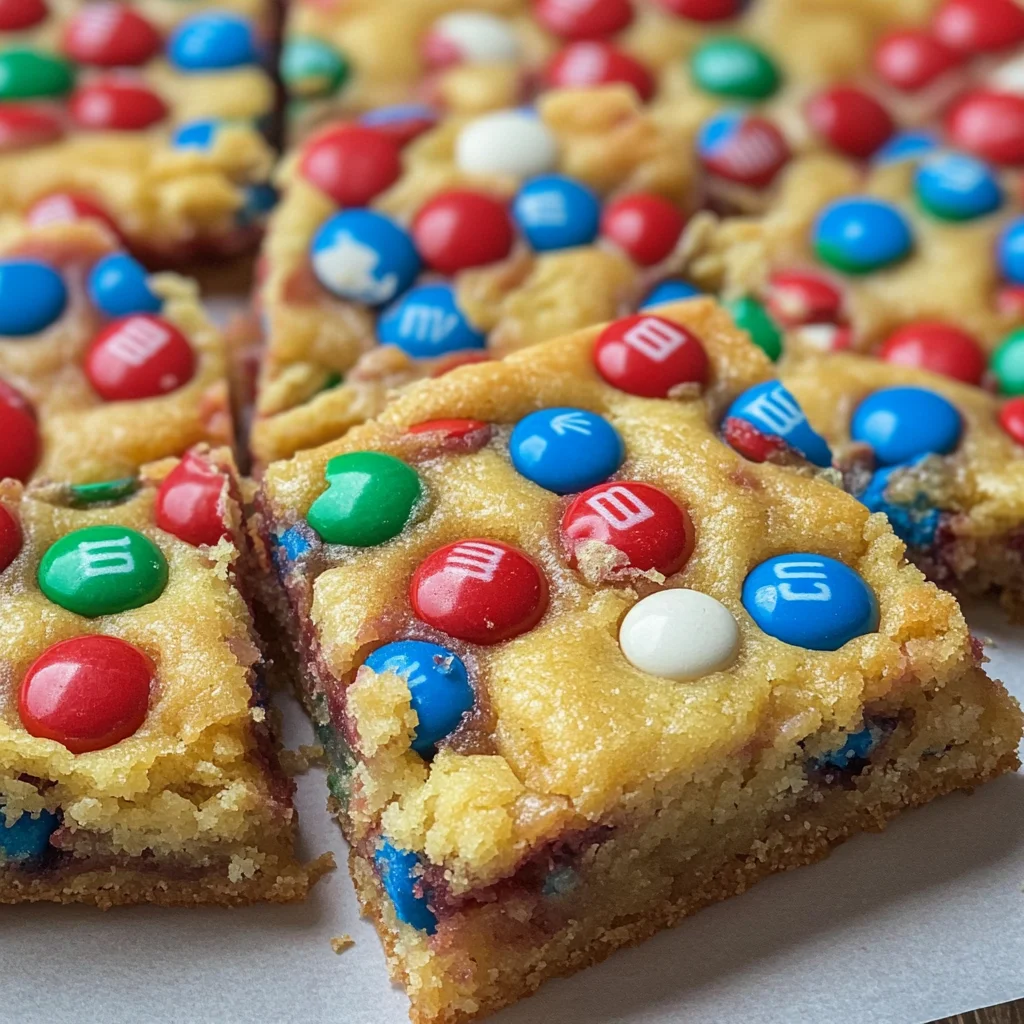
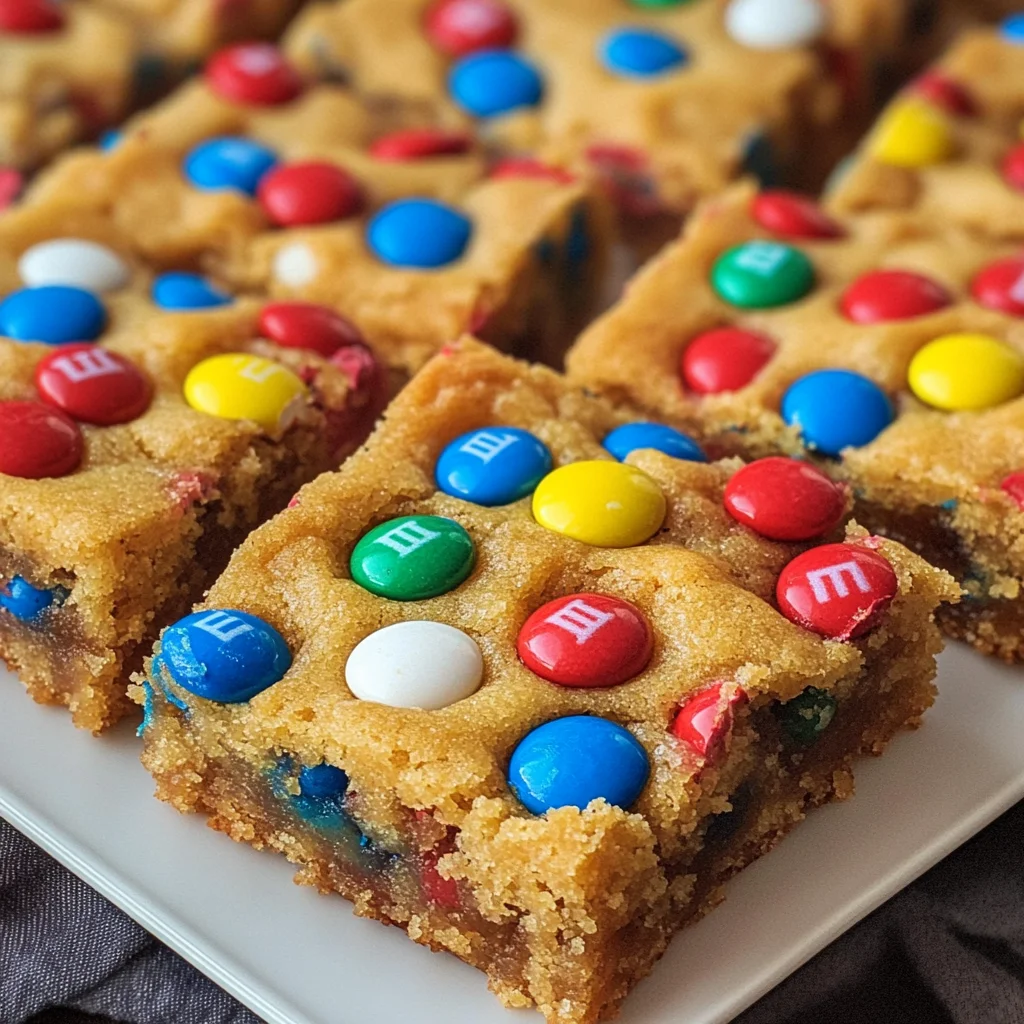
There’s something undeniably magical about the aroma of freshly baked cookies wafting through the air, isn’t there? It envelops you like a warm hug, drawing you in with a promise of sweetness, comfort, and perhaps a sprinkle of nostalgia. These 4th of July Cookie Bars are not just any dessert; they are a celebration of flavor and joy, perfectly suited for sharing with family and friends as fireworks light up the sky. With just four simple ingredients, this recipe is all about bringing people together—each bite bursts with colorful M&M’s that mirror the vibrant spirit of Independence Day. I promise you, these cookie bars will be the highlight of your summer gathering, a delightful treat that’s as easy to make as it is to devour.
When I first stumbled upon this recipe, I was captivated by its simplicity and the sheer delight it brings. Picture this: golden edges that beckon you closer, while the soft center melts in your mouth like a dream. The beauty lies not only in how effortlessly these bars come together but also in the joyous memories they’ll create around your picnic table or backyard BBQ. Whether you’re hosting a festive get-together or simply looking for a sweet way to indulge on a sunny afternoon, these bars are your ticket to effortless entertaining. Trust me; once you bake them, you’ll find yourself making them again and again—not just for holidays but for any occasion that calls for a little sweetness!
4th of July Cookie Bars: A Sweet Celebration in Every Bite
Let’s dive into this delightful recipe together! Making these 4th of July Cookie Bars is like painting your own canvas with flavors—each ingredient adds its voice to create an unforgettable symphony of taste. With such minimal effort required, anyone can whip up these bars and bask in the admiration from friends and family. So roll up your sleeves, grab those colorful M&Ms, and let’s get started on this delicious journey!
Ingredients:
As we embark on this delicious culinary journey together, let’s take a moment to appreciate each ingredient individually. Every single one plays a vital role in crafting these sweet cookie bars that scream “celebration!”
- 1 box yellow cake mix (15.25 oz). This is the heart and soul of our cookie bars! Using cake mix not only simplifies the baking process but also imparts a lovely texture that balances softness with just enough structure—perfect for holding those vibrant M&Ms nestled within. When choosing your cake mix, look for a brand that promises no artificial flavors or colors; after all, we want these treats to shine brightly with flavor! And if you’re feeling adventurous, you can even swap it out for chocolate cake mix for an indulgent twist that’s equally delightful.
- 2 large eggs. Eggs are essential here; they act as binding agents that bring our mixture together beautifully while adding moisture for that rich texture we crave from cookie bars. Make sure they’re at room temperature before mixing; this little step ensures they incorporate smoothly into the batter without clumping or creating cold pockets—nobody wants unevenly mixed cookie bars!
- 1/2 cup butter (1 stick), softened to room temperature. Ahh, butter—the golden liquid gold of baking! Butter enriches our cookie bars with flavor and contributes to their wonderfully chewy consistency. When softened properly (think spreadable but not melted), it creams beautifully with the sugars in the cake mix, leading to an airy texture that’s utterly intoxicating when baked. If you’re looking for alternatives due to dietary preferences or restrictions, feel free to use coconut oil or vegan butter instead; both options will provide excellent results while keeping things dairy-free.
- 2 cups M&M’s (or any colorful candy-coated chocolate). These little gems are what truly make our cookie bars pop—not just visually but also flavor-wise! They add delightful sweetness along with bursts of color reminiscent of fireworks lighting up the night sky on July 4th. You can use classic milk chocolate M&M’s or mix it up with peanut or pretzel varieties for an exciting twist! Don’t worry if some candies break during mixing; that adds character!
Equipment You’ll Need:
Before we dive into making these scrumptious cookie bars, let’s gather our essential tools! Having the right equipment makes everything smoother and more enjoyable while creating something truly special.
- 9×13 inch baking pan – This is where the magic happens! A sturdy baking pan ensures even heat distribution while baking so that every inch of your cookie bar bakes uniformly without hot spots. If you don’t have one on hand, feel free to use two smaller pans instead; just keep an eye on them as they may bake faster!
- Parchment paper – This is non-negotiable if you want easy removal from your pan post-baking! Lining your pan helps prevent sticking while allowing you to lift out your baked creation effortlessly—no fighting with spatulas here! Plus, it saves time on cleanup.
- Medium mixing bowl – A good-sized bowl allows ample room to combine all our ingredients without fear of spills—trust me; nobody enjoys cleaning up flour explosions! Opt for glass or metal bowls as they don’t retain heat like plastic ones do.
- Spatula – A sturdy spatula is invaluable when spreading out our mixture evenly in the pan; its flexibility helps reach all corners without tearing apart your batter too much.
Now that we’ve gathered all our necessary tools and ingredients let’s move on to preparing those beautiful 4th of July Cookie Bars!
Step 1: Preheat & Prepare Your Pan
First things first: let’s preheat that oven to 350°F (175°C) so we’re ready when it’s time to bake! While it warms up, take out your trusty 9×13 inch baking pan and give it a light spray with non-stick cooking spray—this permits easy removal later on—and line it with parchment paper for added insurance against sticking. This step may seem simple but trust me—it’s absolutely paramount for ensuring that you don’t lose any precious cookie goodness when trying to cut them into squares later.
Step 2: Combine Cake Mix & Wet Ingredients
In your medium mixing bowl, combine that lovely box of yellow cake mix along with two large eggs and half a cup of softened butter. Grab a wooden spoon or electric mixer and blend everything together until fully incorporated—you want no dry pockets left behind here! The result should be thick yet smooth, resembling cake batter but slightly denser—a sign you’re headed in the right direction.
Step 3: Add Those Colorful M&Ms
Now comes my favorite part: gently fold in those vibrant M&Ms until they’re evenly distributed throughout the batter! This process helps maintain their shape during baking while ensuring every bite bursts with color and flavor. Don’t rush this step; take your time so each bar has plenty of candy goodness woven throughout.
Step 4: Spread & Bake
Once everything’s combined beautifully—the moment we’ve been waiting for has arrived! Pour the mixture into your prepared baking pan and spread it evenly using your spatula until it fills every corner snugly without being overly pressed down (we want those delicious air pockets!). Pop it into the preheated oven and bake away for about 20-25 minutes or until golden edges begin forming—a tantalizing sign they’re ready!
As tempting as it might be to dive right in once they come out—it’s crucial we allow them some time cooling down before slicing into squares (I know it’s hard!). Patience pays off big time here—trust me!
And there you have it—the first steps toward creating delectable 4th of July Cookie Bars filled with love and celebration! I can’t wait for you to experience this joy yourself—it truly makes every gathering feel special!
Step 5: Mixing It All Together
Now that you’ve got your cake mix, eggs, and melted butter in the bowl, it’s time to bring all these wonderful ingredients together into a cohesive batter. I love using a sturdy wooden spoon for this part—it feels so much more personal, don’t you think? Begin by gently folding the mixture until there are no dry patches of cake mix left. This step is crucial because you want to ensure that every bite of your 4th of July Cookie Bars is filled with that delightful vanilla flavor from the cake mix. As you stir, you’ll notice the batter thickening beautifully, becoming glossy and smooth. Don’t rush this step; take your time to really blend everything together because well-mixed ingredients lead to a cookie bar that has a soft, chewy texture with just the right amount of richness.
Once everything is well combined and the batter has come together into a luscious mass, it’s time to fold in those vibrant M&M’s. This is where the magic happens! I always find it utterly intoxicating how those little candies add not only a burst of color but also a delightful crunch and sweetness that contrasts perfectly with the soft cookie base. Make sure to reserve a handful of M&M’s for topping later—it’s always nice to see those bright hues peeking through the golden crust as they bake! Gently fold them into the batter, being careful not to crush them—this is about preserving their shape and candy-coated charm. Trust me on this; when they melt slightly during baking, they’ll create pockets of gooey goodness that are simply irresistible.
Step 6: Spreading into the Baking Pan
Now comes the fun part: transferring this beautiful batter into your prepared baking pan! Make sure you’ve sprayed your 9×13-inch pan with non-stick spray or lined it with parchment paper—this step is non-negotiable if you want your cookie bars to come out effortlessly. Using an offset spatula or even just a regular spatula, scoop up all that deliciousness from your mixing bowl and spread it evenly across the bottom of the pan. It’s important to get an even layer here because uneven baking can lead to one side being overcooked while the other remains undercooked—a fate we definitely want to avoid!
As you’re spreading, take a moment to appreciate how vibrant and colorful your batter looks with all those M&M’s peeking through. This visual cue will make anyone who sees it eagerly anticipate what’s coming next! Once you’ve smoothed it out, don’t be afraid to give it a gentle shake or tap on the counter; this helps settle any air bubbles in the batter, ensuring that every bite will have that perfect consistency we’re aiming for. Remember, patience is key here—the more lovingly you spread it out now, the better your final product will be!
Step 7: Baking Your Cookie Bars
With everything prepped and ready, it’s time to pop these beauties into the oven! Preheat your oven to 350 degrees Fahrenheit if you haven’t already done so (and I hope you did!). Place your pan on the middle rack—that’s where all good things happen in baking! Set your timer for about 20-25 minutes but keep an eye on them as they approach that mark. You’ll want to watch closely as they bake because this is where transformation occurs: what starts as a simple batter will soon become golden bars enriched with flavor.
To test for doneness, look for edges that are lightly browned and firm while giving a gentle press in the center—if it springs back without leaving an indentation, you’re good to go! Another great indicator is if you see those lovely M&M’s starting to melt ever so slightly and bubble along the top; that’s when you know they are reaching perfection! Don’t be tempted to pull them out too early; underbaked cookie bars can end up being overly gooey in texture rather than delightfully chewy. So give them those precious extra minutes if necessary—trust me; it’s worth every second!
Step 8: Cooling and Cutting Your Masterpiece
Ah, finally! The moment we’ve all been waiting for—the aroma wafting through your kitchen as these cookie bars cool down is absolutely divine! Once they’re baked perfectly and out of the oven, allow them to cool in their pan for about 10-15 minutes. This resting period is essential because it lets them firm up just enough so that when we cut into them later, we’ll achieve clean squares rather than crumbly chaos.
After they’ve cooled slightly but are still warm (not hot!), gently lift them out of the pan using those handy edges of parchment paper if you’ve lined it—that’s why we did that little extra step earlier! Transfer them onto a cooling rack if you have one handy—it helps circulate air around them evenly for proper cooling. But don’t worry if not; placing them on a cutting board works just fine too. Now here’s where patience truly pays off: let them cool completely before cutting into squares; otherwise, you’ll risk losing that beautiful shape we’ve worked so hard for! Once cooled completely—around another 15-20 minutes—you can slice them into squares using a sharp knife (dipped in warm water for clean cuts) and serve those gorgeous treats at your gathering or family celebration!
Final Touches: Presenting Your Festive Dessert
As you prepare to serve these stunning 4th of July Cookie Bars at your festive gathering or family barbecue, consider dusting them lightly with powdered sugar or even drizzling some melted chocolate over top for an extra touch of indulgence! You could also sprinkle some additional M&Ms on top before serving—just imagine how colorful and inviting they will look on your dessert table!
Every bite promises an explosion of flavors—from buttery notes mingling with chocolatey crunches—each square evokes memories of summer celebrations filled with laughter and joy. I promise you; everyone will be coming back for seconds (and maybe even thirds!). So gather around friends and family because these cookie bars aren’t just desserts—they’re moments waiting to be shared. Enjoy every delicious morsel—you deserve it!
Storage and Enjoyment Tips for Your 4th of July Cookie Bars
Now that you’ve whipped up a delightful batch of 4th of July Cookie Bars, it’s time to revel in your sweet creation! These bars are not just a treat; they’re a celebration wrapped in a chewy, colorful package. Whether you’re serving them at a picnic, sharing with friends, or simply enjoying them with a cup of coffee on your porch, the joy is palpable. But what about those delicious leftovers? Don’t worry; I’ve got you covered!
Storing Leftover 4th of July Cookie Bars
To keep your 4th of July Cookie Bars fresh and utterly scrumptious, it’s best to store them in an airtight container. A glass or plastic container will work beautifully, ensuring that they stay soft and perfectly chewy for as long as possible. If you find yourself with leftover bars (though I doubt it!), these treats can last about five days at room temperature. However, if you want to extend their deliciousness, consider placing a slice of bread in the container with the bars; this non-negotiable tip helps maintain moisture and keeps those cookie bars from drying out too quickly. Trust me when I say that even after a few days, they still retain that intoxicating flavor and texture—soft on the inside and slightly crispy on the edges. When you’re ready to indulge again, just pop them in the microwave for about ten seconds to warm them up; the aroma will be utterly irresistible!
Freezing 4th of July Cookie Bars for Later
If you’re like me and love planning ahead for those spontaneous gatherings or cozy nights in, freezing your 4th of July Cookie Bars is an absolute game-changer! To freeze properly, first cut your cooled cookie bars into squares and wrap each piece individually in plastic wrap. Then, place all wrapped bars into a freezer-safe bag or container—this extra layer of protection keeps them from absorbing any unwanted flavors from your freezer. They can be kept frozen for up to three months without losing their delicious charm! When the craving strikes, simply remove the desired number of bars from the freezer and let them thaw at room temperature for about an hour or so; if you’re impatient like me, you can give them a quick zap in the microwave. This method is not only incredibly convenient but also ensures that you have a stash of these festive delights ready to go whenever you need a sweet pick-me-up!
4th of July Cookie Bars
- Total Time: 35 minutes
- Yield: Approximately 24 servings 1x
Description
4th of July Cookie Bars are the ultimate festive treat, perfect for summer celebrations and gatherings. With their vibrant colors and chewy texture, these cookie bars are not only easy to make but also a delightful way to add sweetness to any occasion. Picture golden edges with a soft center bursting with colorful M&Ms that reflect the spirit of Independence Day.
Ingredients
- 1 box yellow cake mix (15.25 oz)
- 2 large eggs
- 1/2 cup butter, softened
- 2 cups M&M’s (or candy-coated chocolate)
Instructions
- Preheat the oven to 350°F (175°C) and prepare a 9×13 inch baking pan by lining it with parchment paper.
- In a medium mixing bowl, combine the yellow cake mix, eggs, and softened butter until smooth and well-blended.
- Gently fold in the M&Ms until evenly distributed throughout the batter.
- Pour the mixture into the prepared baking pan and spread evenly using a spatula.
- Bake for 20-25 minutes or until golden edges form and the center is set.
- Allow to cool before cutting into squares and serving.
- Prep Time: 10 minutes
- Cook Time: 25 minutes
- Category: Dessert
- Method: Baking
- Cuisine: American
Nutrition
- Serving Size: 1 square
- Calories: 180
- Sugar: 12g
- Sodium: 150mg
- Fat: 8g
- Saturated Fat: 5g
- Unsaturated Fat: 3g
- Trans Fat: 0g
- Carbohydrates: 27g
- Fiber: 0g
- Protein: 2g
- Cholesterol: 30mg
Leave a Comment