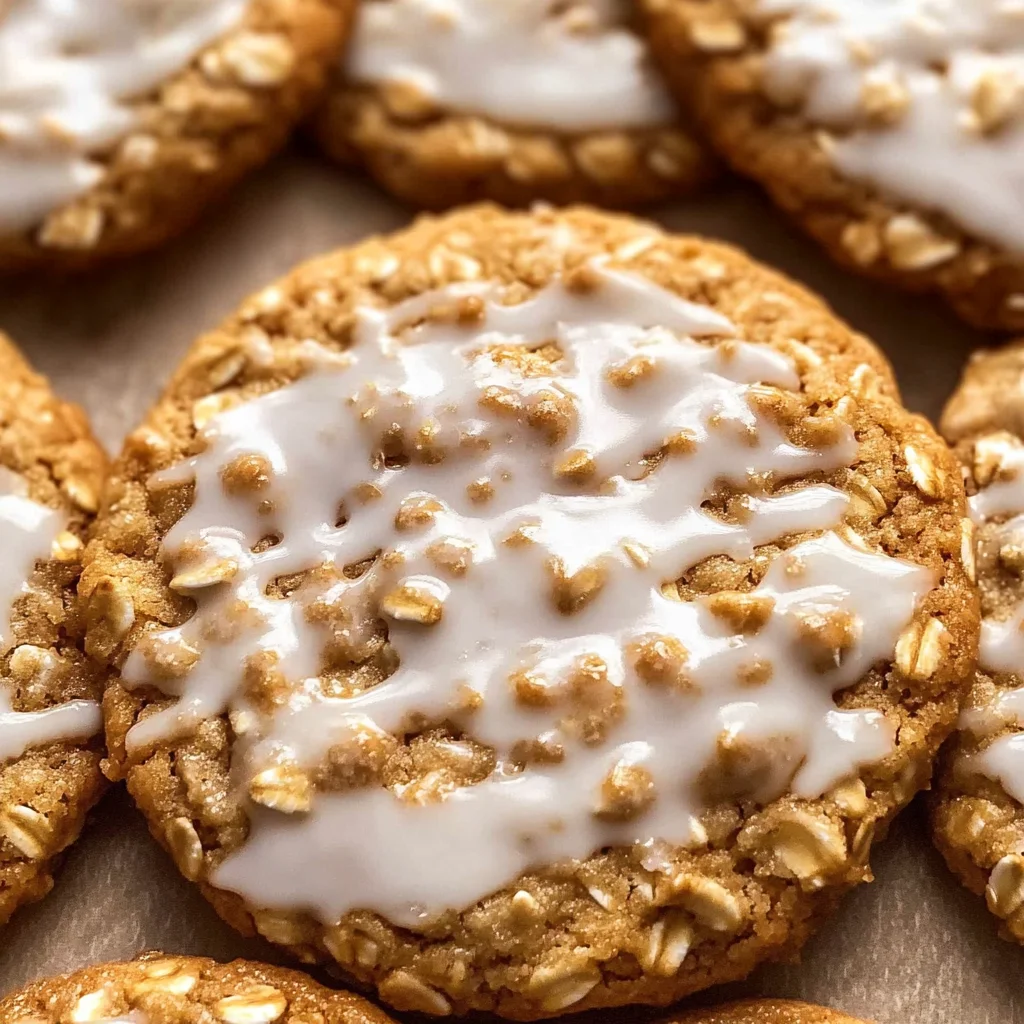
Old-fashioned iced oatmeal cookies are more than just sweet treats; they’re a bridge to nostalgia, drawing us back to lazy afternoons filled with laughter and the comforting aroma of baked goods wafting through the kitchen. Picture this: it’s a sunny day, you’ve just come home from school, and the first thing you smell is that warm, inviting scent of cookies baking in the oven. There’s something undeniably magical about this Iced Oatmeal Cookies Recipe that transforms simple ingredients into delightful morsels that please not just the palate but also the heart. The crispy edges give way to a chewy center, all crowned with a glossy layer of creamy vanilla icing that beckons you for just one more bite. Trust me when I say that these cookies are an experience — they tell stories of family gatherings, after-school snacks, and cozy evenings spent sharing warmth and love over a glass of milk.
What makes these iced oatmeal cookies so special is their delightful balance of textures and flavors. The oats lend a wholesome chewiness that’s both satisfying and nostalgic, while the spices like cinnamon and nutmeg dance playfully on your taste buds. This recipe is rooted in tradition yet incredibly flexible — perfect for those moments when you want to whip up something quick but utterly delicious. Whether you’re baking for a family gathering or simply indulging yourself after a long day, these cookies are sure to become a staple in your home just as they have in mine. So let’s dive into this culinary adventure together!
Iced Oatmeal Cookies Recipe: A Sweet Nostalgia
This Iced Oatmeal Cookies Recipe will guide you through creating these amazing cookies that embody comfort and joy. With every step, you’ll uncover secrets that guarantee success, making sure you create something truly extraordinary.
Ingredients:
As we embark on this delightful journey of baking iced oatmeal cookies, let’s take a moment to appreciate each ingredient that plays its vital role in this recipe. Each one contributes uniquely to the final result, transforming ordinary elements into something magical.
- 3/4 cup shortening. Shortening is an essential fat in our recipe that helps achieve that perfect balance between crispy edges and chewy centers. It has a higher melting point than butter, which means your cookies will hold their shape beautifully while baking. If you’re looking for alternatives due to dietary preferences or availability, vegetable shortening can be used as an effective substitute without compromising texture.
- 1 cup packed brown sugar. Brown sugar not only adds sweetness but also infuses moisture into our cookies thanks to its molasses content. This richness enhances both flavor and color, creating that deep golden hue we all adore. When measuring brown sugar, packing it tightly into your measuring cup is crucial; it ensures your cookies have enough moisture.
- 1/2 cup sugar. Granulated sugar brings sweetness and contributes to the cookie’s crispiness by promoting caramelization during baking. It’s essential for achieving that beautiful golden exterior while allowing the inside to remain soft and chewy. Don’t skip this step; it helps build layers of flavor in your cookie.
- 1/4 cup water. Water may seem like an unusual addition in cookie recipes, but here it plays an important role by helping bind the ingredients together and ensuring our dough is just right — not too dry nor too wet. This small amount helps activate the other ingredients when combined properly.
- 1 teaspoon vanilla extract. Vanilla extract is like magic! It elevates flavors in baked goods, adding depth and warmth to our iced oatmeal cookies. Always choose pure vanilla extract over imitation for richer flavor; it’s well worth it! Plus, there’s nothing quite like that enchanting aroma wafting through your kitchen as it bakes.
- 1 cup all-purpose flour. Flour serves as the backbone of our cookie dough structure; it’s what gives our cookies form! Using all-purpose flour strikes a perfect balance between strength and tenderness — crucial for maintaining that delightful chewiness we’re aiming for.
- 1 teaspoon baking soda. Baking soda acts as our leavening agent here, providing lift to our cookies as they bake. It reacts with acidic components in brown sugar (like molasses) to create carbon dioxide bubbles which expand during baking — contributing to those lovely textures we crave.
- 1/4 teaspoon salt. Salt is often overlooked but is absolutely paramount! It enhances all other flavors present in your cookie dough while balancing sweetness beautifully — trust me on this one!
- 1/4 teaspoon nutmeg. Nutmeg adds an intoxicating warmth and complexity; its subtle spiciness complements the oats perfectly without overpowering them. Just a little pinch goes a long way in creating those cozy notes reminiscent of holiday treat gatherings!
- 3/4 teaspoon cinnamon. Cinnamon brings with it nostalgia; its sweet-spicy aroma reminds us of home-baked goodies shared with loved ones during chilly nights around the fire. Don’t skimp on this essential spice; it’s what ties everything together!
- 2 cups oats (quick cooking or old fashioned). Oats are truly the stars of this recipe! They provide texture and heartiness while offering nutritional benefits without compromising flavor or integrity in every bite—whether you opt for quick-cooking or old-fashioned oats depends on how chewy you’d like them!
- 4 tablespoons milk (for icing). Milk helps create that luscious glaze we’ll dip our cooled cookies into later on! It adds creaminess while ensuring smooth consistency—adjusting with more water if needed gives flexibility based on personal preference.
- 2 cups powdered sugar (sifted). Powdered sugar creates our dreamy icing texture—the sifting part? It’s crucial because lumps can ruin its silky finish! When combined with milk (and possibly some extra water), you’ll achieve sheer perfection!
- Water (as needed). Water allows flexibility when adjusting icing consistency—it should be thick enough to coat yet fluid enough not clump up upon dipping—this step ensures gorgeous finished results each time!

Equipment You’ll Need:
Having the right tools makes all the difference when embarking on this cookie-making adventure! While they might not be “ingredients,” these essential pieces are partners in crafting something wonderful together—so let’s gather what we need before diving into those steps!
- Mixing bowls – at least two medium-sized bowls are needed here! A large bowl will be used for combining wet ingredients while another smaller bowl can hold dry components until ready—they help keep things organized throughout preparation!
- Electric mixer (handheld or stand mixer). An electric mixer saves time & effort when creaming fats & sugars together—it offers efficiency while ensuring thorough incorporation leading toward light fluffy textures—don’t shy away from using one if available!
- Measuring cups & spoons – accuracy matters! Having sets dedicated specifically for liquids versus dry ingredients ensures precision every time—you’ll thank yourself later when ratios come out just right!
- Baking sheets – lined with parchment paper or silicone mats work wonders here! They prevent sticking while allowing easy removal post-baking—making cleanup effortless afterward too!
- Cookie scoop (medium-sized preferred). Investing in one helps ensure uniformity among cookies sizes resulting in even baking—what’s more satisfying than perfectly shaped treats?
Preparing the Iced Oatmeal Cookies Recipe
Step 1: Creaming Together for Success
To start off this joyous process effectively, we begin by creaming together our shortening along with both sugars—brown and granulated—in a large mixing bowl until light and fluffy—a method known simply as creaming. This crucial step incorporates air into the mixture which contributes significantly towards achieving lightness within each cookie once baked—as air pockets expand during cooking! You’ll want to beat them together at medium speed until they’re pale yellow whose texture resembles whipped butter—about 2–3 minutes should suffice here depending on how powerful your mixer may be! If you’re doing this by hand? Don’t fret—it just requires more elbow grease but produces equally rewarding results if done patiently!
Step 2: The Harmony of Wet Ingredients
Next up comes adding water along with vanilla extract directly into our creamed mixture—it’s time now to bring everything else together! Stir gently at low speed until evenly incorporated—trust me when I say patience at this stage pays off later down line yielding smoother batter overall! Once combined successfully next add sifted flour mingled alongside baking soda mixed in salt plus spices including nutmeg & cinnamon previously set aside earlier—it leads us toward deeper flavor profiles developing throughout cooking process itself so don’t skip or rush through any part leading up towards folding oats shortly thereafter…
Step 3: Folding In Those Beautiful Oats
Now comes perhaps one of my favorite parts—the addition of oats which introduce texture galore into every bite imaginable! Gently fold them into previously mixed dough using spatula rather than stirring since doing so prevents breaking down oat pieces too much resulting ultimately against desired chewy characteristics… Keep going until everything looks harmoniously blended—that beautiful combination will soon become irresistible once baked properly—it’s always exciting seeing how unassuming ingredients transform under heat alone producing such delights anyone would cherish indulging upon later…
Step 4: Shaping Our Cookie Dough Mounds
After achieving perfect consistency now comes dropping dough onto lined baking sheets using medium-sized cookie scoop previously mentioned earlier—this tool guarantees similar sizing among individual portions creating even baking times across board regardless batch sizes made afterward… Make sure there’s ample spacing between mounds otherwise they risk merging together during cooking leading toward unsightly results visually… Aim roughly two inches apart typically yields optimal outcomes keeping appearance intact alongside taste expectations met fully throughout experience itself…
Stay tuned as we dive deeper into getting those heavenly iced oatmeal cookies baked perfectly next week where we’ll explore further steps leading towards creating glaze required afterwards adding finishing touches everyone craves endlessly…
The Joy of Icing Your Oatmeal Cookies
Step 5: Crafting the Creamy Glaze
Now that your cookies have been lovingly baked to a golden brown perfection, it’s time to create the star of the show: the glaze! This step is where your iced oatmeal cookies truly transform into a delightful masterpiece. In a medium bowl, combine 4 tablespoons of milk with 2 cups of sifted powdered sugar. Sifting is absolutely paramount here; it breaks up any lumps and ensures your glaze is silky smooth. Trust me on this—nobody wants a gritty texture interrupting the symphony of flavors in each bite! Once you’ve got those two ingredients together, start stirring. The mixture may seem too thick at first, but don’t worry; this is where the magic happens. Gradually add water, one teaspoon at a time, mixing thoroughly until you reach your desired consistency. You want the glaze to be thick enough to cling to the cookie but not so thick that it doesn’t spread easily when dipped.
Take a moment to appreciate how all those elements blend together—your kitchen will smell like sweet vanilla and sugar! If you find yourself in need of a bit more fluidity, simply add more water; if it becomes too runny, you can always add a spoonful of powdered sugar. The goal is to achieve that glossy finish that makes these cookies utterly intoxicating when they come out of the oven and into your hands. Remember, patience is key here; take your time to get the consistency just right—this will elevate your iced oatmeal cookies into an experience rather than just another dessert.
Step 6: Dipping Into Sweetness
Now comes one of my favorite parts—the dipping! As those freshly baked cookies cool on their wire rack, you can prepare for what feels like an artistic endeavor. Grab each cookie by its edges and gently dip just the top into that luscious glaze we created earlier. Make sure to submerge just enough for an even coating without drowning them completely—after all, we want our oats’ deliciousness to shine through! Allow any excess glaze to drip back into your bowl; this is also one reason why having a rimmed baking sheet or parchment paper underneath is so helpful—it catches any drips and keeps things tidy.
This step is crucial because it not only beautifies our cookies with a delightful sheen but also adds layers of flavor that complement the natural sweetness of the oats and spices inside. As you dip, take note of how each cookie absorbs that glorious icing—this process will create a harmonious balance between chewy and crispy textures that’ll leave everyone wanting more. Don’t rush this part; allow each cookie just enough time to absorb some icing before moving onto the next one. You want them to be beautifully glazed but not overly saturated so they maintain their delightful integrity.
Step 7: Letting it Set
With all your cookies beautifully glazed, it’s now time for them to rest—a step that many might overlook but one that’s absolutely essential for achieving that perfect finish! Allowing your iced oatmeal cookies to sit for about 30 minutes at room temperature gives the glaze time to set and solidify slightly. This allows each bite to reveal layers upon layers of flavor without creating a gooey mess when they’re picked up.
As these lovely treats cool down and settle, something magical happens—the flavors meld together even further, creating an experience that’s profoundly satisfying with every single bite. Picture this: as you take your first bite after they’ve set perfectly, you’ll taste not only the sweet creaminess from the glaze but also those warm notes from cinnamon and nutmeg wafting through each cookie. This resting period transforms them from simple baked goods into something truly extraordinary! Just remember: patience pays off here.
Step 8: The Final Touch & Serving Suggestions
Ah, the moment has arrived—your iced oatmeal cookies are ready for their grand debut! After allowing them to set beautifully on your counter, it’s time for presentation. I love serving these warm yet slightly cooled with a glass of cold almond milk or perhaps even alongside fresh fruit like apple slices or berries; it creates such a wonderful contrast in textures and flavors. You might want to arrange them on a decorative plate or even stack them in an old-fashioned cookie jar—there’s something undeniably charming about presenting these beauties as if they were treasures!
When serving, keep in mind that these cookies are best enjoyed within a few days as they retain their delightful chewiness while still offering that irresistible crispy edge at first bite. If you’ve made extras (which I highly recommend!), store them in an airtight container at room temperature—they’ll stay fresh longer than you might think! The flavors continue to deepen over time due to those wonderful spices we added earlier. So go ahead and share with friends or family; I promise you they’ll be begging for seconds!
Remember, cooking should always bring joy and warmth into our lives—each step we’ve taken together has been about creating not just food but memories filled with laughter and love surrounding our tables. Enjoy every crumb of this journey as much as I know you’ll enjoy every bite of these extraordinary iced oatmeal cookies!
Conclusion: Your New Favorite Recipe Awaits
And there you have it—the comprehensive guide to creating my beloved Iced Oatmeal Cookies Recipe! With every ingredient carefully selected and every step thoughtfully crafted, these cookies promise not just satisfaction but joy wrapped up in each sweet morsel. Whether you’re looking for an after-school treat or a cozy dessert after dinner, these cookies will deliver smiles all around.
So roll up those sleeves and embrace this adventure in baking—I can’t wait for you to share your experiences with me! Happy baking!
Storage and Enjoyment Tips for Your Iced Oatmeal Cookies Recipe
Now that your kitchen is filled with the warm, inviting aroma of freshly baked Iced Oatmeal Cookies, it’s time to savor the rewards of your labor! These cookies are not just a delightful treat; they embody a cozy moment waiting to happen. Whether you’re enjoying them straight off the cooling rack or storing them for later indulgence, let’s talk about how to keep that homemade goodness alive. Trust me, there’s something truly special about reaching for a cookie that brings back memories of laughter and joy.
Storing Leftover Iced Oatmeal Cookies Recipe
To keep your Iced Oatmeal Cookies at their best, it’s essential to store them properly. Place these little gems in an airtight container—this is crucial for preserving their texture and flavor. If you have one, consider using a container with a tight-fitting lid that keeps out moisture and air, allowing those cookies to maintain their delightful chewiness. They can be stored at room temperature for up to a week, but I promise you—they’re so delicious they might not last that long! For an added pro tip, place a slice of bread in the container alongside your cookies; this non-negotiable trick helps keep them fresh by absorbing excess moisture. And don’t worry—after a few days, they still taste fantastic, holding onto that sweet nostalgia with each bite. When you’re ready to indulge again, simply take them out and enjoy them as is or give them a quick pop in the microwave for about 10 seconds to bring back that fresh-out-of-the-oven warmth.
Freezing Iced Oatmeal Cookies Recipe for Later
If you find yourself with an abundance of these scrumptious cookies or just want to prepare ahead of time, freezing is a wonderful option! To freeze your cookies properly, allow them to cool completely before placing them in an airtight freezer bag or container. Layering parchment paper between the cookies can help prevent them from sticking together—a real lifesaver when you’re ready to grab just one (or two!). When frozen this way, they will keep well for up to three months without losing their charm. When you’re craving a sweet treat, simply pull out the desired number of cookies and let them thaw at room temperature or pop them in the microwave for a quick reheat. This convenience factor makes these cookies not only delightful but also incredibly practical for busy days ahead!

Iced Oatmeal Cookies
- Total Time: 27 minutes
- Yield: Approximately 24 cookies 1x
Description
Indulge in the comforting nostalgia of our Iced Oatmeal Cookies Recipe, where each bite brings back memories of warm afternoons spent sharing laughter and treats. These delightful cookies boast a perfect balance of crispy edges and chewy centers, all enhanced by a glossy layer of creamy vanilla glaze. With their heartiness from oats and the warm embrace of spices like cinnamon and nutmeg, these cookies are more than just a dessert; they’re a sweet reminder of cherished moments. A simple yet satisfying recipe that’s perfect for any occasion—baking these cookies will fill your home with an inviting aroma that tugs at your heartstrings. Ready to create some delicious memories? Let’s get started!
Ingredients
- 3/4 cup shortening
- 1 cup packed brown sugar
- 1/2 cup granulated sugar
- 1/4 cup water
- 1 teaspoon vanilla extract
- 1 cup all-purpose flour
- 1 teaspoon baking soda
- 1/4 teaspoon salt
- 1/4 teaspoon nutmeg
- 3/4 teaspoon cinnamon
- 2 cups oats (quick cooking or old-fashioned)
- 4 tablespoons milk (for icing)
- 2 cups powdered sugar (sifted)
Instructions
- Preheat your oven to 350°F (175°C) and line baking sheets with parchment paper.
- In a large mixing bowl, cream together shortening, brown sugar, and granulated sugar until light and fluffy.
- Add water and vanilla extract, mixing well.
- Gradually incorporate sifted flour, baking soda, salt, cinnamon, and nutmeg into the mixture.
- Gently fold in oats until well combined.
- Drop cookie dough onto prepared baking sheets, spacing them about two inches apart.
- Bake for 10-12 minutes or until the edges are golden brown.
- Let cookies cool on wire racks.
- In a medium bowl, combine milk with sifted powdered sugar for the glaze.
- Stir until smooth, adding water as needed for desired consistency.
- Dip cooled cookies in the glaze to coat the tops evenly.
- Prep Time: 15 minutes
- Cook Time: 12 minutes
- Category: Dessert
- Method: Baking
- Cuisine: American
Nutrition
- Serving Size: 1 cookie (30g)
- Calories: 130
- Sugar: 11g
- Sodium: 55mg
- Fat: 5g
- Saturated Fat: 1g
- Unsaturated Fat: 4g
- Trans Fat: 0g
- Carbohydrates: 20g
- Fiber: 1g
- Protein: 2g
- Cholesterol: 0mg

Leave a Comment