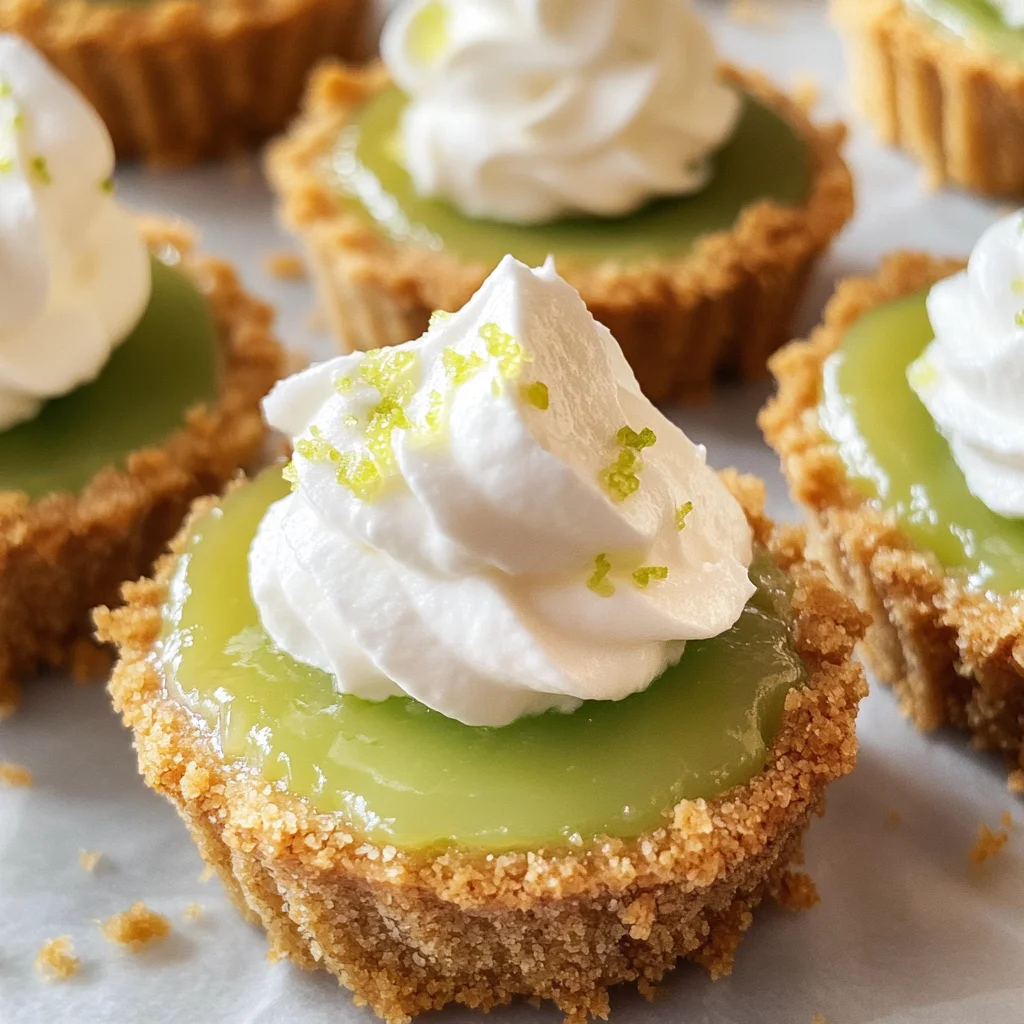
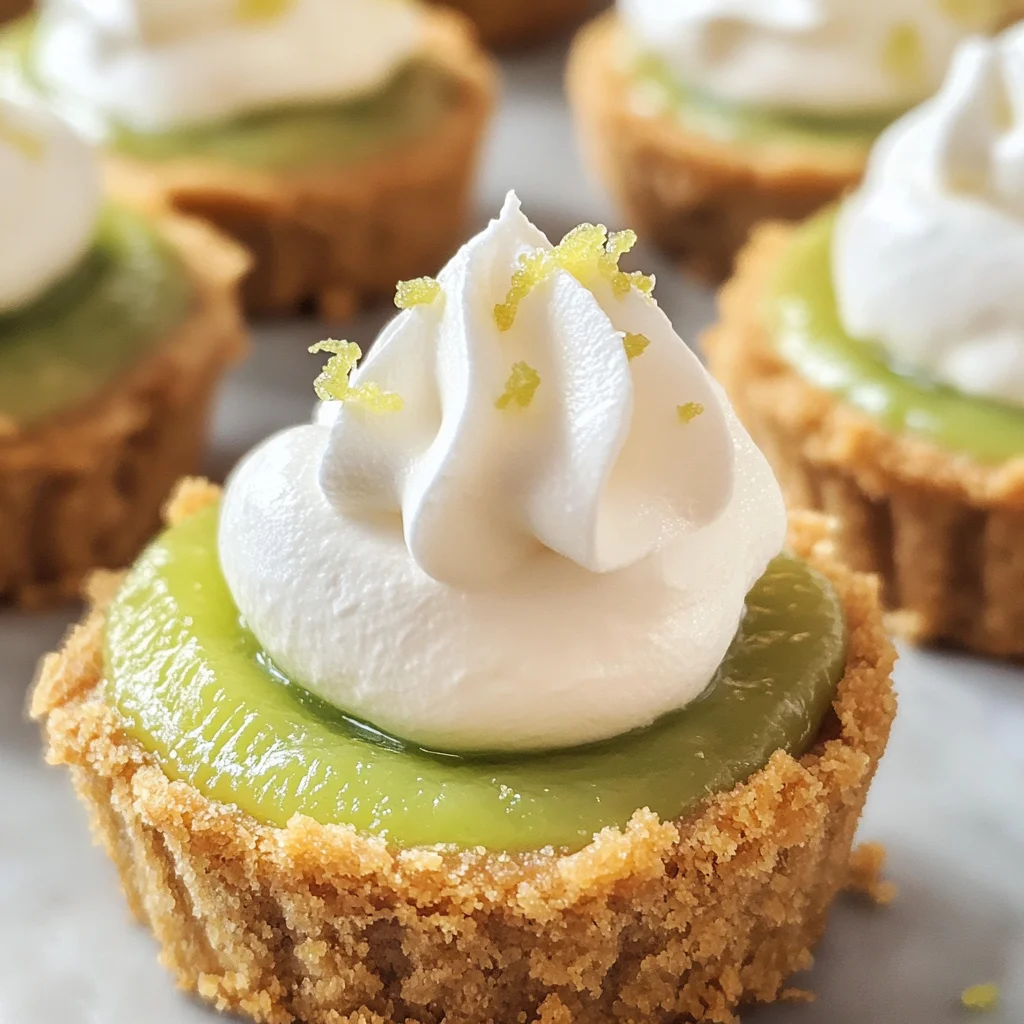
There’s something utterly intoxicating about the first bite of a Mini Key Lime Pie. It’s like summer in your mouth, with that perfect balance of sweet and tart singing a beautiful duet that lifts your spirits and warms your heart. I’ve always been captivated by the way these tiny treats manage to capture the essence of a classic key lime pie but in poppable bites that are perfect for sharing—or not sharing, if you’re like me! Each little pie is a symphony of flavors, where the zesty brightness of key lime juice dances with the creamy richness of sweetened condensed milk and egg yolks, all cradled in a buttery graham cracker crust. Trust me on this: once you make these Mini Key Lime Pies, they’ll become an irresistible staple in your dessert repertoire.
What makes these delightful mini pies so special? They are not only incredibly easy to make but also evoke childhood memories of family gatherings, beach vacations, and sun-soaked days. The vibrant citrus notes remind us of lazy afternoons spent lounging by the ocean, while the creamy filling offers a comforting sweetness that feels like a warm embrace from an old friend. Plus, they are wonderfully versatile—perfect for summer barbecues, holiday celebrations, or any occasion that calls for a little sweetness. So let’s embark on this culinary adventure together; I promise you won’t regret it!
Mini Key Lime Pies: A Bite-Sized Sunshine Delight
These Mini Key Lime Pies are sure to become your new favorite dessert—easy to make and even easier to devour! With just seven basic ingredients and a few simple steps, you’ll create a treat that’s bursting with flavor and joy.
Ingredients:
As we dive into making these glorious Mini Key Lime Pies, let’s take a moment to appreciate each ingredient’s role in crafting this delicious dessert. Each one is crucial for achieving that perfect balance between tartness and sweetness.
- 1 ½ cups (180 grams) graham cracker crumbs: This ingredient serves as the foundation for our mini pies, providing that unmistakable crunchy texture that complements the creamy filling beautifully. When choosing graham crackers, look for those made with whole ingredients—this ensures you get that authentic flavor without any unnecessary additives. If you’re feeling adventurous or want to cater to specific dietary preferences, you can substitute traditional graham crackers with crushed digestive biscuits or even gluten-free alternatives; just keep an eye on how they behave in terms of moisture absorption.
- ⅓ cup (70 grams) granulated sugar: Sugar is essential not just for sweetness but also for balancing the acidity of the key lime juice. In this recipe, it helps create a harmonious blend of flavors while enhancing the overall texture of the filling. I recommend using fine granulated sugar here; its small crystals dissolve easily into liquids, ensuring every bite is perfectly sweetened without any gritty texture.
- 6 tablespoons (85 grams) unsalted butter, melted: Butter is absolutely paramount in making our graham cracker crust rich and flavorful. The melting process allows it to coat each crumb evenly, creating a delightful binding agent that holds everything together beautifully. When selecting your butter, don’t shy away from high-quality options—European-style butter with higher fat content will elevate your crust to another level of richness.
- 1 cup (240 ml) key lime juice: Ahh, the star of our show! Freshly squeezed key lime juice is what gives these mini pies their signature tangy punch that cuts through the creaminess. If fresh limes aren’t available, opt for bottled key lime juice made from real limes rather than artificial flavors—this will ensure you capture that authentic zest we all adore.
- 2 (14-ounce) cans sweetened condensed milk: Not evaporated milk! Sweetened condensed milk adds incredible creaminess and sweetness to our filling—it’s liquid gold in this recipe! Its thick consistency helps create that lush texture we crave when indulging in desserts while providing just enough sweetness to balance out the tartness from our key limes. Make sure you’re grabbing sweetened condensed milk specifically; evaporated milk lacks the necessary sugar content and will yield entirely different results.
- 4 large egg yolks at room temperature: The yolks contribute richness and help thicken our filling beautifully; they act as emulsifiers that bind everything together smoothly. Using eggs at room temperature is crucial because it allows them to incorporate more easily into our mixture without cooling it down too much—this step ensures we achieve that custard-like consistency we desire.
- Homemade whipped cream (optional): While completely optional, topping each mini pie with freshly whipped cream adds an airy lightness that balances out the rich filling perfectly. It’s also an excellent way to add visual appeal! If you’d like to make homemade whipped cream, just whip heavy cream with a touch of sugar until soft peaks form—it’s truly worth it!
Equipment You’ll Need:
Before we get started on creating these delightful Mini Key Lime Pies, let’s gather our trusty kitchen tools! Having the right equipment makes all the difference in ensuring your baking experience goes smoothly.
- Muffin pans: These are essential for shaping our mini pies into perfect bite-sized portions. Using non-stick muffin pans or lining them with paper liners ensures easy removal after baking—a crucial factor when dealing with delicate desserts like these!
- Mixing bowls: A good set of mixing bowls will be your best friends throughout this process! You’ll need one large bowl for mixing up your filling and another medium bowl for combining your crust ingredients. Investing in glass or stainless steel bowls allows you better visibility when whisking ingredients together.
- Whisk: A sturdy whisk is indispensable for combining ingredients thoroughly; it aerates mixtures beautifully while helping achieve those smooth textures we’re after in both our crust and filling.
- Measuring cups and spoons: Precision matters when baking! Accurate measurements ensure consistent results each time you make these mini delights. A set featuring both dry measuring cups (for dry ingredients) and liquid measuring cups (for wet ingredients) will serve you well here.
Now that we’ve gathered all our ingredients and equipment let’s roll up our sleeves and start preparing these fabulous Mini Key Lime Pies!
Step 1: Prepping the Graham Cracker Crust
First things first—let’s get our graham cracker crust ready because it’s going to be the blanket holding all those luscious flavors together! Preheat your oven to 350°F (180°C); this step is crucial because starting with a hot oven ensures even cooking from the get-go. As it heats up, line two muffin pans with 18 liners; I love using colorful liners—they add such charm! In a mixing bowl, combine 1 ½ cups of graham cracker crumbs with ⅓ cup granulated sugar until evenly mixed—the sugar will bring out those lovely caramel notes when baked. Next comes melted butter—stir in 6 tablespoons until every crumb is moistened; this step transforms them into beautiful sandy granules clinging together harmoniously.
Now it’s time for some hands-on action! Distribute about one heaping tablespoon of this mixture evenly among all 18 liners—you want them packed firmly so they hold their shape during baking. I find using the bottom of my ¼ cup measuring cup works wonders here; it presses everything down nicely into an even layer without making too much mess (always appreciated!). Pop those pans into your preheated oven for about 5 minutes or until lightly browned—the smell wafting through your kitchen at this point will be divine! Once done baking, remove them from heat but leave them in their pans while we whip up our zesty filling.
Step 2: Creating That Zesty Filling
With those crusts cooling off nicely beside us—which takes about five minutes—it’s time to focus on what makes these pies truly shine: their delectable filling! Keep your oven preheated at 350°F (180°C), as we’ll need it again shortly. Grab yourself another mixing bowl because we’re diving into combining flavors here! Start by pouring in one generous cup of freshly squeezed key lime juice followed by two cans (14 ounces each) of sweetened condensed milk—this combination is where magic happens as they meld together beautifully!
Next comes four large egg yolks at room temperature—their richness brings depth along with velvety smoothness—and whisk everything vigorously until fully combined; you should see no traces left behind from either ingredient—just silky goodness begging to be transformed into something extraordinary! This step creates an emulsion which thickens upon baking due primarily due its egg content—trust me when I say skipping or rushing through any part here would lead us astray from achieving optimal results!
Step 3: Filling Those Crusts
Now comes one of my favorite parts—the moment where all elements unite harmoniously! With crusts cooled slightly but still warm in their muffin tins (which helps set everything better), it’s time to distribute our luscious key lime mixture evenly among each liner filled previously—fill them almost to the top but leave just enough room so they don’t overflow while baking—that would be tragic indeed! This stage showcases how patient preparation leads us closer towards dessert nirvana!
Once filled perfectly across all eighteen pies—a sight worth admiring—I invite you to gently place those pans back into your still-hot oven once more; bake them anywhere from twelve up until fifteen minutes maximum or until tops have slightly settled but remain ever-so-slightly jiggly—a telltale sign indicating they’re cooked through properly without overbaking which could ruin texture!
Step 4: Cooling Off Before Enjoyment
After patiently waiting during baking time—and oh my goodness does it smell heavenly now—it’s finally time to remove those mini masterpieces from heat! Carefully transfer both muffin pans onto wire racks allowing them cool completely within their molds over roughly an hour before attempting removal—that’s right—we must grant them some quality cooling time before they can shine independently outside their cozy homes!
Once they’ve cooled sufficiently—in fact allowing flavors meld even further—you can gently lift each mini pie out using cupcake liners as handles before placing them inside airtight containers meant for refrigeration purposes where they’ll ideally sit covered within chill zones around two-to-three hours until setting occurs—which makes all difference regarding how firm yet luscious textures feel upon indulgence later on when served topped generously topped off homemade whipped cream if desired!
And there you have it—the journey toward crafting exquisite Mini Key Lime Pies has only begun yet feels deeply rewarding already as anticipation builds towards tasting moments filled joy awaiting ahead… So share these delightful bites amongst loved ones or simply savor each piece at leisure—all alone if preferred too—I won’t judge because trust me—I often do exactly same thing myself sometimes too… Enjoy every moment spent savoring every single bite alongside laughter shared amongst friends along way…
Step 5: Crafting the Zesty Filling
Now that you have your crusts baked to a delightful golden hue, it’s time to whip up that utterly intoxicating key lime filling. This is where the magic really begins, my friends! In a large mixing bowl, combine 1 cup of key lime juice—make sure it’s freshly squeezed for that vibrant zing—with two cans (that’s 28 ounces total) of sweetened condensed milk. It’s crucial to use sweetened condensed milk here because its rich sweetness balances the tartness of the key limes beautifully, creating that perfect creamy texture we all adore. Add in four large egg yolks at room temperature; this is a non-negotiable step! Room temperature eggs blend more seamlessly into the mixture, ensuring a smooth and luscious filling without any lumps.
Using a whisk, mix vigorously until everything is completely combined—don’t rush this step! The action of whisking not only incorporates air but also helps emulsify the ingredients, leading to a silky-smooth filling that will melt in your mouth. You’ll know you’re done when the mixture takes on a pale yellow color and has thickened slightly, promising a flavor explosion with every bite. Trust me on this: you want to achieve that perfect blend, as it ensures an even bake and delightful texture once cooled.
Step 6: Filling Those Sweet Crusts
This is the moment we’ve all been waiting for—the assembly! With your heavenly filling ready, it’s time to distribute it evenly among those beautiful little graham cracker crusts. Grab your muffin pans again and carefully pour the key lime mixture into each liner, filling them almost to the top but leaving just a little room for expansion during baking. Why do we leave space? It allows for a gentle rise while preventing any overflow that could lead to messy clean-ups later—no one wants that!
As you pour, take a moment to appreciate how vibrant and inviting the filling looks; it’s reminiscent of sun-drenched afternoons spent by the beach. Once filled, give each muffin pan a gentle shake—it’s like giving them a little dance party before they hit the oven! This movement helps eliminate any air bubbles trapped within the filling, ensuring a smooth surface after baking. It might seem insignificant, but those little details make all the difference in achieving that professional finish.
Step 7: Baking with Precision
Now comes another exciting phase: baking our mini key lime pies! With your oven preheated to 350°F (180°C), place your muffin pans on the middle rack—this position is pivotal because it allows for even heat distribution. Bake these beauties for about 12 to 15 minutes. Keep an eye on them during these crucial moments; you’ll want to look for visual cues indicating they are ready. The tops should appear just set with slight jiggles remaining in the center; this means they are perfectly cooked without being overdone.
Why is it important not to overbake? Overcooking can lead to cracks and an unappealing texture—nobody wants dry mini pies! If you notice any cracks forming while they bake, don’t panic; these little quirks add character and remind us that home-cooked treats are made with love. As they bake, take in the intoxicating aroma wafting through your kitchen—a heavenly combination of citrusy brightness blending with buttery goodness!
Step 8: Cooling Down Gently
Once your mini key lime pies have baked beautifully and those enticing scents have enveloped your kitchen, it’s crucial to let them cool down properly before moving on. Remove them from the oven and transfer them carefully onto a wire rack—this step allows for air circulation around each pie so they can cool evenly without becoming soggy from steam. Leave them in their pans for about an hour; I promise you this patience pays off tremendously!
During this cooling period, you’ll notice how they start to firm up slightly as they settle into their perfect textures—a process known as carryover cooking where residual heat continues cooking them ever so gently. Once they’ve cooled completely in their pans, it’s time for another essential phase: chilling! Place them into an airtight container—or simply cover them well—and refrigerate for at least 2 to 3 hours or until they’re set fully. This chilling time isn’t just about making them cold; it’s when all those flavors meld together into something profoundly satisfying and extraordinary.
Next Major Phase – Final Touches
Step 9: The Whipped Cream Finale
As we approach our final steps, let’s talk about what truly makes these mini key lime pies sing—the whipped cream topping! While some may argue it’s optional, I believe it’s absolutely paramount for elevating your dessert experience from great to truly spectacular! Whether you choose store-bought or make homemade whipped cream (which I highly encourage), this fluffy cloud adds lovely contrast against the tartness of our pies.
If you’re opting for homemade whipped cream—which I wholeheartedly recommend—start by chilling your mixing bowl and beaters beforehand; this small detail ensures better whipping results due to colder temperatures helping stabilize creams effectively. Whip one cup of heavy cream until soft peaks form—you’ll know they’re ready when peaks hold their shape yet still look silky smooth and luscious! For sweetness and flavor enhancement, consider adding two tablespoons of powdered sugar along with half a teaspoon of vanilla extract during mixing; trust me when I say this adds an exquisite depth!
Once your mini key lime pies have chilled adequately (and you’ve managed not to eat too many), top each one generously with that delightful whipped cream right before serving. A sprinkle of lime zest or even some crushed graham crackers on top creates visual appeal while enhancing texture—just imagine biting into that creamy topping followed by zesty filling nestled on buttery crust—it feels like paradise in every bite!
And there you have it—your very own batch of irresistible mini key lime pies ready to impress family and friends alike! I can’t wait for you all to experience this symphony of flavors bursting forth from each mouthful; it’s guaranteed happiness served up in poppable bites!
Storage and Enjoyment Tips for Your Mini Key Lime Pies
Now that you’ve whipped up a batch of these delightful mini key lime pies, it’s time to bask in the glory of your creation! Trust me when I say, each bite is a little burst of sunshine, perfect for any occasion or just to brighten your day. But what happens if you have leftovers? Fear not! I’ve got you covered with some fantastic storage tips that will keep your mini treasures fresh and flavorful.
Storing Leftover Mini Key Lime Pies
To preserve the deliciousness of your mini key lime pies, it’s important to store them in an airtight container. This is crucial because it prevents moisture from wreaking havoc on that perfectly set filling and crumbly crust. If you’re planning to keep them in the fridge, they’ll stay good for about 3 to 5 days—though I promise they’re at their best within the first couple of days. A pro tip? Place a slice of bread in the container with them; this little trick will help absorb excess moisture and maintain that delightful texture. After a few days in the fridge, you might find the flavors have melded beautifully, creating an even more profound taste experience—but be warned, they rarely last long enough for that to happen! When you’re ready to serve them again, simply take them out and enjoy as is or top with fresh homemade whipped cream right before indulging.
Freezing Mini Key Lime Pies for Later
If you want to extend the life of these sweet treats even further, consider freezing the mini key lime pies. To do this properly, allow them to cool completely and then place each pie in individual freezer-safe bags or wrap them tightly in plastic wrap followed by foil. They can be stored in the freezer for up to 2 months without losing their vibrant flavor. When you’re ready to enjoy one (or several!), simply transfer them from the freezer to the refrigerator and let them thaw overnight. The convenience factor here is absolutely paramount; you can have a delicious dessert ready at a moment’s notice! Just imagine pulling out a frozen mini pie on a warm summer day—it’s like having a slice of paradise waiting for you whenever you crave something sweet!

Mini Key Lime Pies
- Total Time: 35 minutes
- Yield: Approximately 18 servings 1x
Description
Mini Key Lime Pies are the ultimate bite-sized treats that capture the essence of summer in every delicious morsel. These delightful desserts balance the bright tang of key lime juice with the creamy sweetness of condensed milk, all nestled in a buttery graham cracker crust. Perfect for sharing or savoring solo, each mini pie is a nostalgic reminder of sun-soaked days and family gatherings. The easy-to-follow recipe ensures that anyone can whip up these zesty delights, making them an ideal addition to any occasion—be it a summer barbecue or a cozy dinner at home. With just a few simple ingredients and quick preparation steps, you’ll be indulging in these refreshing desserts in no time!
Ingredients
- 1 ½ cups graham cracker crumbs
- ⅓ cup granulated sugar
- 6 tablespoons unsalted butter, melted
- 1 cup key lime juice
- 2 cans (14 ounces each) sweetened condensed milk
- 4 large egg yolks
- Homemade whipped cream (optional)
Instructions
- Preheat oven to 350°F (180°C). Line muffin pans with paper liners.
- In a mixing bowl, combine graham cracker crumbs and sugar. Stir in melted butter until well mixed.
- Press about one tablespoon of the mixture into each muffin liner to form crusts. Bake for 5 minutes until lightly browned.
- In another bowl, whisk together key lime juice, sweetened condensed milk, and egg yolks until smooth.
- Pour the filling into the cooled crusts, filling each nearly to the top.
- Bake for 12-15 minutes until set but slightly jiggly in the center.
- Allow to cool completely before refrigerating for at least 2 hours.
- Serve chilled, topped with whipped cream if desired.
- Prep Time: 15 minutes
- Cook Time: 20 minutes
- Category: Dessert
- Method: Baking
- Cuisine: American
Nutrition
- Serving Size: 1 mini pie (50g)
- Calories: 140
- Sugar: 14g
- Sodium: 60mg
- Fat: 7g
- Saturated Fat: 4g
- Unsaturated Fat: 2g
- Trans Fat: 0g
- Carbohydrates: 17g
- Fiber: <1g
- Protein: 2g
- Cholesterol: 40mg
Leave a Comment