There’s something undeniably magical about the combination of chocolate, marshmallows, and graham crackers that has captured our hearts for generations. Picture a warm summer evening, the sun setting gently as laughter fills the air, and then there’s that first bite of a gooey s’more melting in your mouth—a blissful moment that lingers long after it’s gone. Now, imagine capturing that very essence into bite-sized delights that require no baking! That’s precisely what these No Bake S’mores Cookie Dough Bites bring to the table. They are not just a dessert; they are a delightful experience, a bridge connecting nostalgic flavors with modern health-conscious choices. Each bite is an explosion of sweet, salty, and utterly indulgent flavors, all while being packed with protein, making them perfect for any time of day.
I’ve always been captivated by recipes that remind me of simpler times but evolve into something new and exciting. This recipe for No Bake S’mores Cookie Dough Bites does just that! With just a handful of wholesome ingredients and minimal prep time—under 15 minutes—these little morsels are not only delicious but also guilt-free. Imagine treating yourself to a snack that tastes like a decadent dessert yet offers the protein boost you need during your busy day. The beauty lies in their versatility; whether you’re hosting friends or simply craving something sweet after dinner, these bites promise to satisfy without the fuss of traditional baking.
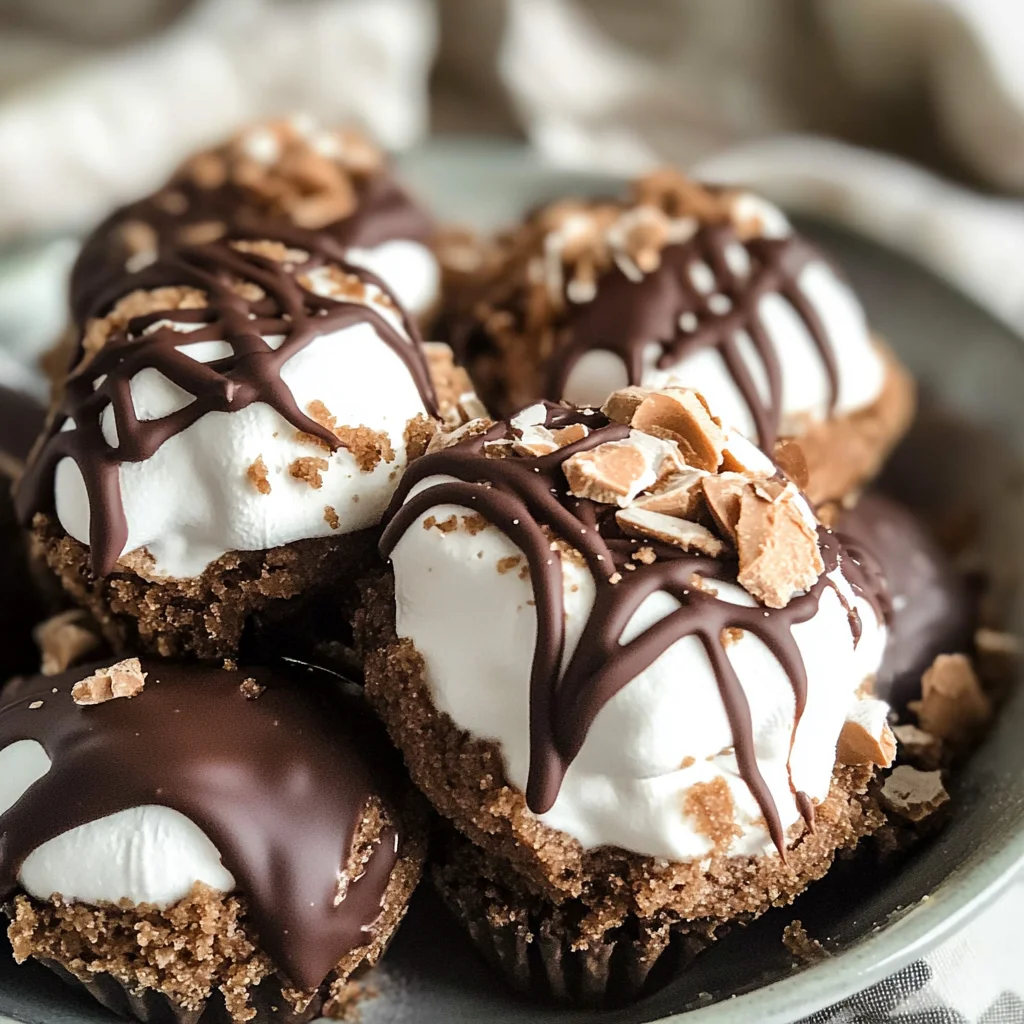
No Bake S’mores Cookie Dough Bites: A Sweet Treat Without the Heat
Gather around, my friend! I’m so excited to share this delightful recipe with you. These No Bake S’mores Cookie Dough Bites are truly a treasure in my kitchen—a blend of nostalgia and innovation that brings comfort and joy with every bite. Let’s embark on this culinary journey together!
Ingredients:
As we dive into creating these scrumptious bites, let’s take a moment to appreciate each ingredient’s role in crafting this perfect treat.
- 1/2 cup semisweet or dark chocolate chips. Chocolate is the heart and soul of any s’mores creation! For these bites, I recommend using semisweet or dark chocolate chips because they melt beautifully and provide a rich depth of flavor that harmonizes perfectly with the sweetness of the marshmallows. When selecting chocolate chips, opt for high-quality brands; trust me on this—quality chocolate makes all the difference in taste. If you have dietary preferences or restrictions, feel free to explore dairy-free options; they work just as well here!
- 1/4 cup oat flour (30g). Oat flour is an absolute gem in healthy baking! It lends a lovely nutty flavor while keeping things gluten-free if needed (just ensure your oats are certified gluten-free). This flour not only acts as a binding agent but also adds fiber and nutrients to our cookie dough bites. Plus, it gives them that slightly chewy texture we all love—so don’t skimp on it!
- 1/4 cup vanilla protein powder (31g). This ingredient is what elevates our bites from mere treats to protein-packed satisfaction! I used PEScience vanilla protein powder for its amazing flavor and smooth consistency. It blends seamlessly into our oat flour mixture without clumping up, providing both nourishment and a subtle sweetness that’s essential for this dessert. If you prefer other brands or even plant-based options, go ahead—just keep in mind how it may affect texture.
- 3 Tbsp peanut butter (45g). Ahh, peanut butter—the creamy dream come true! Not only does it introduce an irresistible flavor profile but it also adds healthy fats and proteins to our bites. When choosing peanut butter, look for natural varieties without added sugars or oils; pure ground peanuts will give you that authentic taste we’re aiming for here. If you’re allergic or looking for alternatives, almond butter or sunflower seed butter can work wonderfully too!
- 2 Tbsp brown sugar sweetener (14g). Sweetener plays an important role in balancing flavors in desserts like these No Bake S’mores Cookie Dough Bites! I opted for Truvia as it provides that sweet kick without adding unnecessary calories. This particular sweetener mimics brown sugar’s deep caramel notes beautifully while still keeping things healthier—a win-win if you ask me!
- 2 Tbsp maple syrup (I used sugar-free pancake syrup). Maple syrup is liquid gold in cooking! It adds moisture while enhancing the overall flavor profile with its distinct richness—perfectly complementing our chocolate and peanut butter duo. If you’re using sugar-free syrup like I did here, be sure it’s made from quality ingredients because not all syrups are created equal!
- 1/8 tsp cinnamon. Cinnamon adds warmth and complexity to our cookie dough bites—it whispers hints of comforting spice that make each bite feel like home! A little goes a long way here; trust me when I say this tiny pinch elevates everything else.
- Pinch of salt. Salt is absolutely paramount when baking or preparing sweets; it enhances flavors and balances sweetness beautifully! Just a small pinch helps bring out all those rich flavors we’ve layered together.
- 6 Tbsp vegan marshmallows fluff. Here comes one of my favorite components: vegan marshmallow fluff! It brings back memories of campfire nights spent roasting marshmallows under starry skies while introducing creaminess into our no-bake bites without any guilt attached.
- 12 mini vegan marshmallows (optional for presentation). While these are purely optional—let’s be real—they do make your creations look irresistibly cute on display! Plus, who doesn’t love an extra pop of marshmallow goodness?
Equipment You’ll Need:
Before we get started mixing up this delightful concoction, let’s gather our trusty tools—it makes everything smoother and more enjoyable when we have the right equipment at hand!
- Muffin pan – This is where the magic happens as we create individual servings for our cookie dough bites! A muffin pan allows us to shape them perfectly so they hold together nicely once chilled.
- Cupcake liners – These little liners not only help with easy removal but also add an adorable touch to your finished treats! Choose vibrant colors or fun designs to suit any occasion—you can never go wrong with some personality!
- Microwave-safe bowl – We’ll be melting chocolate for this recipe; using glass or ceramic ensures even heating without hot spots which can cause burning—definitely something we want to avoid!
- Spoon – A sturdy spoon will be crucial throughout this process—from stirring ingredients together smoothly to helping spread melted chocolate evenly across muffin cups.
With everything lined up perfectly like soldiers ready for duty—that’s when we’re ready to start preparing these fantastic No Bake S’mores Cookie Dough Bites!
Step 1: Prepare Your Muffin Pan – Setting Up the Stage
First things first: let’s line our muffin pan with cupcake liners so they’re ready for action when we put everything together later on! This step may seem simple but trust me—it makes life infinitely easier when it comes time to serve them up after chilling since they’ll slide right out without sticking! Take care in placing them securely within each cavity because having them well positioned will ensure even distribution while pouring in melted chocolate later on.
Step 2: Melt That Chocolate – Liquid Gold Awaits
Now onto one of my favorite steps: melting chocolate! Place your semisweet or dark chocolate chips into your microwave-safe bowl and heat them carefully at medium power in 30-second intervals until smooth—this usually takes about 1 minute total depending on wattage levels (but keep an eye on it!). Stir thoroughly between intervals because residual heat continues melting those last stubborn bits even after removing from microwaves; achieving silky-smooth melted chocolate is crucial before moving forward with pouring it into those liners we prepared earlier!
Step 3: Create Your Chocolate Base – Building Layers
Once your chocolate has transformed into glossy perfection—oh my goodness, I could practically eat it straight off my spoon—it’s time to pour just about ½ tablespoon into each lined cavity at the bottom of your muffin pan before tapping gently against counter surfaces so it spreads evenly across bottoms (and slightly up sides if desired). This creates a solid base layer reminiscent of classic s’mores sandwiches—we want every delicious bite packed full flavor throughout every layer produced here today!
Step 4: Chill Out – Firming Up Our Foundation
After spreading out melted goodness across muffin liners neatly—it’s time for some patience as we place this setup into freezer briefly (about 5–10 minutes) until hardened completely before proceeding onward towards assembling cookie dough layers atop chocolaty bases created previously! Don’t rush this step; letting those bases chill will ensure they set properly which ultimately leads us toward creating delightful textures once everything comes together later down road during final stages involving marshmallow fluff drizzled over tops too!
Stay tuned as we continue through each exciting step until every layer culminates into extraordinary No Bake S’mores Cookie Dough Bites worthy enough sharing moments filled laughter joy around tables surrounded by friends family alike—all captured within little morsels reflecting nostalgic warmth every single time enjoyed!
Crafting Your Delicious No Bake S’mores Cookie Dough Bites
Step 5: Assemble the Cookie Dough Layer
Now that your chocolate base has set into a lovely, glossy coating, it’s time to bring everything together with the cookie dough layer. Grab your mixing bowl and combine the oat flour, protein powder, brown sugar sweetener, and a pinch of salt. This blend is not just a random assortment of ingredients; each one plays a critical role in building that quintessential cookie dough texture that’s chewy yet satisfying. The oat flour provides a gentle nuttiness, while the protein powder adds structure and boosts the nutritional profile—trust me, it makes those bites feel like a guilt-free treat!
Once mixed thoroughly, add in your peanut butter and maple syrup. Here’s where the magic happens! The peanut butter brings an utterly intoxicating creaminess that binds everything together while imparting that signature nutty flavor we all adore. Combine everything until you achieve a dough-like consistency; it should be slightly tacky but hold its shape when rolled into balls. If it feels too dry (which can happen if your peanut butter is particularly thick), don’t hesitate to add a tiny splash of water or almond milk to reach that perfect balance. Don’t rush this step—getting the texture right will ensure each bite is profoundly satisfying!
Step 6: Forming Perfect Cookie Dough Balls
With your dough ready, let’s shape these delightful bites! Take small portions of your cookie dough—about one tablespoon each—and roll them into balls between your palms. It’s amazing how something so simple can evoke such joy; rolling these little morsels feels like crafting tiny treasures destined to delight everyone who tries them. After rolling, gently flatten each ball slightly so they resemble disks, making them easier to layer on top of the hardened chocolate.
Why flatten? Great question! This technique allows for better contact with the chocolate layer beneath and ensures an even distribution of flavors as you bite into these heavenly treats later on. Plus, it makes assembly straightforward—no more balancing act! Place each disk carefully atop the chocolate base in your cupcake liners, pressing down gently to secure them in place without smushing them too much. Watching these come together is like witnessing magic; you’re one step closer to an extraordinary treat!
Step 7: Adding That Irresistible Marshmallow Fluff
Now for what makes these No Bake S’mores Cookie Dough Bites truly shine—the vegan marshmallows fluff! Spoon about one tablespoon of this luscious fluff onto each cookie dough disk. Remember, this isn’t just any filling; this marshmallow fluff acts as a sweet pillow of gooey goodness that elevates every bite into s’mores heaven—absolutely paramount for achieving that nostalgic flavor we all cherish from campfire nights.
If you’re feeling adventurous (and I wholeheartedly encourage this), go ahead and pop two mini vegan marshmallows on top for extra visual appeal and texture contrast. You want those little bursts of sweetness in every mouthful! But don’t forget to drizzle the remaining melted chocolate across the tops; this final touch seals in all those layers beautifully and adds an exquisite shine that beckons you to indulge. Trust me on this—the combination of flavors and textures is simply out of this world!
Step 8: Chilling for Sweet Success
With everything assembled and drizzled, it’s time for some patience—cue dramatic music here because this part is absolutely crucial! Pop your muffin pan back into the freezer for at least 30 minutes. Why freeze? Well, chilling allows all those delightful layers to meld together perfectly while ensuring that your chocolate sets up beautifully so you can enjoy clean bites without a melty mess.
While they chill, take a moment to imagine how incredible they’ll taste once ready! When you pull them out after half an hour, they should be firm but not rock hard; if they feel too soft or gooey, give them another few minutes in the freezer. Once they’ve reached that perfect chewy yet firm consistency—a beautiful balance—you’ll know it’s time for the grand reveal! This resting period allows all those flavors to intermingle and deepen, creating what I promise will be an unforgettable experience with every bite.
Final Touches: Unwrapping Your Sweet Creations
Step 9: Reveal Your No Bake S’mores Cookie Dough Bites
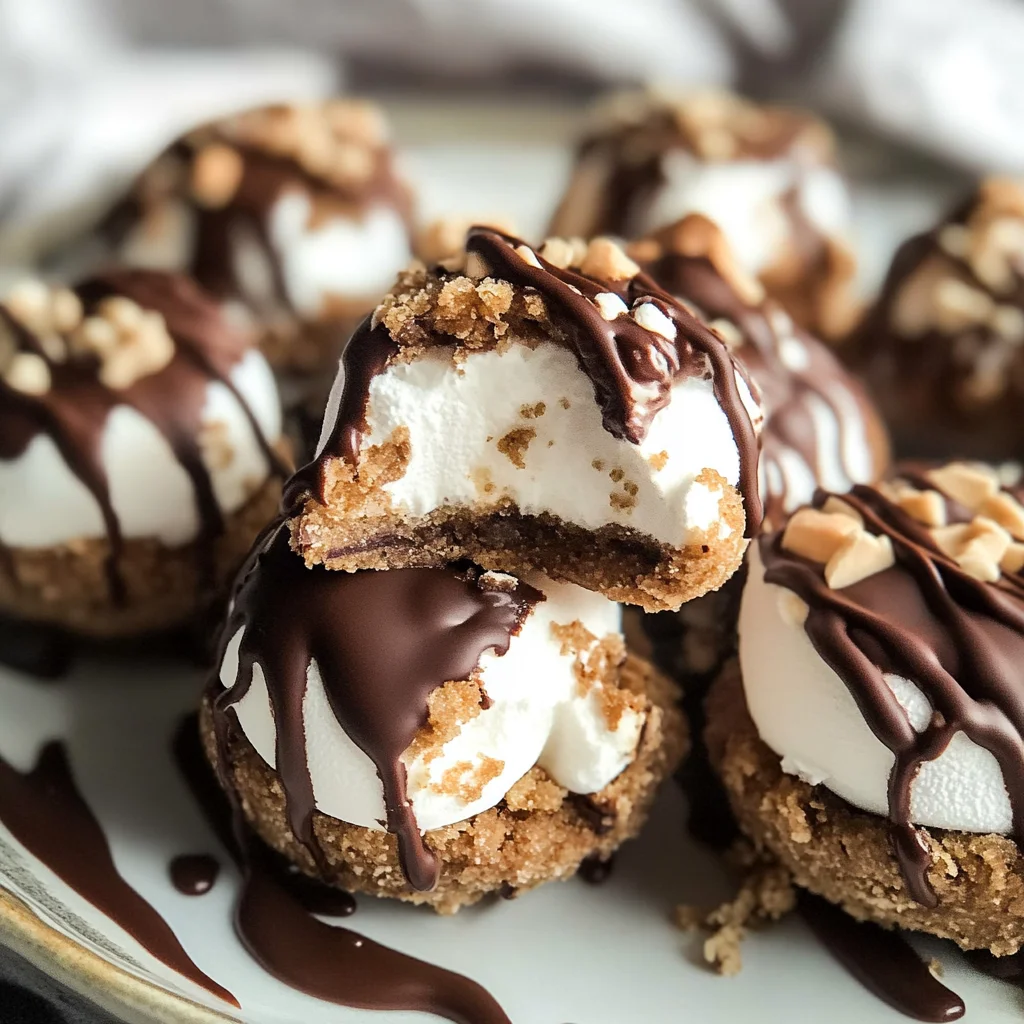
It’s finally time to unveil your glorious creation! Carefully peel away those cupcake liners—it’s like unwrapping little gifts filled with joy. As you do so, take a moment to appreciate the beautiful layers you’ve crafted: rich chocolate at the bottom, creamy cookie dough in the middle adorned with dreamy marshmallow fluff, all topped off with a glossy drizzle of chocolate.
Now comes my favorite part: tasting! These bites are best enjoyed fresh from the freezer but can also be stored in an airtight container in your fridge or freezer if they last long enough (which is often not the case around my friends!). I promise you won’t be able to resist sneaking one—or two—before they’re fully frozen!
As you take that first bite, let yourself savor the explosion of flavors—the sweetness from the chocolate harmonizing beautifully with the nuttiness of peanut butter and comforting hints of marshmallow—a true symphony of flavors dancing on your palate. Each No Bake S’mores Cookie Dough Bite encapsulates summer evenings spent around campfires while being completely guilt-free.
So there you have it—your very own batch of No Bake S’mores Cookie Dough Bites ready to share (or not!) with family and friends. Each bite is not just delicious but also filled with love and memories waiting to be made around dessert tables everywhere. Enjoy every delicious moment!
Storage and Enjoyment Tips for Your No Bake S’mores Cookie Dough Bites
Now that you’ve crafted these delightful No Bake S’mores Cookie Dough Bites, it’s time to dive into the joy of enjoying them—and let me tell you, they are every bit as scrumptious as they sound! These little gems are perfect for satisfying your sweet tooth without the guilt, and they offer an incredible combination of textures and flavors that will have you reaching for just one more. But if you happen to have some leftovers (which is a rare occurrence in my kitchen!), let’s talk about how to store them properly so you can relish that s’mores magic for days to come.
Storing Leftover No Bake S’mores Cookie Dough Bites
To keep your No Bake S’mores Cookie Dough Bites fresh and tasty, I recommend placing them in an airtight container. This is crucial because it prevents moisture from ruining their lovely texture while also keeping any unwanted odors at bay. If you’ve got a container with a tight lid—bonus points! These treats can stay fresh in the refrigerator for up to a week. However, I promise you, they’ll be devoured long before then! To maintain their quality even longer, consider layering the bites with parchment paper; this will keep them from sticking together. Trust me when I say that after a few days in the fridge, they still taste utterly divine and retain that creamy center that makes each bite profoundly satisfying. When you’re ready for a treat, simply pull one out and enjoy it cold or let it sit at room temperature for a few minutes to soften slightly—both ways are delicious!
Freezing No Bake S’mores Cookie Dough Bites for Later
If you’re looking to extend the life of your No Bake S’mores Cookie Dough Bites even further, freezing them is an excellent option! Just place them on a baking sheet lined with parchment paper first to prevent sticking, and pop them in the freezer until they’re solid—about an hour should do the trick. Once frozen, transfer them to an airtight container or a zip-top bag, making sure to remove as much air as possible. They’ll keep beautifully in the freezer for up to three months! To enjoy them later, simply take out as many bites as you want and let them thaw at room temperature for about 10-15 minutes; this allows those flavors to shine through again without losing their delightful texture. Isn’t it fantastic knowing you have a stash of these indulgent treats waiting for you whenever the craving hits? It’s like having a little piece of joy tucked away just for you!

No Bake S’mores Cookie Dough Bites
- Total Time: 0 hours
- Yield: Approximately 12 servings 1x
Description
Indulge in the delightful experience of No Bake S’mores Cookie Dough Bites, where classic campfire flavors meet modern health-conscious choices. These easy-to-make treats blend rich chocolate, creamy peanut butter, and vegan marshmallow fluff into a protein-packed snack that’s perfect for any time of day. With no baking required and just 15 minutes of prep, you can whip up these scrumptious bites that satisfy your sweet cravings without guilt. Each bite offers a harmonious balance of sweet and salty flavors, making them a fantastic addition to your dessert repertoire or a quick energy boost on busy days. So gather your ingredients, and let’s create these irresistible morsels that promise to bring joy in every bite!
Ingredients
- 1/2 cup semisweet or dark chocolate chips
- 1/4 cup oat flour
- 1/4 cup vanilla protein powder
- 3 Tbsp peanut butter
- 2 Tbsp brown sugar sweetener
- 2 Tbsp maple syrup
- 1/8 tsp cinnamon
- Pinch of salt
- 6 Tbsp vegan marshmallows fluff
- Optional: 12 mini vegan marshmallows for garnish
Instructions
- Line a muffin pan with cupcake liners.
- Melt the chocolate chips in a microwave-safe bowl using medium power in 30-second intervals until smooth. Pour about ½ tablespoon into each liner as the base layer.
- In another bowl, combine oat flour, protein powder, brown sugar sweetener, and salt.
- Mix in peanut butter and maple syrup until you have a dough-like consistency.
- Roll the dough into small balls (about one tablespoon) and flatten slightly before placing them on top of the hardened chocolate layer.
- Spoon vegan marshmallow fluff over each cookie dough disk and drizzle with any remaining melted chocolate.
- Freeze for at least 30 minutes before enjoying.
- Prep Time: 15 minutes
- Cook Time: None
- Category: Dessert
- Method: No bake
- Cuisine: American
Nutrition
- Serving Size: 1 cookie dough bite (35g)
- Calories: 130
- Sugar: 6g
- Sodium: 50mg
- Fat: 6g
- Saturated Fat: 1g
- Unsaturated Fat: 5g
- Trans Fat: 0g
- Carbohydrates: 16g
- Fiber: 2g
- Protein: 4g
- Cholesterol: 0mg
Leave a Comment